---
title: Software - 0110.be
canonical: https://0110.be/Software?page=2
markdown_url: https://0110.be/Software.md?page=2
page: 2
posts_per_page: 30
total_posts: 106
filters:
content_page: Software
tags:
- Code
previous: https://0110.be/Software.md?page=1
next: https://0110.be/Software.md?page=3
---
# Software - 0110.be
# Software
Below you can find links to the open source software I developed during my research. It is always nice to hear how this software is used, don't hesitate to drop me a line. Bug reports are welcomed as well.
---
## [Echo or Delay Audio Effect in Java With TarsosDSP](https://0110.be/posts/Echo_or_Delay_Audio_Effect_in_Java_With_TarsosDSP.md)
- Published: 2012-02-23T15:33:11Z
- Updated: 2013-12-05T18:19:15Z
- Author: Joren
- ID: 398
- Canonical: https://0110.be/posts/Echo_or_Delay_Audio_Effect_in_Java_With_TarsosDSP
- Tags: [Code](https://0110.be/tags/Code.md), [HoGent](https://0110.be/tags/HoGent.md), [Java](https://0110.be/tags/Java.md), [TarsosDSP](https://0110.be/tags/TarsosDSP.md)
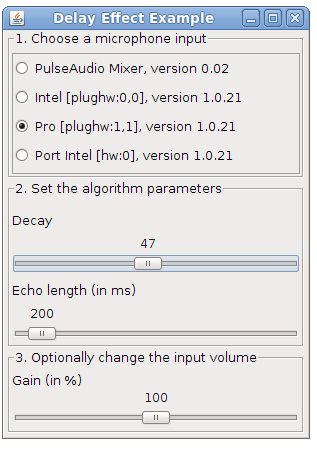
The DSP library for Taros, aptly named TarsosDSP, now includes an implementation of an audio echo effect. An echo effect is very simple to implement digitally and can serve as a good example of a DSP operation.
"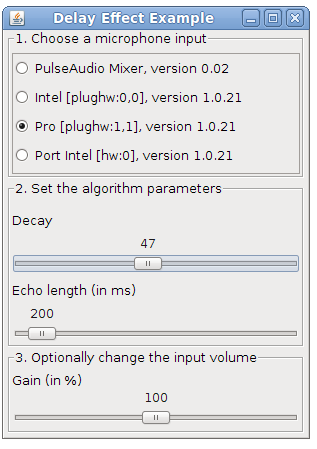":\[Delay.jar\]
The implementation of the effect can be seen below. As can be seen, to achieve an echo one simply needs to mix the current sample `i` with a delayed sample present in `echoBuffer` with a certain decay factor. The length of the buffer and the decay are the defining parameters for the sound of the echo. To fill the echo buffer the current sample is stored (line 4). Looping through the echo buffer is done by incrementing the position pointer and resetting it at the correct time (lines 6-9).
\`\`\`java\
//output is the input added with the decayed echo\
audioFloatBuffer\[i\] = audioFloatBuffer\[i\] + echoBuffer\[position\] \* decay;\
//store the sample in the buffer;\
echoBuffer\[position\] = audioFloatBuffer\[i\];\
//increment the echo buffer position\
position;\
//loop in the echo buffer\
if(position == echoBuffer.length)\
position = 0;\
\`\`\`
To test the application, download and execute the "Delay.jar":\[Delay.jar\] file and start singing in a microphone.
The source code of the Java implementation can be found on the [TarsosDSP github page](https://github.com/JorenSix/TarsosDSP/).
- [Delay.jar](https://0110.be/files/attachments/398/Delay.jar)
- [echo\_or\_delay\_effect.png](https://0110.be/files/attachments/398/echo_or_delay_effect.png)
---
## [Spectrogram in Java with TarsosDSP](https://0110.be/posts/Spectrogram_in_Java_with_TarsosDSP.md)
- Published: 2012-02-14T14:31:04Z
- Updated: 2013-12-05T18:19:15Z
- Author: Joren
- ID: 384
- Canonical: https://0110.be/posts/Spectrogram_in_Java_with_TarsosDSP
- Tags: [Code](https://0110.be/tags/Code.md), [Computational musicology](https://0110.be/tags/Computational%20musicology.md), [HoGent](https://0110.be/tags/HoGent.md), [Java](https://0110.be/tags/Java.md), [TarsosDSP](https://0110.be/tags/TarsosDSP.md)
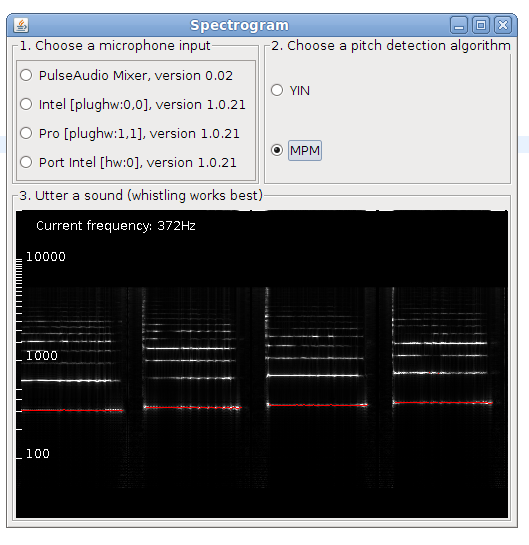
This is post presents a better version of the [spectrogram implementation](https://0110.be/artikels/lees/Tarsos_Spectrogram). Now it is included as an example in TarsosDSP, a small java audio processing library. The application show a live spectrogram, calculated using an FFT and the detected fundamental frequency (in red).
To test the application, download and execute the "Spectrogram.jar":\[Spectrogram.jar\] file and start singing in a microphone.
There is also a command line interface, the following command shows the spectrum for `in.wav`:
\
java -jar Spectrogram.jar in.wav\
The source code of the Java implementation can be found on the [TarsosDSP github page](https://github.com/JorenSix/TarsosDSP/).
- [Spectrogram.jar](https://0110.be/files/attachments/384/Spectrogram.jar)
- [spectrogram.png](https://0110.be/files/attachments/384/spectrogram.png)
---
## [Tarsos CLI: Detect Pitch](https://0110.be/posts/Tarsos_CLI%3A__Detect_Pitch.md)
- Published: 2012-02-03T15:00:06Z
- Updated: 2013-12-05T18:19:15Z
- Author: Joren
- ID: 390
- Canonical: https://0110.be/posts/Tarsos_CLI%3A__Detect_Pitch
- Tags: [Code](https://0110.be/tags/Code.md), [Command Line Application](https://0110.be/tags/Command%20Line%20Application.md), [HoGent](https://0110.be/tags/HoGent.md), [Java](https://0110.be/tags/Java.md), [Music Information Retrieval](https://0110.be/tags/Music%20Information%20Retrieval.md), [Tarsos](https://0110.be/tags/Tarsos.md)
Tarsos contains a couple of useful command line applications. They can be used to execute common tasks on lots of files. [Dowload Tarsos](http://tarsos.0110.be/attachment/tarsos.jar) and call the applications using the following format:
`java -jar tarsos.jar command [argument...] [--option [value]...]`
The first part `java -jar tarsos.jar` tells the Java Runtime to start the correct application. The first argument for Tarsos defines the command line application to execute. Depending on the command, required arguments and options can follow.
`java -jar tarsos.jar detect_pitch in.wav --detector TARSOS_YIN`
To get a list of available commands, type `java -jar tarsos.jar -h`. If you want more information about a command type `java -jar tarsos.jar command -h`
## Detect Pitch
Detects pitch for one or more input audio files using a pitch detector. If a directory is given it traverses the directory *recursively*. It writes CSV data to standard out with five columns. The first is the start of the analyzed window (seconds), the second the estimated pitch, the third the saillence of the pitch. The name of the algorithm follows and the last column shows the original filename.
Synopsis
--------
java -jar tarsos.jar detect_pitch [option] input_file...
Option Description
------ -----------
-?, -h, --help Show help
--detector The detector to use [VAMP_YIN |
VAMP_YIN_FFT |
VAMP_FAST_HARMONIC_COMB |
VAMP_MAZURKA_PITCH | VAMP_SCHMITT |
VAMP_SPECTRAL_COMB |
VAMP_CONSTANT_Q_200 |
VAMP_CONSTANT_Q_400 | IPEM_SIX |
IPEM_ONE | TARSOS_YIN |
TARSOS_FAST_YIN | TARSOS_MPM |
TARSOS_FAST_MPM | ] (default:
TARSOS_YIN)
The output of the command looks like this:
Start(s),Frequency(Hz),Probability,Source,file
0.52245,366.77039,0.92974,TARSOS_YIN,in.wav
0.54567,372.13873,0.93553,TARSOS_YIN,in.wav
0.55728,375.10638,0.95261,TARSOS_YIN,in.wav
0.56889,380.24854,0.94275,TARSOS_YIN,in.wav
---
## [How To: Generate an Audio Fingerprinting Data Set With Sox Audio Effects](https://0110.be/posts/How_To%3A_Generate_an_Audio_Fingerprinting_Data_Set_With_Sox_Audio_Effects.md)
- Published: 2011-12-07T09:42:13Z
- Updated: 2013-12-05T18:19:15Z
- Author: Joren
- ID: 391
- Canonical: https://0110.be/posts/How_To%3A_Generate_an_Audio_Fingerprinting_Data_Set_With_Sox_Audio_Effects
- Tags: [Code](https://0110.be/tags/Code.md), [HoGent](https://0110.be/tags/HoGent.md)
A small part of Tarsos has been turned into a [audio fingerprinting application](https://0110.be/artikels/lees/Robust_Audio_Fingerprinting_with_Tarsos_and_Pitch_Class_Histograms). The idea of audio fingerprinting is to create a condensed representation of an audio file. A perceptually similar audio file should generate similar fingerprints. To test how robust a fingerprinting technique is, a data set with audio files that are alike in some way is practical.
[SoX - Sound eXchange](http://sox.sourceforge.net/) is a command line utility for sound processing. It can apply audio effects to a sound. Using these effects and a set of unmodified songs an audio fingerprinting data set can be created. To generate such a data set SoX can be used to:
- Trim the first x seconds of a file
- Speed-up or slow-down the audio
- Change the pitch of a file without modifying the tempo
- Generate background noise (white noise is used)
- Reverse the audio stream
\`\`\`ruby\
#Trim the first 10 seconds\
sox input.wav output.wav trim 10
#speed-up of 10%\
sox input.wav output.wav speed 1.10
#change the pitch upwards 100 cents (one semitone)\
#without changing the tempo\
sox input.wav output.wav pitch 100
#generate white noise with the length of input.wav\
sox input.wav noise.wav synth whitenoise\
#mix the white noise with the input to generate noisy output\
#-v defines how loud the white noise is\
sox -m input.wav -v 0.1 noise.wav output.wav
#reverse the audio\
sox input.wav output.wav reverse\
\`\`\`
A ruby script to generate a lot of these files can be found "attached":\[audio_fingerprinting_dataset_generator.rb.txt\].
- [audio\_fingerprinting\_dataset\_generator.rb.txt](https://0110.be/files/attachments/391/audio_fingerprinting_dataset_generator.rb.txt)
---
## [Robust Audio Fingerprinting with Tarsos and Pitch Class Histograms](https://0110.be/posts/Robust_Audio_Fingerprinting_with_Tarsos_and_Pitch_Class_Histograms.md)
- Published: 2011-11-09T14:46:36Z
- Updated: 2013-12-05T18:19:15Z
- Author: Joren
- ID: 378
- Canonical: https://0110.be/posts/Robust_Audio_Fingerprinting_with_Tarsos_and_Pitch_Class_Histograms
- Tags: [Code](https://0110.be/tags/Code.md), [HoGent](https://0110.be/tags/HoGent.md), [Java](https://0110.be/tags/Java.md), [Music Information Retrieval](https://0110.be/tags/Music%20Information%20Retrieval.md), [Tarsos](https://0110.be/tags/Tarsos.md), [featured](https://0110.be/tags/featured.md)
The aim of acoustic fingerprinting is to generate a small representation of an audio signal that can be used to identify or recognize similar audio samples in a large audio set. A robust fingerprint generates similar fingerprints for perceptually similar audio signals. A piece of music with a bit of noise added should generate an almost identical fingerprint as the original. The use cases for audio fingerprinting or acoustic fingerprinting are myriad: detection of duplicates, identifying songs, recognizing copyrighted material,...
Using a pitch class histogram as a fingerprint seems like a good idea: it is unique for a song and it is reasonably robust to changes of the underlying audio (length, tempo, pitch, noise). The idea has probably been found a couple of times independently, but there is also a reference to it in the literature, by Tzanetakis, 2003: [Pitch Histograms in Audio and Symbolic Music Information Retrieval](http://marsyas.info/pdfs/0000/0008/jnmr03gtzan.pdf):
> Although mainly designed for genre classification it is possible that features derived from Pitch Histograms might also be applicable to the problem of content-based audio identification or audio fingerprinting (for an example of such a system see (Allamanche et al., 2001)). We are planning to explore this possibility in the future.
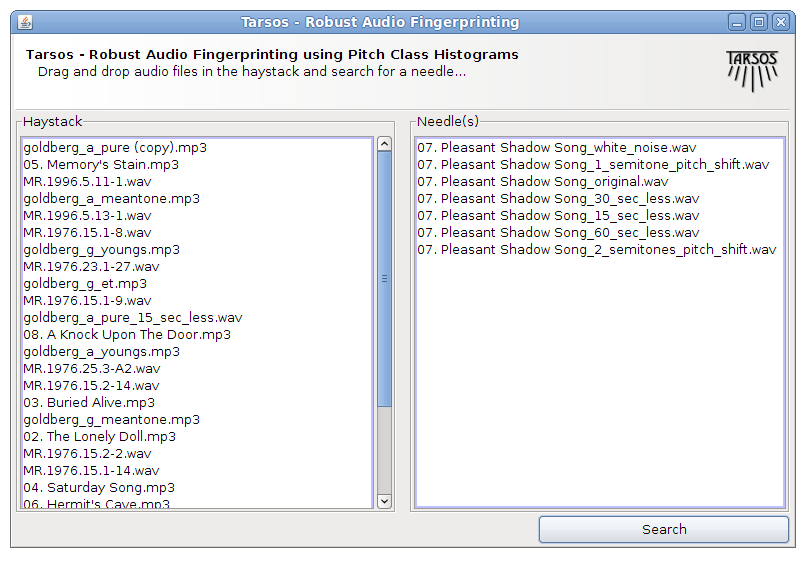
Unfortunately they never, as far as I know, did explore this possibility, and I also do not know if anybody else did. I found it worthwhile to implement a fingerprinting scheme on top of the Tarsos software foundation. Most elements are already available in the Tarsos API: a way to detect pitch, construct a pitch class histogram, correlate pitch class histograms with a pitch shift,... I created a GUI application which is presented here. It is, probably, the first open source acoustic / "audio fingerprinting system based on pitch class histograms":\[AudioFingerprinter.jar\].
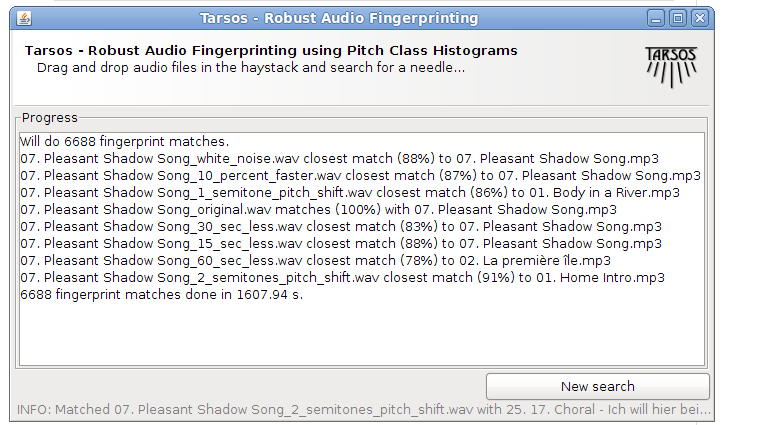
It works using drag and drop and the idea is to find a needle (an audio file) in a hay stack (a large amount of audio files). For every audio file in the haystack and for the needle pitch is detected using an optimized, for speed, Yin implementation. A pitch class histogram is created for each file, the histogram for the needle is compared with each histogram in the hay stack and, hopefully, the needle is found in the hay stack.
Unfortunately I do not have time for rigorous testing (by building a large acoustic fingerprinting data set, or an other decent test bench) but the idea seems to work. With the following modifications, done with [audacity effects](http://audacity.sourceforge.net/onlinehelp-1.2/menu_effect.htm) the needle was still found a hay stack of 836 files :
- A 10% speedup
- 15 and 30 seconds removed form the needle (a song of 4 minutes 12 seconds)
- White noise added
- Reversed the audio (This is, I believe, a rather unique property of this fingerprinting technique)
- GSM reencoded
The following modifications failed to identify the correct song:
- A one semitone pitch shift
- A two semitone pitch shift
- 60 seconds removed from the needle
The original was also found. No failure analysis was done. The hay stack consists of about 100 hours of western pop, the needle is also a western pop song. If somebody wants to pick up this work or has an acoustic fingerprinting data set or drop me a line at
.
The source code is available, as always, on the [Tarsos GitHub page](https://github.com/JorenSix/Tarsos).

- [x360-dc445.audio\_fingerprinting\_query.png](https://0110.be/files/attachments/378/x360-dc445.audio_fingerprinting_query.png)
- [AudioFingerprinter.jar](https://0110.be/files/attachments/378/AudioFingerprinter.jar)
---
## [Dual-Tone Multi-Frequency (DTMF) Decoding with the Goertzel Algorithm in Java](https://0110.be/posts/Dual-Tone_Multi-Frequency_%28DTMF%29_Decoding_with_the_Goertzel_Algorithm_in_Java.md)
- Published: 2011-09-27T09:07:26Z
- Updated: 2013-12-05T18:19:15Z
- Author: Joren
- ID: 343
- Canonical: https://0110.be/posts/Dual-Tone_Multi-Frequency_%28DTMF%29_Decoding_with_the_Goertzel_Algorithm_in_Java
- Tags: [Code](https://0110.be/tags/Code.md), [HoGent](https://0110.be/tags/HoGent.md), [Java](https://0110.be/tags/Java.md), [TarsosDSP](https://0110.be/tags/TarsosDSP.md)
The DSP library of Tarsos, aptly named TarsosDSP, now contains an implementation of the Goertzel Algorithm. It is implemented using pure Java.
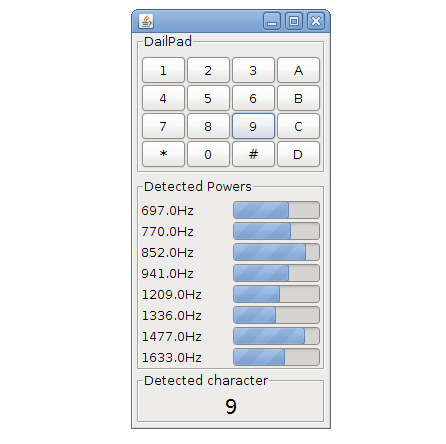
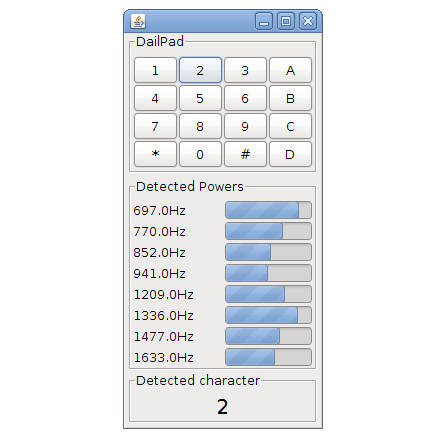
The [Goertzel algorithm](http://en.wikipedia.org/wiki/Goertzel_algorithm) can be used to detect if one or more predefined frequencies are present in a signal and it does this very efficiently. One of the classic applications of the Goertzel algorithm is decoding the tones generated on by touch tone telephones. These use [DTMF (Dual tone multi frequency)-signaling](http://en.wikipedia.org/wiki/Dual-tone_multi-frequency_signaling).
To make the algorithm visually appealing a Java Swing interface has been created(visible right). You can try this application by running the "Goertzel DTMF Jar-file":\[GoertzelDTMF.jar\]. The souce code is included in the jar and is avaliable as a separate "zip file":\[GoertzelDTMF_src.zip\]. The [TarsosDSP github page](https://github.com/JorenSix/TarsosDSP) also contains the source for the [Goertzel algorithm Java implementation](https://github.com/JorenSix/TarsosDSP/blob/master/src/be/hogent/tarsos/dsp/pitch/Goertzel.java).
- [goertzel\_DTMF\_java\_7.png](https://0110.be/files/attachments/343/goertzel_DTMF_java_7.png)
- [GoertzelDTMF.jar](https://0110.be/files/attachments/343/GoertzelDTMF.jar)
- [GoertzelDTMF\_src.zip](https://0110.be/files/attachments/343/GoertzelDTMF_src.zip)
---
## [PeachNote Piano at the ISMIR 2011 demo session](https://0110.be/posts/PeachNote_Piano_at_the_ISMIR_2011_demo_session.md)
- Published: 2011-09-26T07:32:02Z
- Updated: 2013-12-05T18:19:15Z
- Author: Joren
- ID: 340
- Canonical: https://0110.be/posts/PeachNote_Piano_at_the_ISMIR_2011_demo_session
- Tags: [Code](https://0110.be/tags/Code.md), [Computational musicology](https://0110.be/tags/Computational%20musicology.md), [HoGent](https://0110.be/tags/HoGent.md), [ISMIR](https://0110.be/tags/ISMIR.md), [Music Information Retrieval](https://0110.be/tags/Music%20Information%20Retrieval.md), [PeachNote Piano](https://0110.be/tags/PeachNote%20Piano.md), [Presentation](https://0110.be/tags/Presentation.md), [Research papers](https://0110.be/tags/Research%20papers.md)
The extended abstract about PeachNote Piano has been accepted as a demonstration presentation to appear at the ISMIR (International Society for Music Information Retrieval) 2011 conference in Miami. To know more about PeachNote Piano come see us at our demo stand (during the [Late Breaking and Demo Session](http://ismir2011.ismir.net/program2011.html#demo)) or read the paper: "Peachnote Piano: Making MIDI instruments social and smart using Arduino, Android and Node.js":\[PeachNote_Piano_ISMIR_Demo.pdf\]. What follows here is the introduction of the extended abstract:
Playing music instruments can bring a lot of joy and satisfaction, but not all apsects of music practice are always enjoyable. In this contribution we are addressing two such sometimes unwelcome aspects: the solitude of practicing and the "dumbness" of instruments.
The process of practicing and mastering of music instruments often takes place behind closed doors. A student of piano spends most of her time alone with the piano. Sounds of her playing get lost, and she can't always get feedback from friends, teachers, or, most importantly, random Internet users. Analysing her practicing sessions is also not easy. The technical possibility to record herself and put the recordings online is there, but the needed effort is relatively high, and so one does it only occasionally, if at all.
Instruments themselves usually do not exhibit any signs of intelligence. They are practically mechanic devices, even when implemented digitally. Usually they react only to direct actions of a player, and the player is solely responsible for the music coming out of the insturment and its quality. There is no middle ground between passive listening to music recordings and active music making for someone who is alone with an instrument.
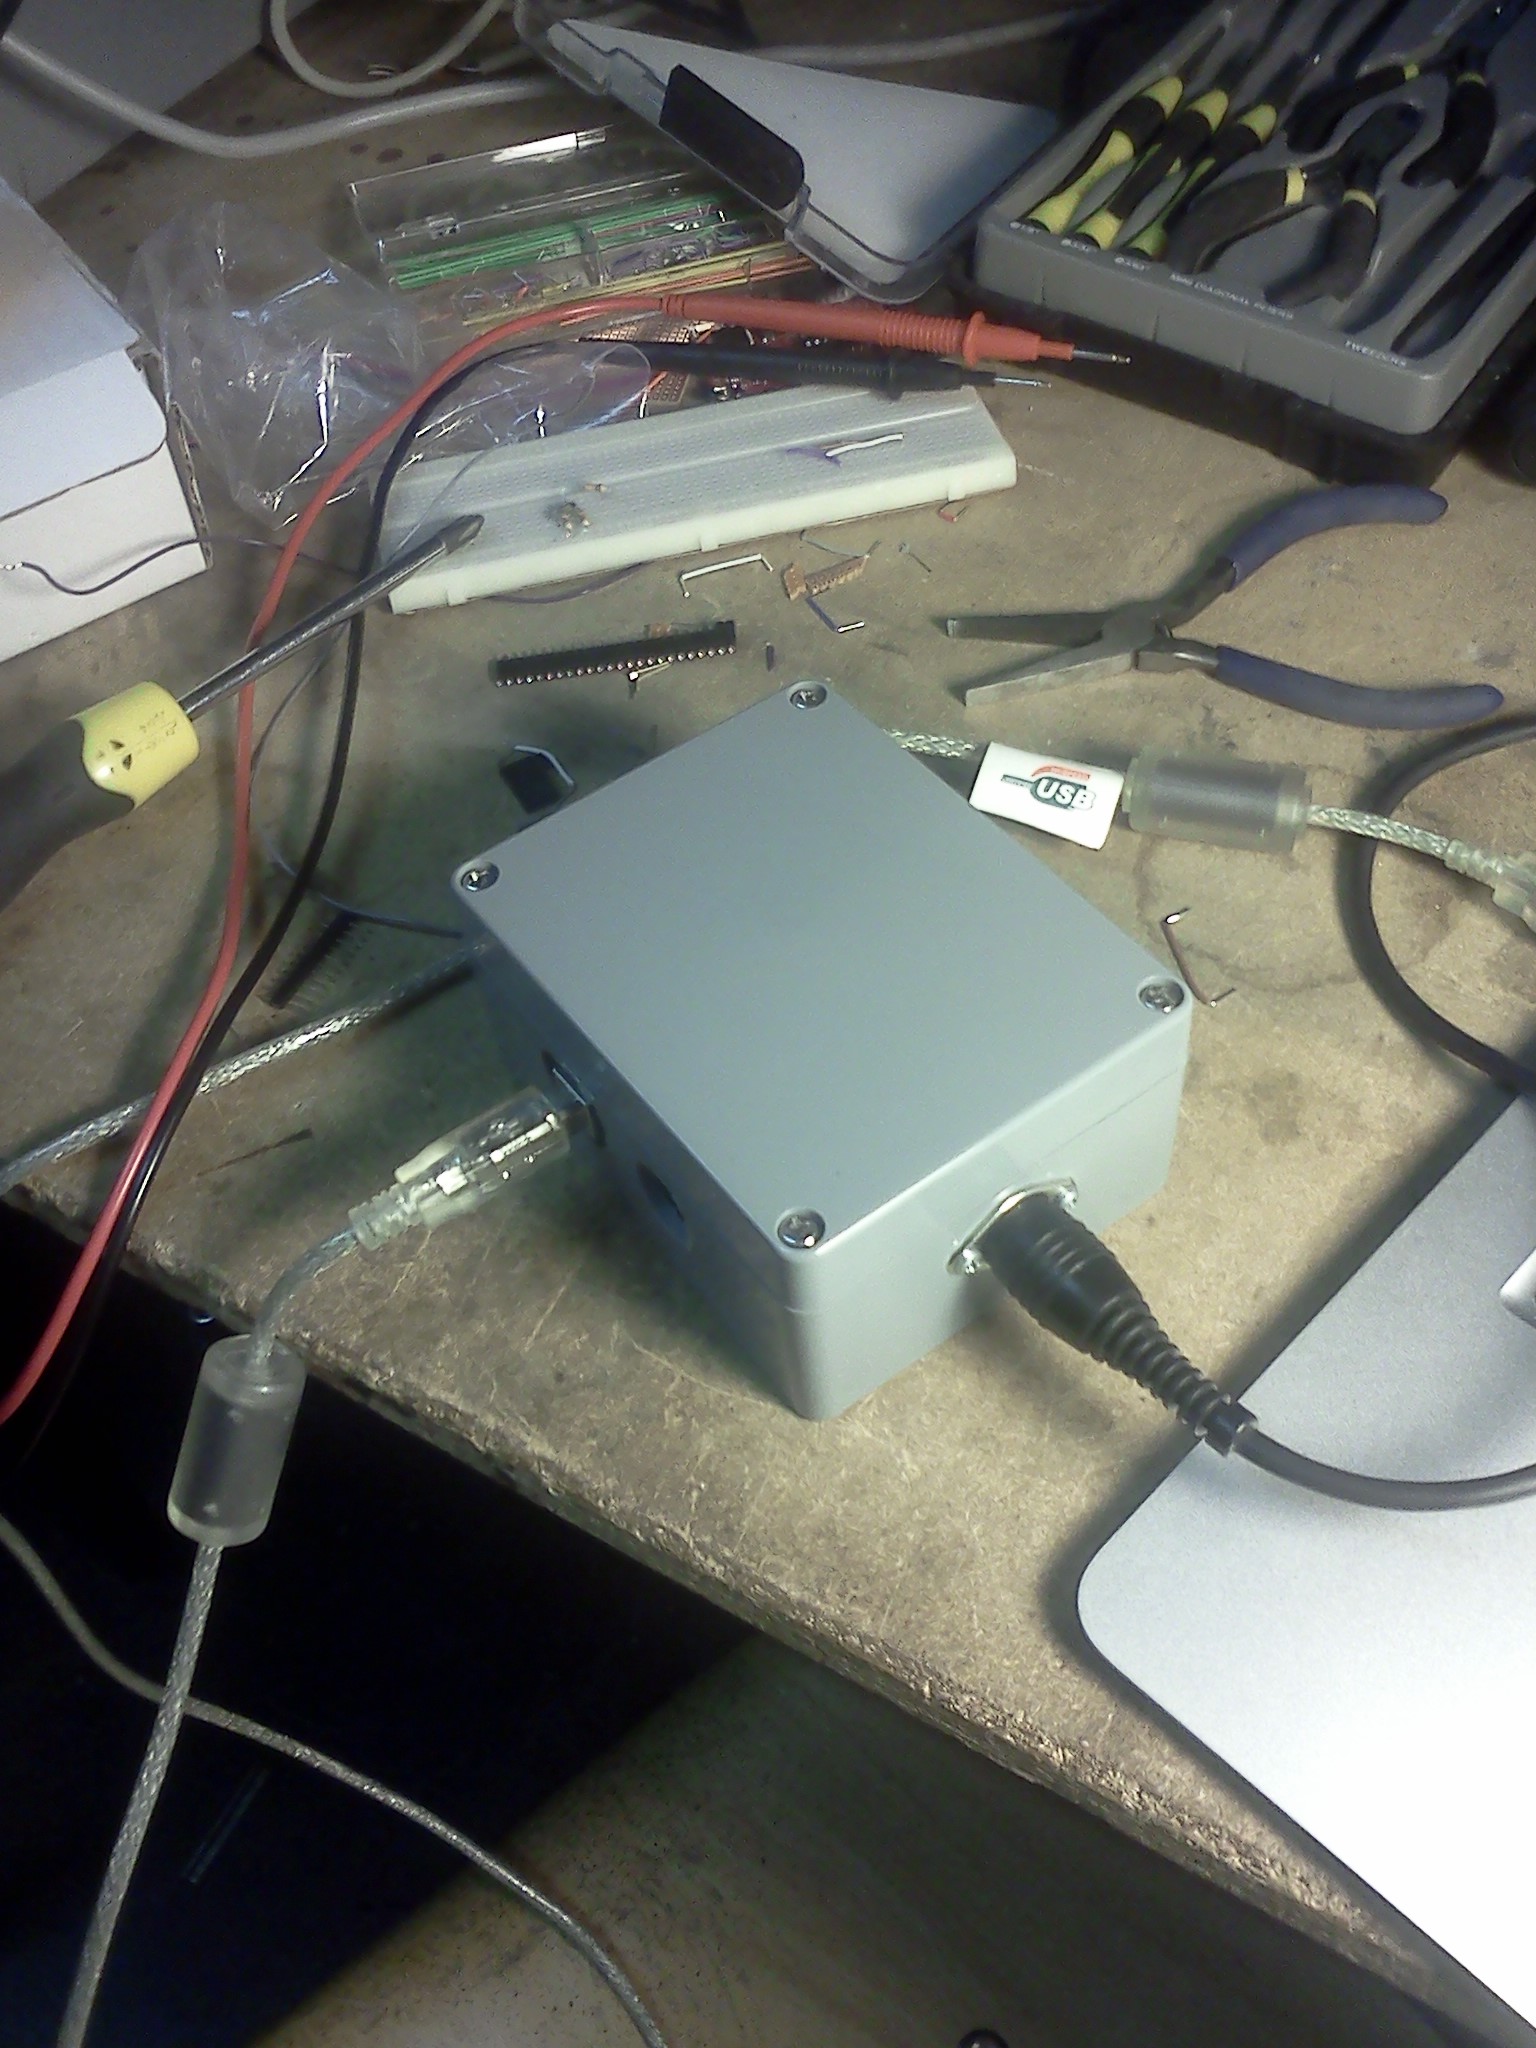
We have built a prototype of a system that strives to offer a practical solution to the above problems for digital pianos. From ground up, we have built a system which is capable of transmitting MIDI data from a MIDI instrument to a web service and back, exposing it in real-time to the world and optionally enriching it.
A previous post [about PeachNote Piano](http://tarsos.0110.be/artikels/lees/PeachNote_Piano) has more technical details together with a video showing the core functionality (quasi-instantaneous USB-BlueTooth-MIDI communication). Some photos can be found below.
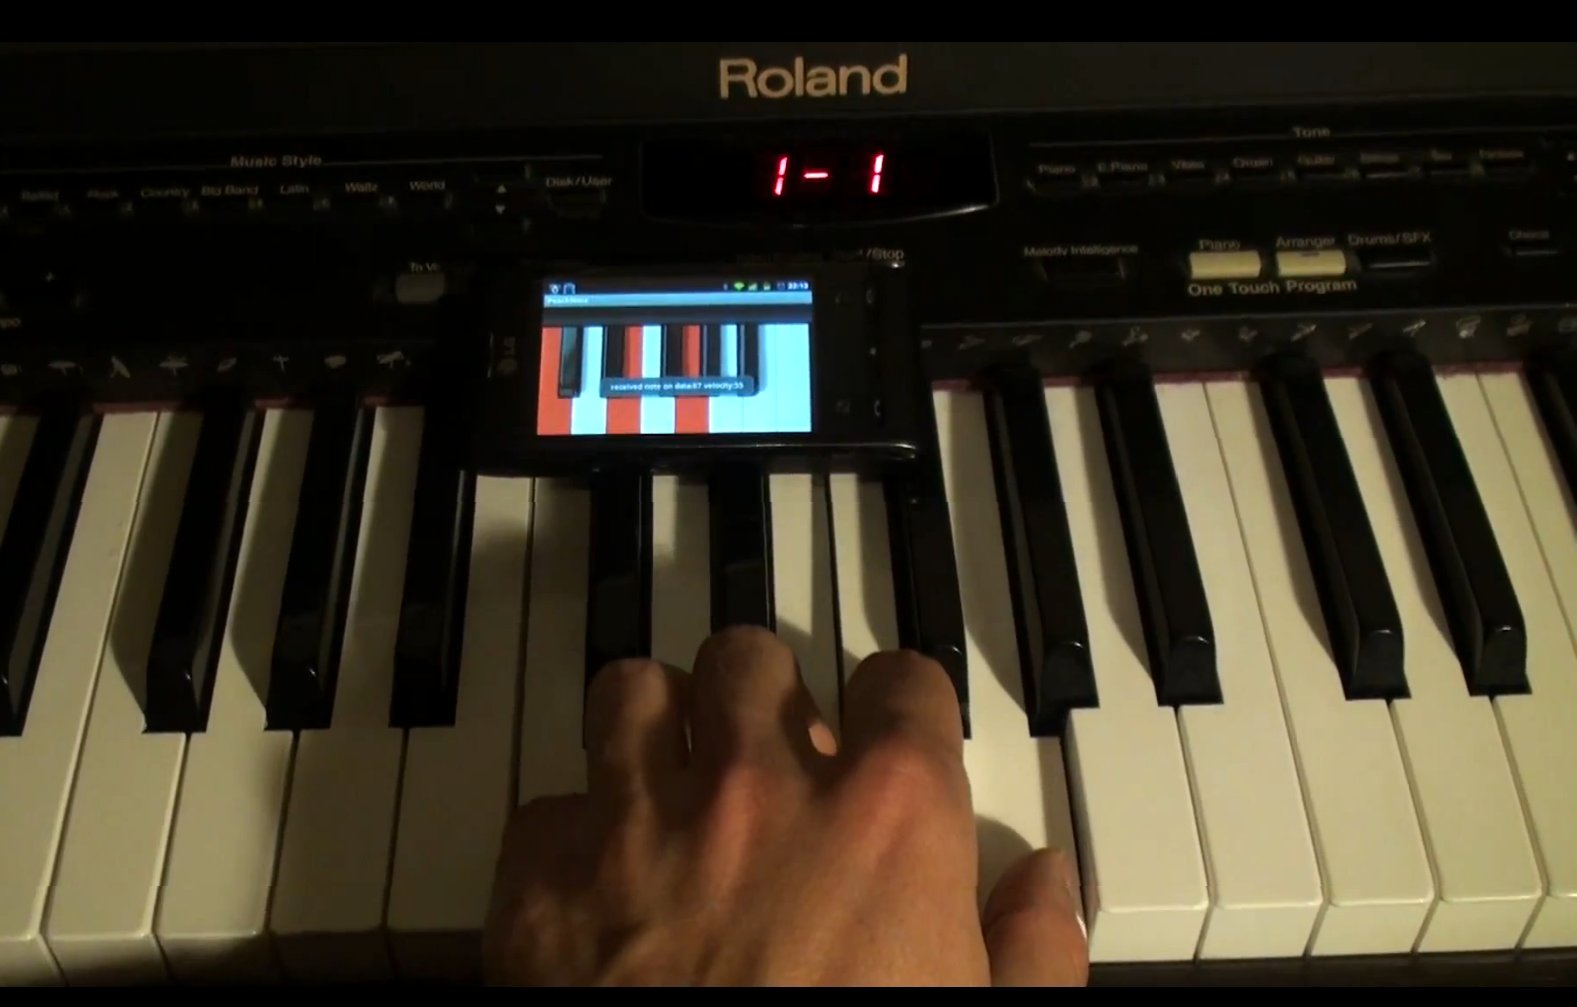
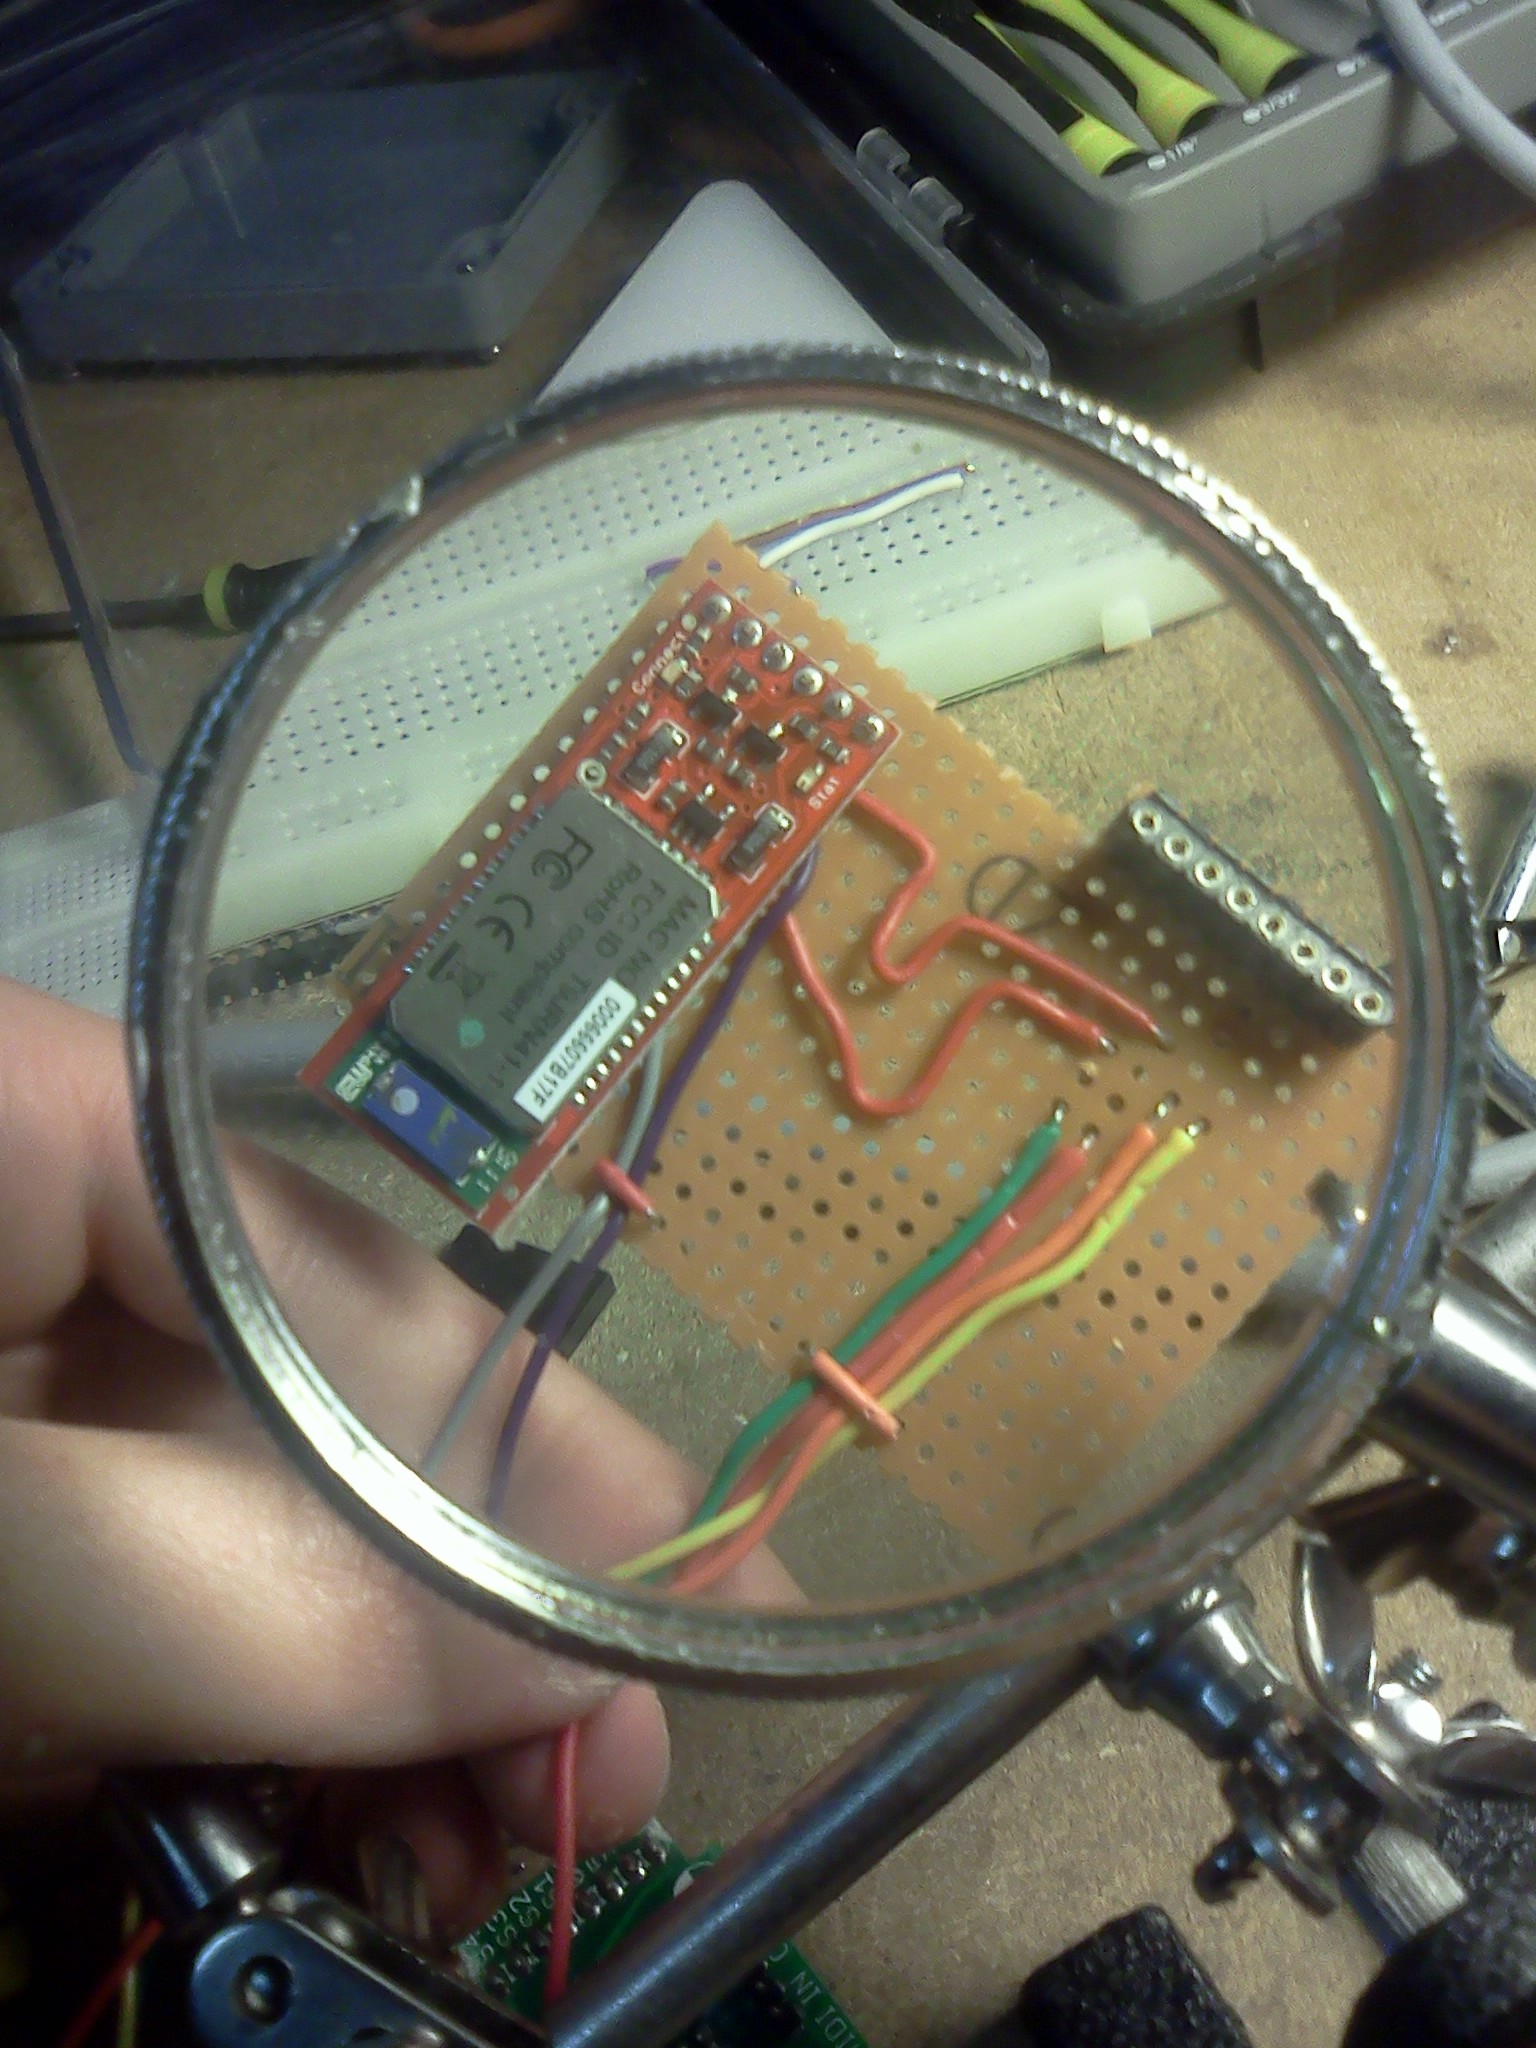
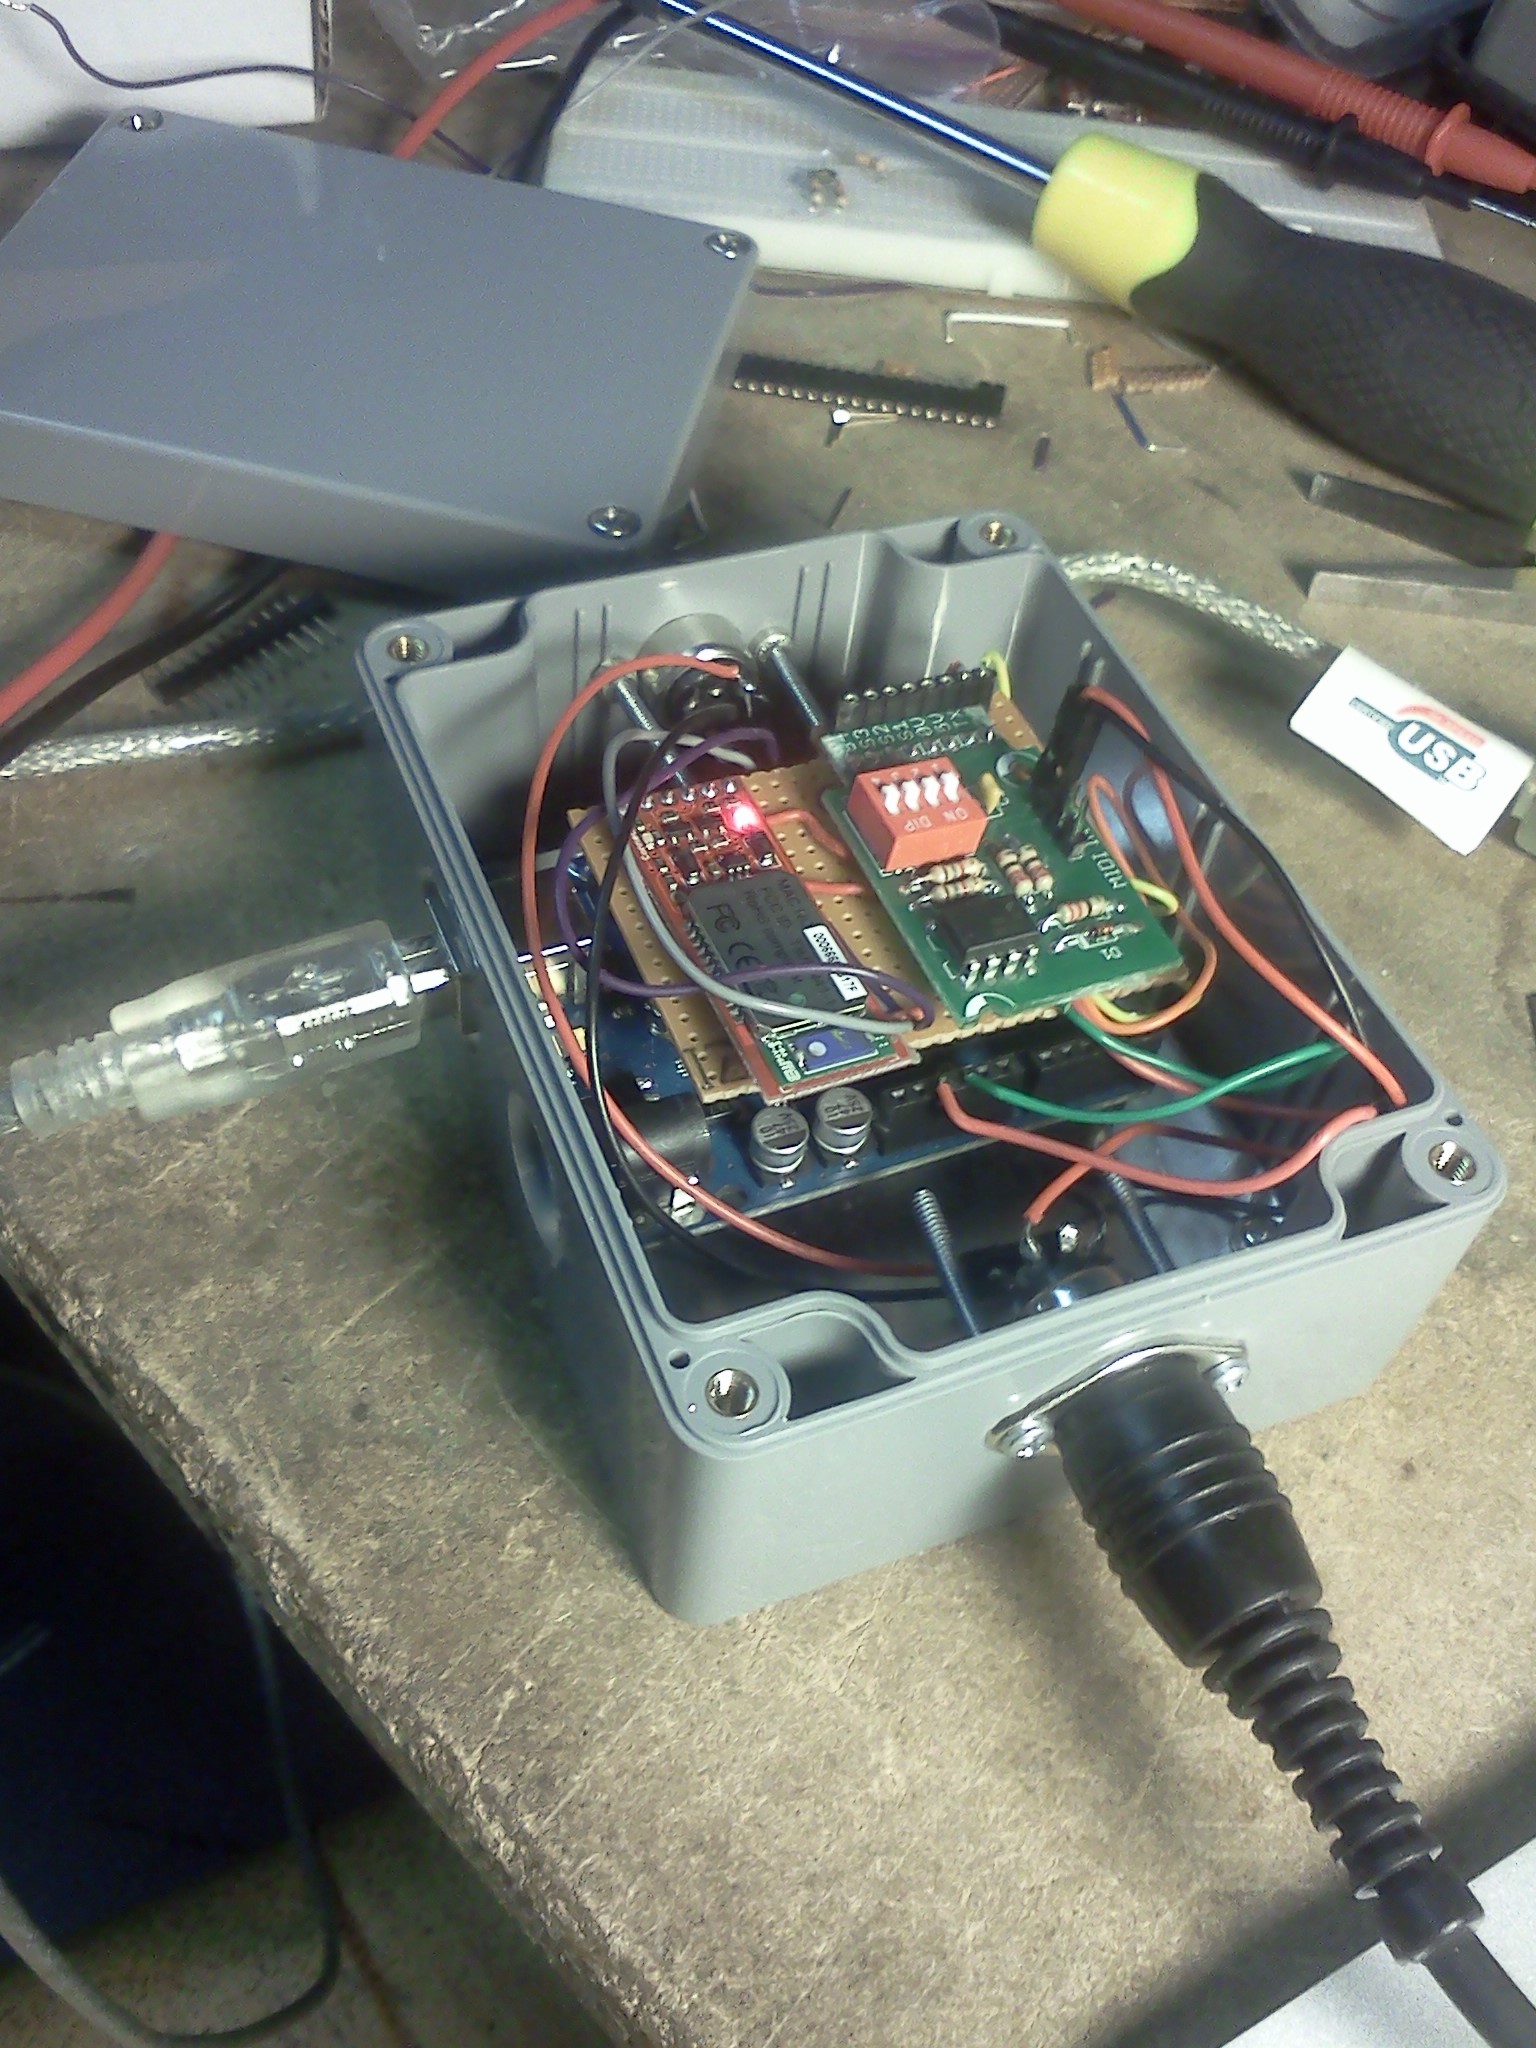
- [PeachNote\_Piano\_ISMIR\_Demo.pdf](https://0110.be/files/attachments/340/PeachNote_Piano_ISMIR_Demo.pdf)
---
## [Simplify Collaboration on a LaTeX Documents with Dropbox and a Build Server](https://0110.be/posts/Simplify_Collaboration_on_a_LaTeX_Documents_with_Dropbox_and_a_Build_Server.md)
- Published: 2011-09-21T09:46:41Z
- Updated: 2013-12-05T18:19:15Z
- Author: Joren
- ID: 409
- Canonical: https://0110.be/posts/Simplify_Collaboration_on_a_LaTeX_Documents_with_Dropbox_and_a_Build_Server
- Tags: [Code](https://0110.be/tags/Code.md), [HoGent](https://0110.be/tags/HoGent.md), [LaTeX](https://0110.be/tags/LaTeX.md), [Research papers](https://0110.be/tags/Research%20papers.md)
### Problem
While working on a Latex document with several collaborators some problems arise:
- Who has the latest version of the TeX-files?
- Which LaTeX distributions are in use (MiKTeX, LiveTex,...)
- Are all [LaTeX packages](http://en.wikibooks.org/wiki/LaTeX/Packages) correctly installed on each computer?
- Why is the bibliography, generated with BiBTeX, not included or incomplete?
- How does the final PDF look like when it is build by one of the collaborators, with a different LaTeX distribution?
Especially installing and maintaining LaTeX distributions on different platforms (Mac OS X, Linux, Windows) in combination with a lot of LaTeX packages can be challenging. This blog post presents a way to deal with these problems.
### Solution
The solution proposed here uses a build-server. The server is responsible for compiling the LaTeX source files and creating a PDF-file when the source files are modified. The source files should be available on the server should be in sync with the latest versions of the collaborators. Also the new PDF-file should be distributed. The syncing and distribution of files is done using a Dropbox install. Each author installs a Dropbox share (available on all platforms) which is also installed on the server. When an author modifies a file, this change is propagated to the server, which, in turn, builds a PDF and sends the resulting file back. This has the following advantages:
- Everyone always has the latest version of files;
- Only one LaTeX install needs to be maintained (on the server);
- The PDF is the same for each collaborator;
- You can modify files on every platform with Dropbox support (Linux, Mac OS X, Windows) and even smartphones;
- Compiling a large LaTeX file can be computationally intensive, a good task for a potentially beefy server.
### Implementation
The implementation of this is done with a couple of bash-scripts running on Ubuntu Linux. LaTeX compilation is handeled by the LiveTeX distribution. The first script `compile.bash` handles compilation in multiple stages: the cross referencing and BiBTeX bibliography need a couple of runs to get everything right.
\`\`\`ruby\
#!/bin/bash\
#first iteration: generate aux file\
pdflatex -interaction=nonstopmode ---src-specials article.tex\
#run bibtex on the aux file\
bibtex article.aux\
#second iteration: include bibliography\
pdflatex -interaction=nonstopmode ---src-specials article.tex\
#third iteration: fix references\
pdflatex -interaction=nonstopmode ---src-specials article.tex\
#remove unused files\
rm article.aux article.bbl article.blg article.out\
\`\`\`
The second script `watcher.bash` is more interesting. It watches the Dropbox directory for changes (only in .tex-files) using the efficient inotify library. If a modification is detected the compile script (above) is executed.
\`\`\`ruby\
#!/bin/bash\
directory=/home/user/Dropbox/article/\
#recursivly watch te directory\
while inotifywait -r \$directory; do\
#find all files changed the last minute that match tex\
#if there are matches then do something...\
if find \$directory -mmin --1 \| grep tex; then\
#tex files changed =\> recompile\
echo "Tex file changed... compiling"\
/bin/bash \$directory/compile.bash\
#sleep a minute to prevent recompilation loop\
sleep 60\
fi\
done\
\`\`\`
To summarize: a user-friendly way of collaboration on LaTeX documents was presented. Some server side configuration needs to be done but the clients only need Dropbox and a simple text editor and can start working togheter.
---
## [The Pidato Experiment: Vibrato on a Digital Piano Using an Arduino](https://0110.be/posts/The_Pidato_Experiment%3A_Vibrato_on_a_Digital_Piano_Using_an_Arduino.md)
- Published: 2011-09-21T00:00:00Z
- Updated: 2023-05-25T07:36:48Z
- Author: Joren
- ID: 410
- Canonical: https://0110.be/posts/The_Pidato_Experiment%3A_Vibrato_on_a_Digital_Piano_Using_an_Arduino
- Tags: [Code](https://0110.be/tags/Code.md), [HoGent](https://0110.be/tags/HoGent.md)
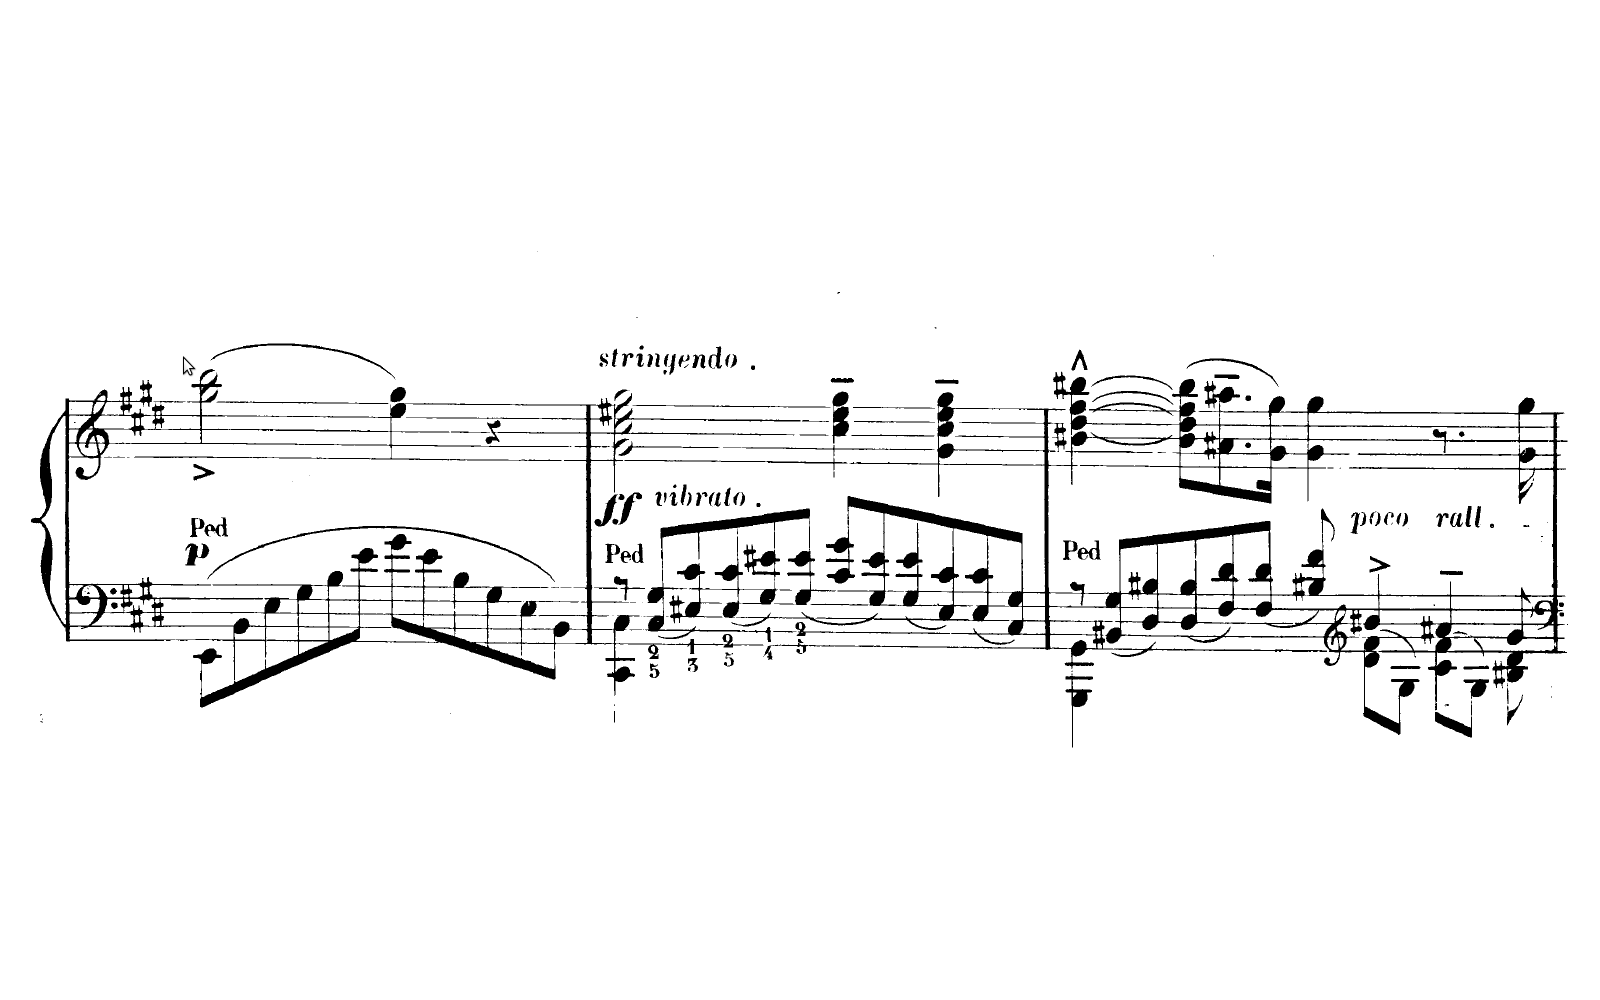
The Pidato experiment demonstrates a rather straightforward method to handle vibrato on a digital piano. It solves the age-old problem on what to do with the enigmatic "vibrato" instructions on some piano solo scores of Franz Liszt. The figure on the right is an exerpt of [*sonetto 104 del Petrarca*](http://imslp.org/wiki/3_Sonetti_del_Petrarca,_S.270_%28Liszt,_Franz%29).
Since there is no way to perform vibrato on an *analogue* piano there are all kinds of different interpretations. Interpretations of the 'vibrato' instruction include: vibrating the pedal, vibrating the key, simply ignoring it, [a vibrato like wiggling with a psychological sounding effect](http://www3.sympatico.ca/norma.barr/library/piano/tone_piano_playing.html), ... A pianist specialized in 19th century music, explains his embodied use of vibrato in a youtube video: [Brian Ganz on piano vibrato](http://www.youtube.com/watch?v=FxwBDZQslzI&feature=related). Those solutions all seem a bit halfhearted, so I created an alternative approach which resulted in the Pidato experiment.
Pidato is a portmanteau of piano and vibrato, the d, a and o hint to the use of an Arduino. Pidato is also Indonesian for speech, expression. To get a feel of what it actually does I created the video below. Please note that this is a *technical demonstration*, not an artistic performance... in any way.
Vid: The Pidato experiment - Vibrato on a Digital Piano using an Arduino.
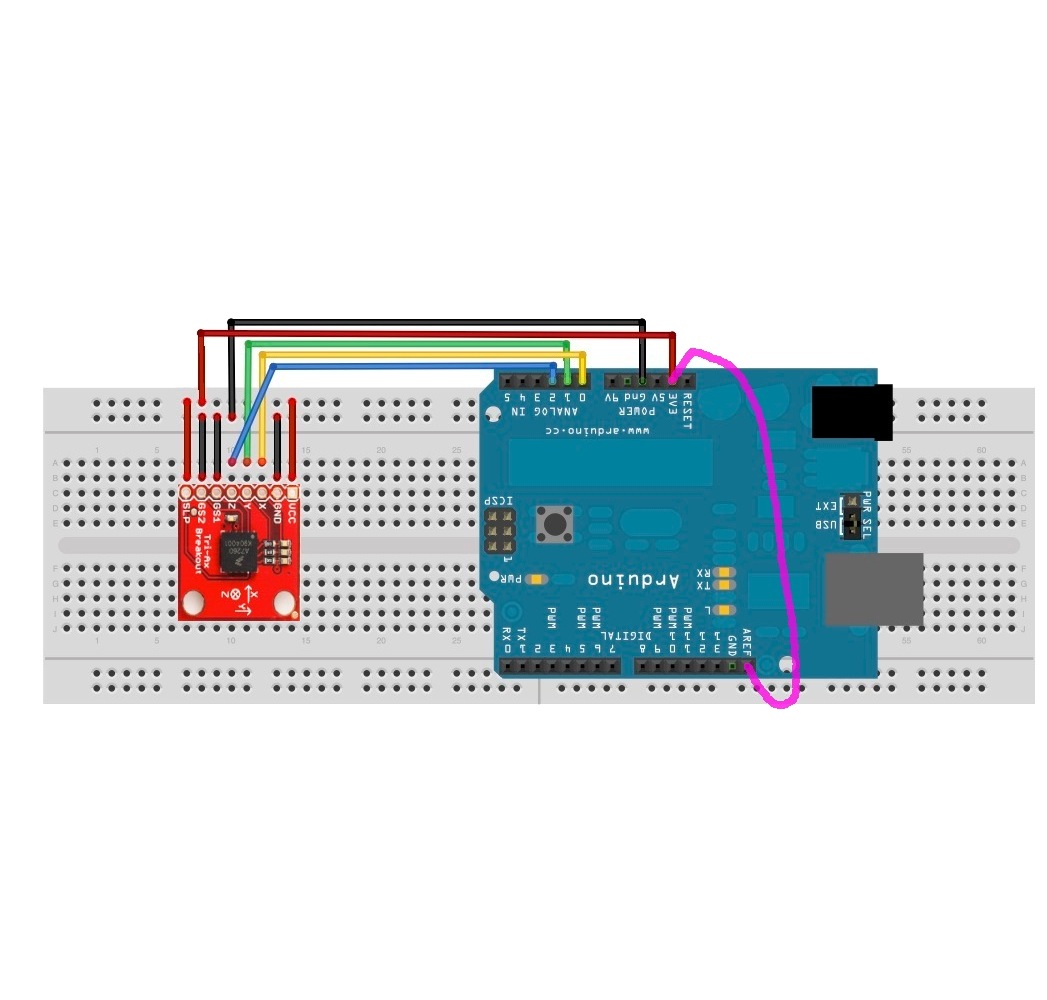
The way it works is by translating movement (accelerometer data) to MIDI messages. The hardware consists of an [Arduino](http://arduino.cc), MIDI-ports and a three axis accelerometer. The MIDI-ports are provided by this [MIDI IN & OUT Arduino shield](http://tomscarff.110mb.com/MIDI_IN_OUT_ARDUINO/midi_in_out_arduino.htm). The accelerometer is a [MMA7260Q](http://www.sparkfun.com/datasheets/Accelerometers/MMA7260Q-Rev1.pdf) from [Sparkfun](http://sparkfun.com). Attaching the MMA7260Q and the arduino is done by following the instructions [here](http://chalmersphyscomp10.wordpress.com/2010/09/17/mma7260q/). One change was made: by attaching the 3.3V output to `AREF` and executing [`analogReference(EXTERNAL);`](http://www.arduino.cc/en/Reference/AnalogReference) fluctuations in power supply cease to have an influence on accelerometer data readings. It is represented by the purple wire in the diagram below.
The software should know when a vibrato like movement is made and how to translate such movement to MIDI messages. The software therefore contains a periodicity estimator and frequency detector to detect how periodic a movement is and how fast the movement is repeated. This was done with the [YIN algorithm](http://audition.ens.fr/adc/pdf/2002_JASA_YIN.pdf) (more commonly used in audio signal analysis). A periodicity threshold was determined experimentally so the system does not yield false positives when playing the piano in the usual way. Another interesting bit of code is the interrupt setup that samples the accelerometer at a fixed sample rate and sends MIDI messages, also at a fixed rate.
MIDI messaging is done over a serial connection. From the Arduino sending a MIDI message is as simple as calling `Serial.print` with the correct data. For the task at hand (sending vibrato) [Pitch Bend messages](http://tomscarff.110mb.com/midi_analyser/pitch_bend.htm) were used. The standard Arduino UNO firmware is replaced with [Arduino MIDI firmware](http://hunt.net.nz/users/darran/weblog/5b7f8/Arduino_UNO_USB_MIDI_firmware.html). This makes the Arduino appear as a standard MIDI device when connected to a computer, which makes interfacing with it practical.
The YIN algorithm is encapsulated in a reusable Arduino library and can be used to detect periodicity and frequency for any signal. [This guy](http://www.youtube.com/watch?v=oGKE1vmAWCA) used his implementation to create a chromatic tuner. The source code for both the [Yin Arduino library](https://github.com/JorenSix/Pidato) and [Pidato experiment](https://github.com/JorenSix/Pidato) can be found on github or "here (zip)":\[Pidato.src.zip\].
The Pidato experiment was done with the help the friendly hackers at [Hackerspace Ghent](http://0x20.be).
This [piano vibrato](http://hackaday.com/2011/04/16/pidato-box-adds-vibrato-effect-to-digital-pianos/) hack was also covered by [hackaday.com](http://hackaday.com) and posted to the [Hackerspace Ghent blog](http://0x20.posterous.com/).
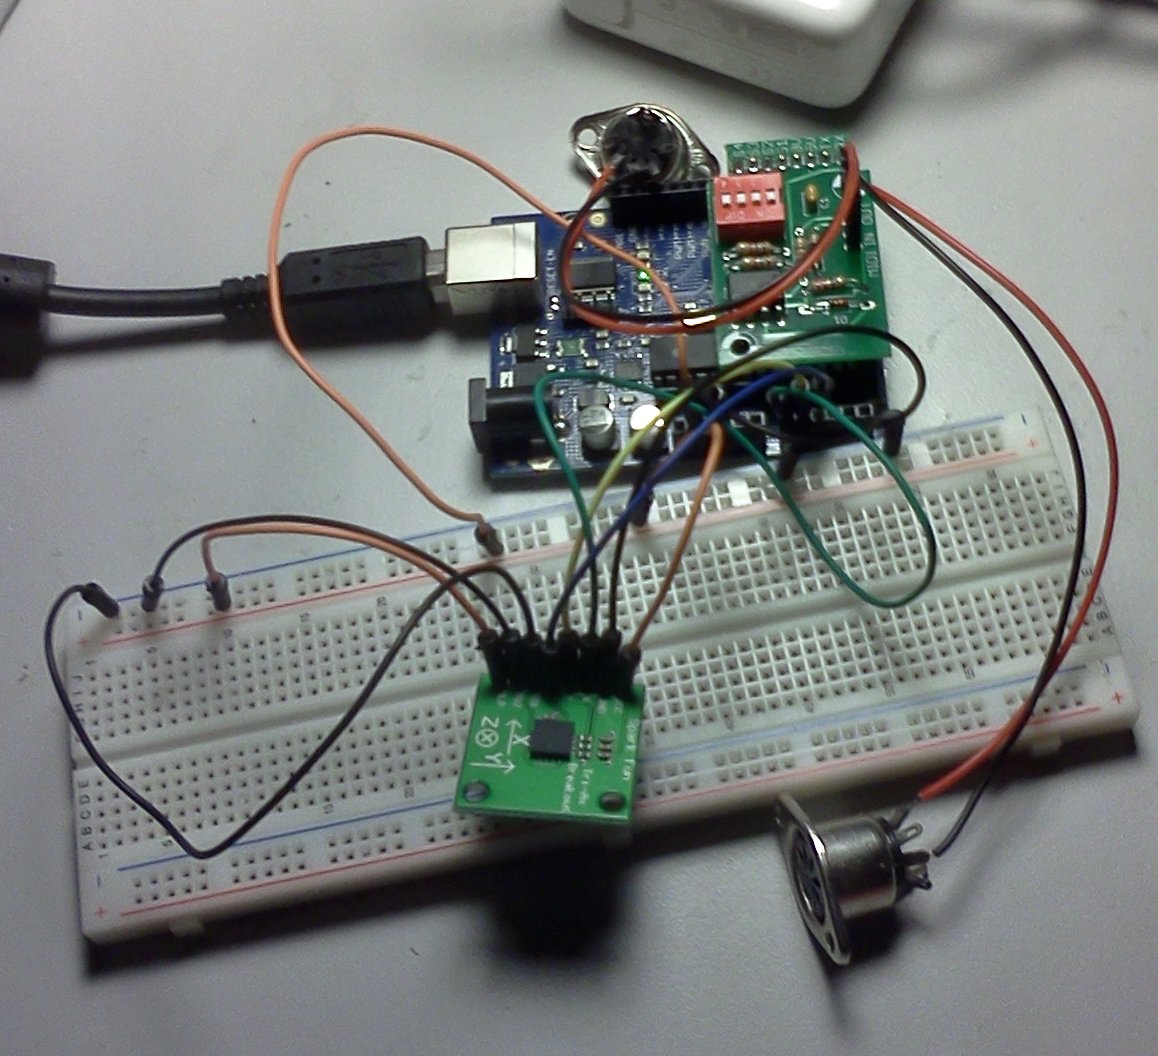
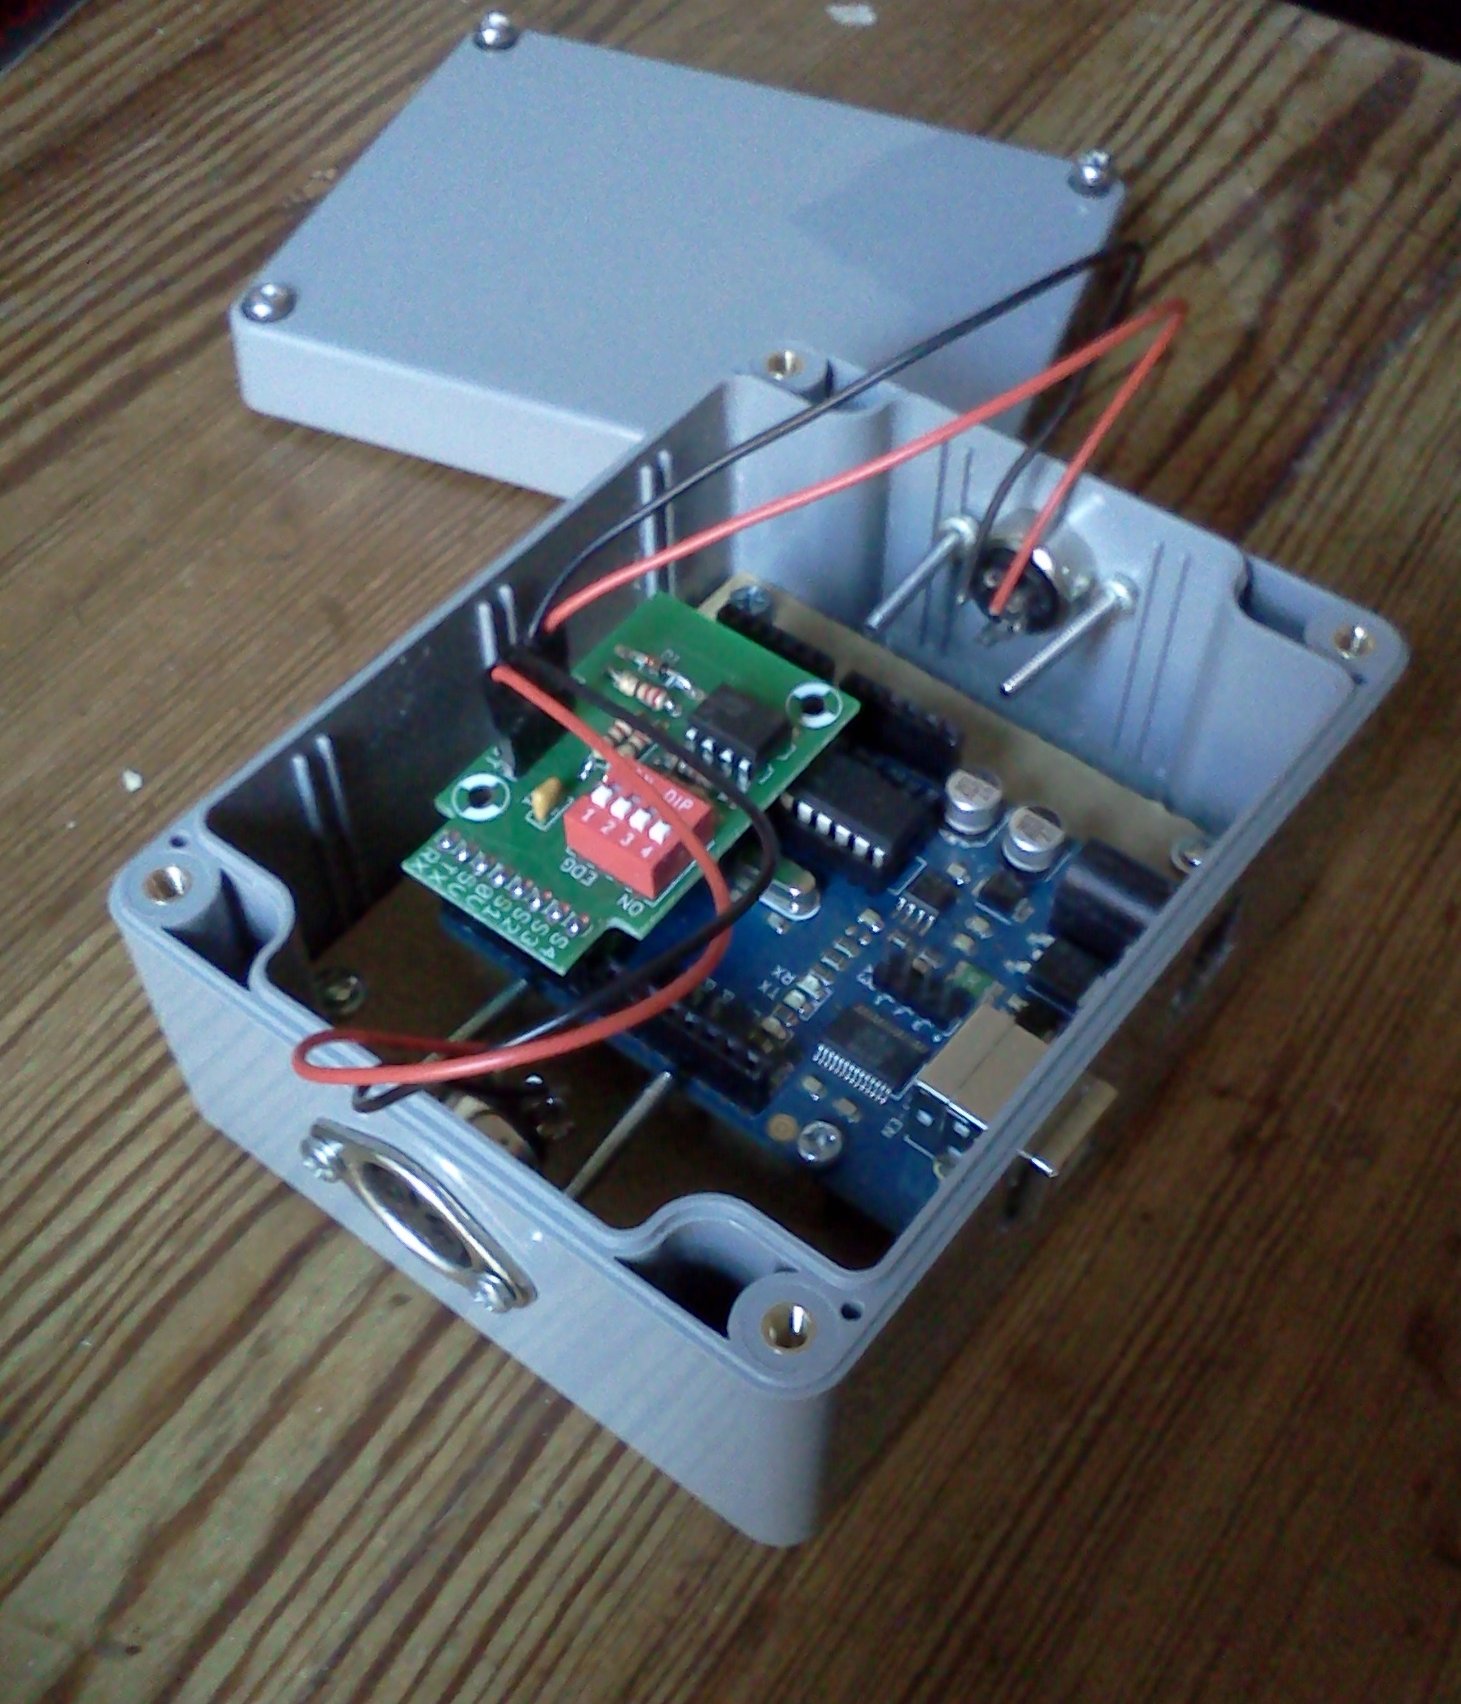
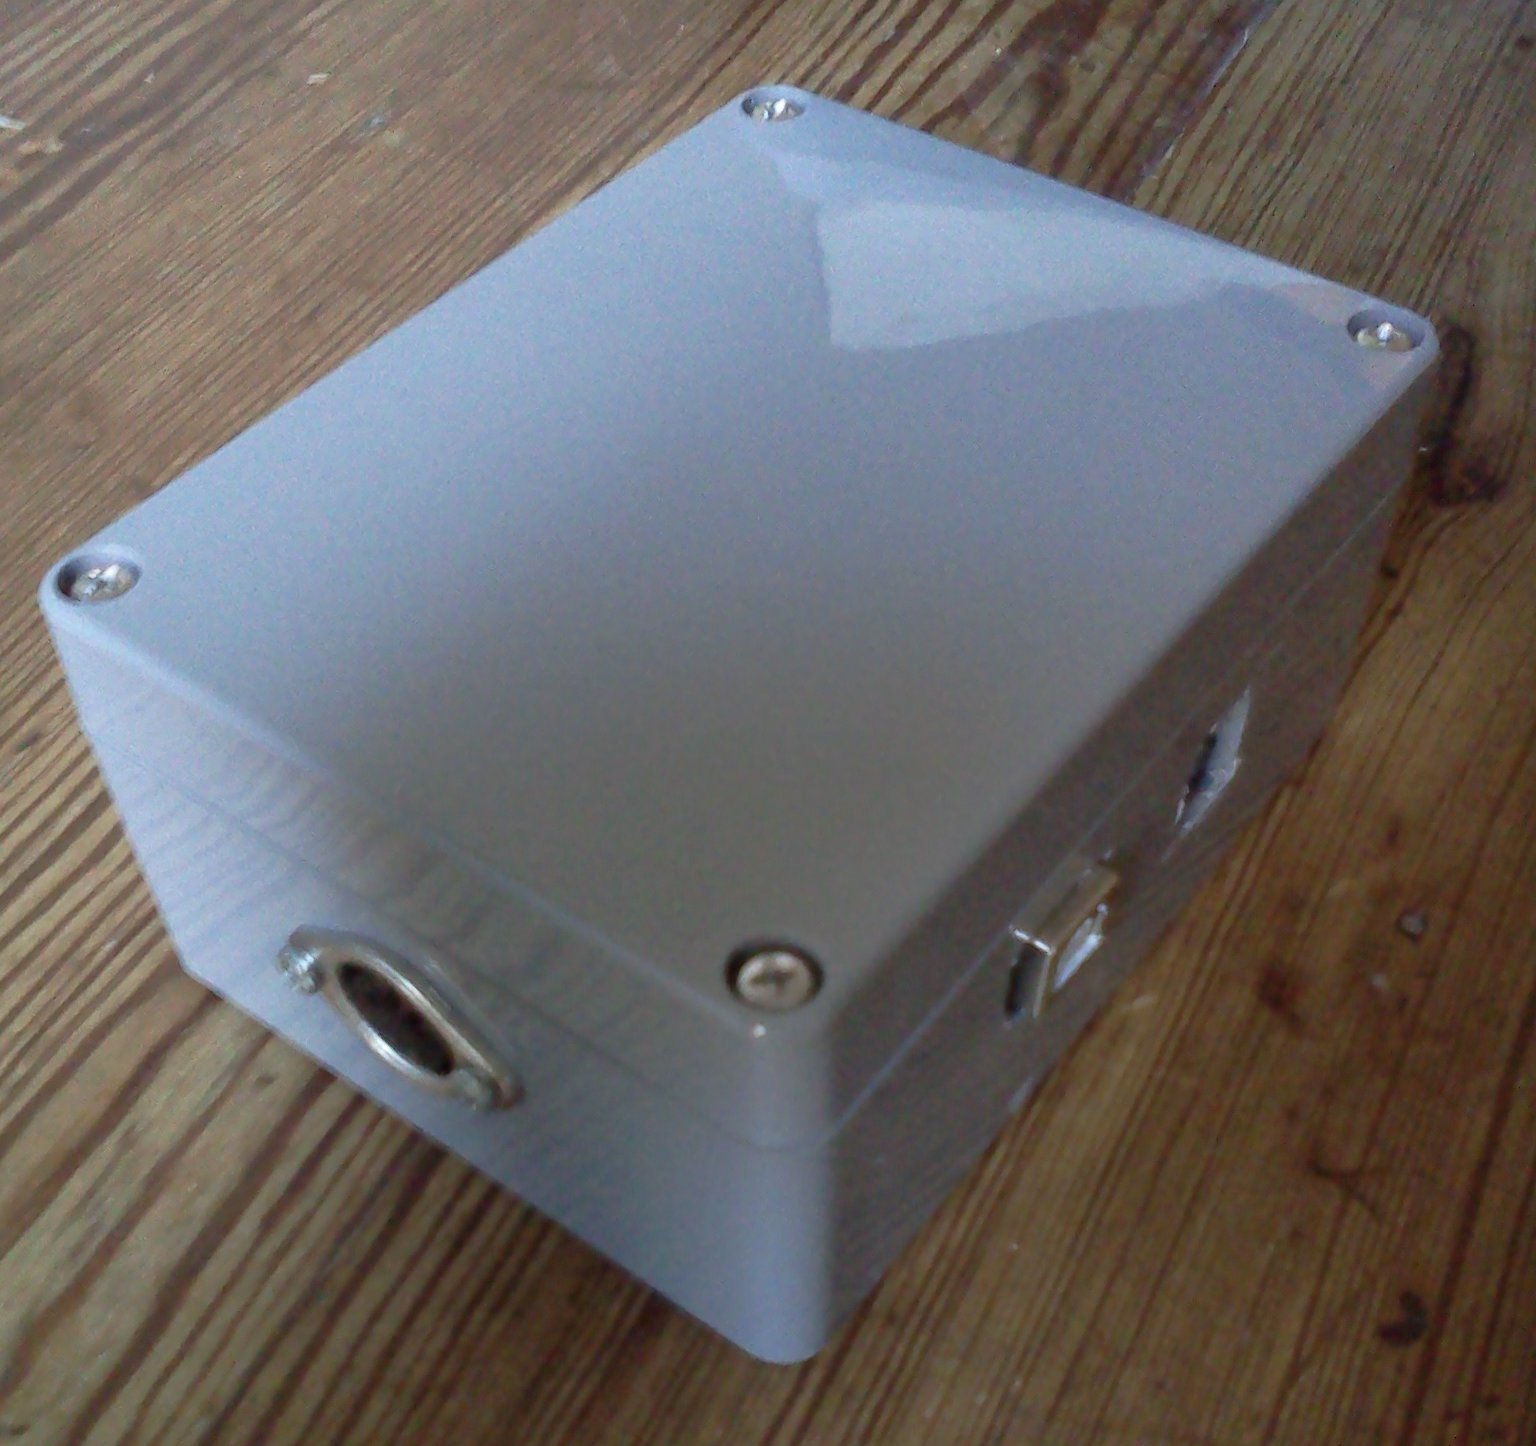
- [Pidato.src.zip](https://0110.be/files/attachments/410/Pidato.src.zip)
- [vibrato\_ff.png](https://0110.be/files/attachments/410/vibrato_ff.png)
- [accelerometer\_wire\_piano\_vibrato.jpg](https://0110.be/files/attachments/410/accelerometer_wire_piano_vibrato.jpg)
- [The\_Pidato\_experiment-Vibrato\_on\_a\_Digital\_Piano\_using\_an\_Arduino.mp4](https://0110.be/files/attachments/410/The_Pidato_experiment-Vibrato_on_a_Digital_Piano_using_an_Arduino.mp4)
- [The\_Pidato\_experiment-Vibrato\_on\_a\_Digital\_Piano\_using\_an\_Arduino.webp](https://0110.be/files/attachments/410/The_Pidato_experiment-Vibrato_on_a_Digital_Piano_using_an_Arduino.webp)
---
## [Rendering MIDI Using Arbitrary Tone Scales - Revisited](https://0110.be/posts/Rendering_MIDI_Using_Arbitrary_Tone_Scales_-_Revisited.md)
- Published: 2011-09-20T14:14:02Z
- Updated: 2013-12-05T18:19:15Z
- Author: Joren
- ID: 408
- Canonical: https://0110.be/posts/Rendering_MIDI_Using_Arbitrary_Tone_Scales_-_Revisited
- Tags: [Code](https://0110.be/tags/Code.md), [Computational musicology](https://0110.be/tags/Computational%20musicology.md), [HoGent](https://0110.be/tags/HoGent.md), [Java](https://0110.be/tags/Java.md)
Tarsos can be used to render MIDI files to audio (WAV) files using arbitrary tone scales. This functionallity can be used to (automatically) verify tone scale extraction from audio files. Since I could not find a dataset with audio and corresponding tone scales creating one using MIDI seemed a good idea.
MIDI files can be found in spades (for example on [piano-midi.de](http://www.piano-midi.de/midi_files.htm) or [kunstderfuge.com](http://kunstderfuge.com)), tone scales on the other hand are harder to find. Luckily there is one massive source, the [Scala Tone Scale Archive](http://www.huygens-fokker.org/scala/downloads.html#scales): *A large collection of over 3700 tone scales*.
Using Scala tone scale files and a midi files a *Tone Scale - Audio* dataset can be generated. The quality of the audio depends on the (software) synthesizer and the [SoundFont](http://en.wikipedia.org/wiki/SoundFont) used. Tarsos currently uses the [Gervill synthesizer](https://gervill.dev.java.net/). Gervill is a pure Java software synthesizer with support for 24bit SoundFonts and the MIDI tuning standard.\
### How To Render MIDI Using Arbitrary Tone Scales with Tarsos
A recent version of the JRE (Java Runtime Environment) needs to be installed on your system if you want to use Tarsos. Tarsos itself can be downloaded in the form of the "MIDI and Scala to Wav - JAR Package":\[MidiToWav.jar\].
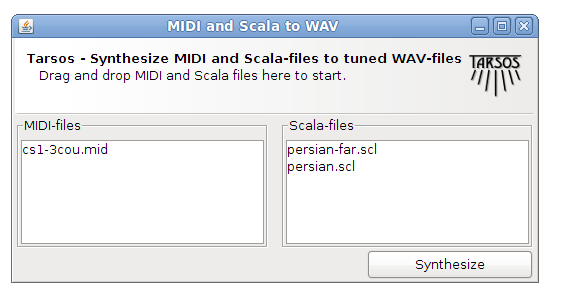
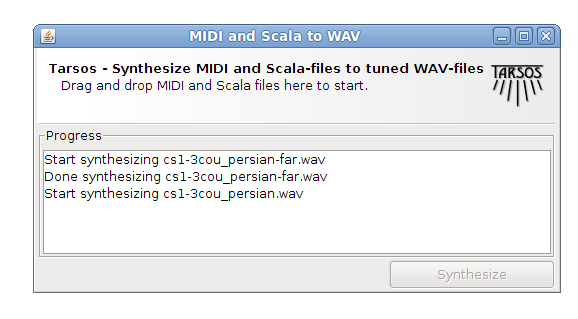
To test the program you can use "a MIDI file":\[MIDI_file.mid\] and "a Scala file":\[persian.scl.txt\] and drag and drop those on the graphical interface.
The result should sound like this:
To summarize: by rendering audio with MIDI and Scala tone scale files a dataset with tone scale - audio information can be generated and tone scale extraction algorithms can be tested on the fly.
- [MidiToWav.jar](https://0110.be/files/attachments/408/MidiToWav.jar)
- [MIDI\_file.mid](https://0110.be/files/attachments/408/MIDI_file.mid)
- [persian.scl.txt](https://0110.be/files/attachments/408/persian.scl.txt)
---
## [PeachNote Piano](https://0110.be/posts/PeachNote_Piano.md)
- Published: 2011-09-08T06:32:37Z
- Updated: 2013-12-05T18:19:15Z
- Author: Joren
- ID: 407
- Canonical: https://0110.be/posts/PeachNote_Piano
- Tags: [Code](https://0110.be/tags/Code.md), [HoGent](https://0110.be/tags/HoGent.md), [Java](https://0110.be/tags/Java.md), [PeachNote Piano](https://0110.be/tags/PeachNote%20Piano.md), [Presentation](https://0110.be/tags/Presentation.md)
This is about PeachNote Piano, a project only tangentially related to Tarsos. PeachNote Piano aims to capture as many piano practice sessions as possible and offer useful services using this data. The system does this by capturing and redirecting MIDI events on a Bluetooth enabled smartphone. It is done together with [Vladimir Viro](http://www.peachnote.com/about.html) and builds on the existing [PeachNote](http://peachnote.com) infrastructure.
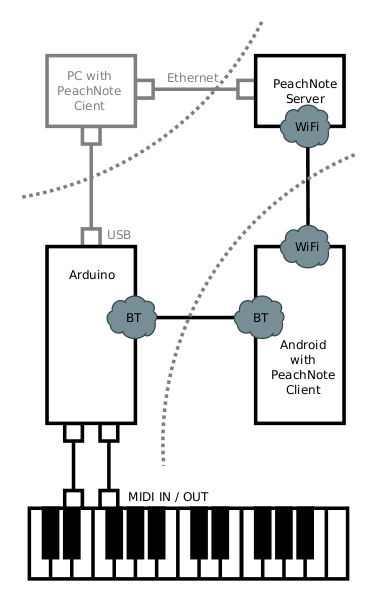
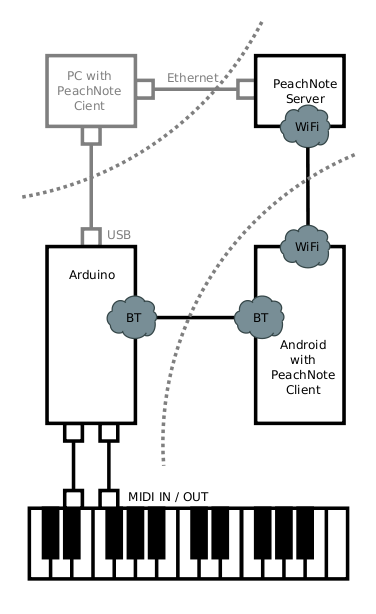
The schema - right - shows the components of the PeachNote Piano system. At the bottom you have a MIDI keyboard connected to the MIDI-Bluetooth-bridge. A smartphone (middle left) receives these MIDI events via Bluetooth and controls the communication to the server (top left). An alternative path goes through a standard computer (top right).
The Arduino based Bluetooth to MIDI bridge is an improvement on the work by [Peter Brinkmann](http://nettoyeur.noisepages.com/). The video below shows communication between USB-MIDI, Bluetooth MIDI and MIDI IN/OUT ports.
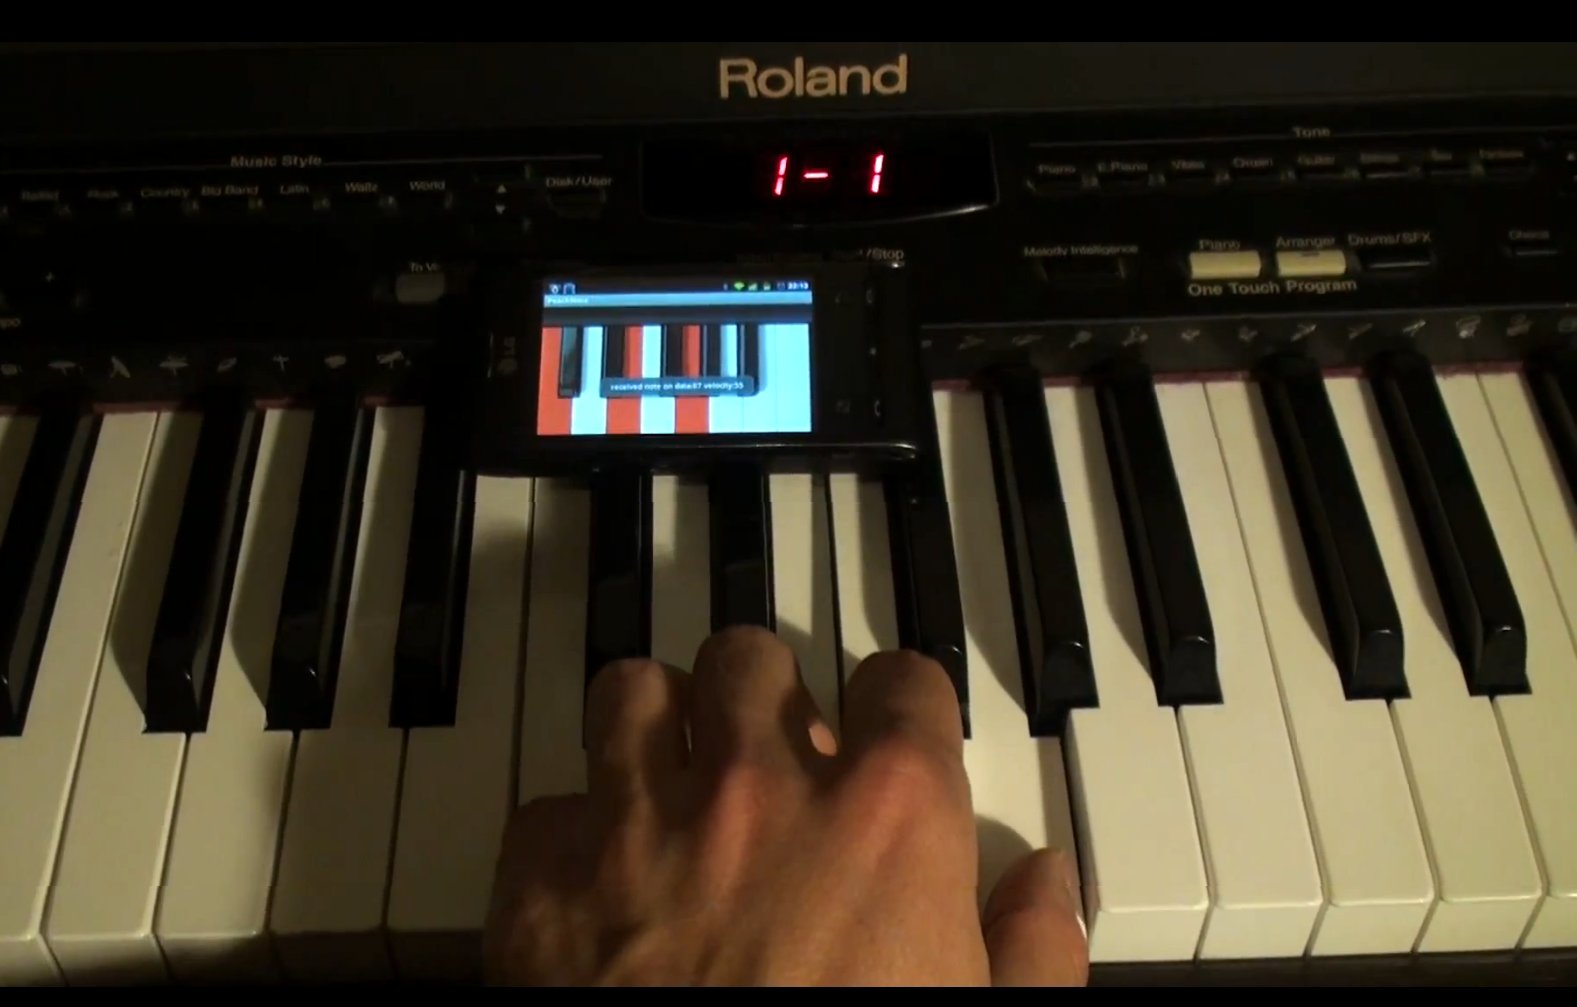
As an example application of the PeachNote Piano system we implemented a "Continue a Melody" service which works as follows: a user plays something on a keyboard, maybe just a few notes, and pauses for a few seconds. In the meantime, the server searches through a large database of MIDI piano recordings, finds the longest fuzzy match for the user's most recent input, and, after a short silence on the users part, starts streaming the continuation of the best matched performance from the database to the user. This mechanism, in fact, is way of browsing a music collection. Users may play a known leitmotiv or just improvise something, and the system continues playing a high quality recording, "replying" to the musical proposition of the user.
### More technical details
The melody matching is done on the server, which is implemented in Javascript in the Node.js framework. The whole dataset (about 350 hours of piano recordings) resides in memory in two representations: as a sequence of pitches, and as a sequence of "densities" at the corresponding places of the pitch sequence dataset. This second array is used to store the rough tempo information (number of notes per second) absent in the pitch sequence data.\
By combining the two search criteria we can achieve reasonable approximation of the tempo-aware search without its computational complexity.
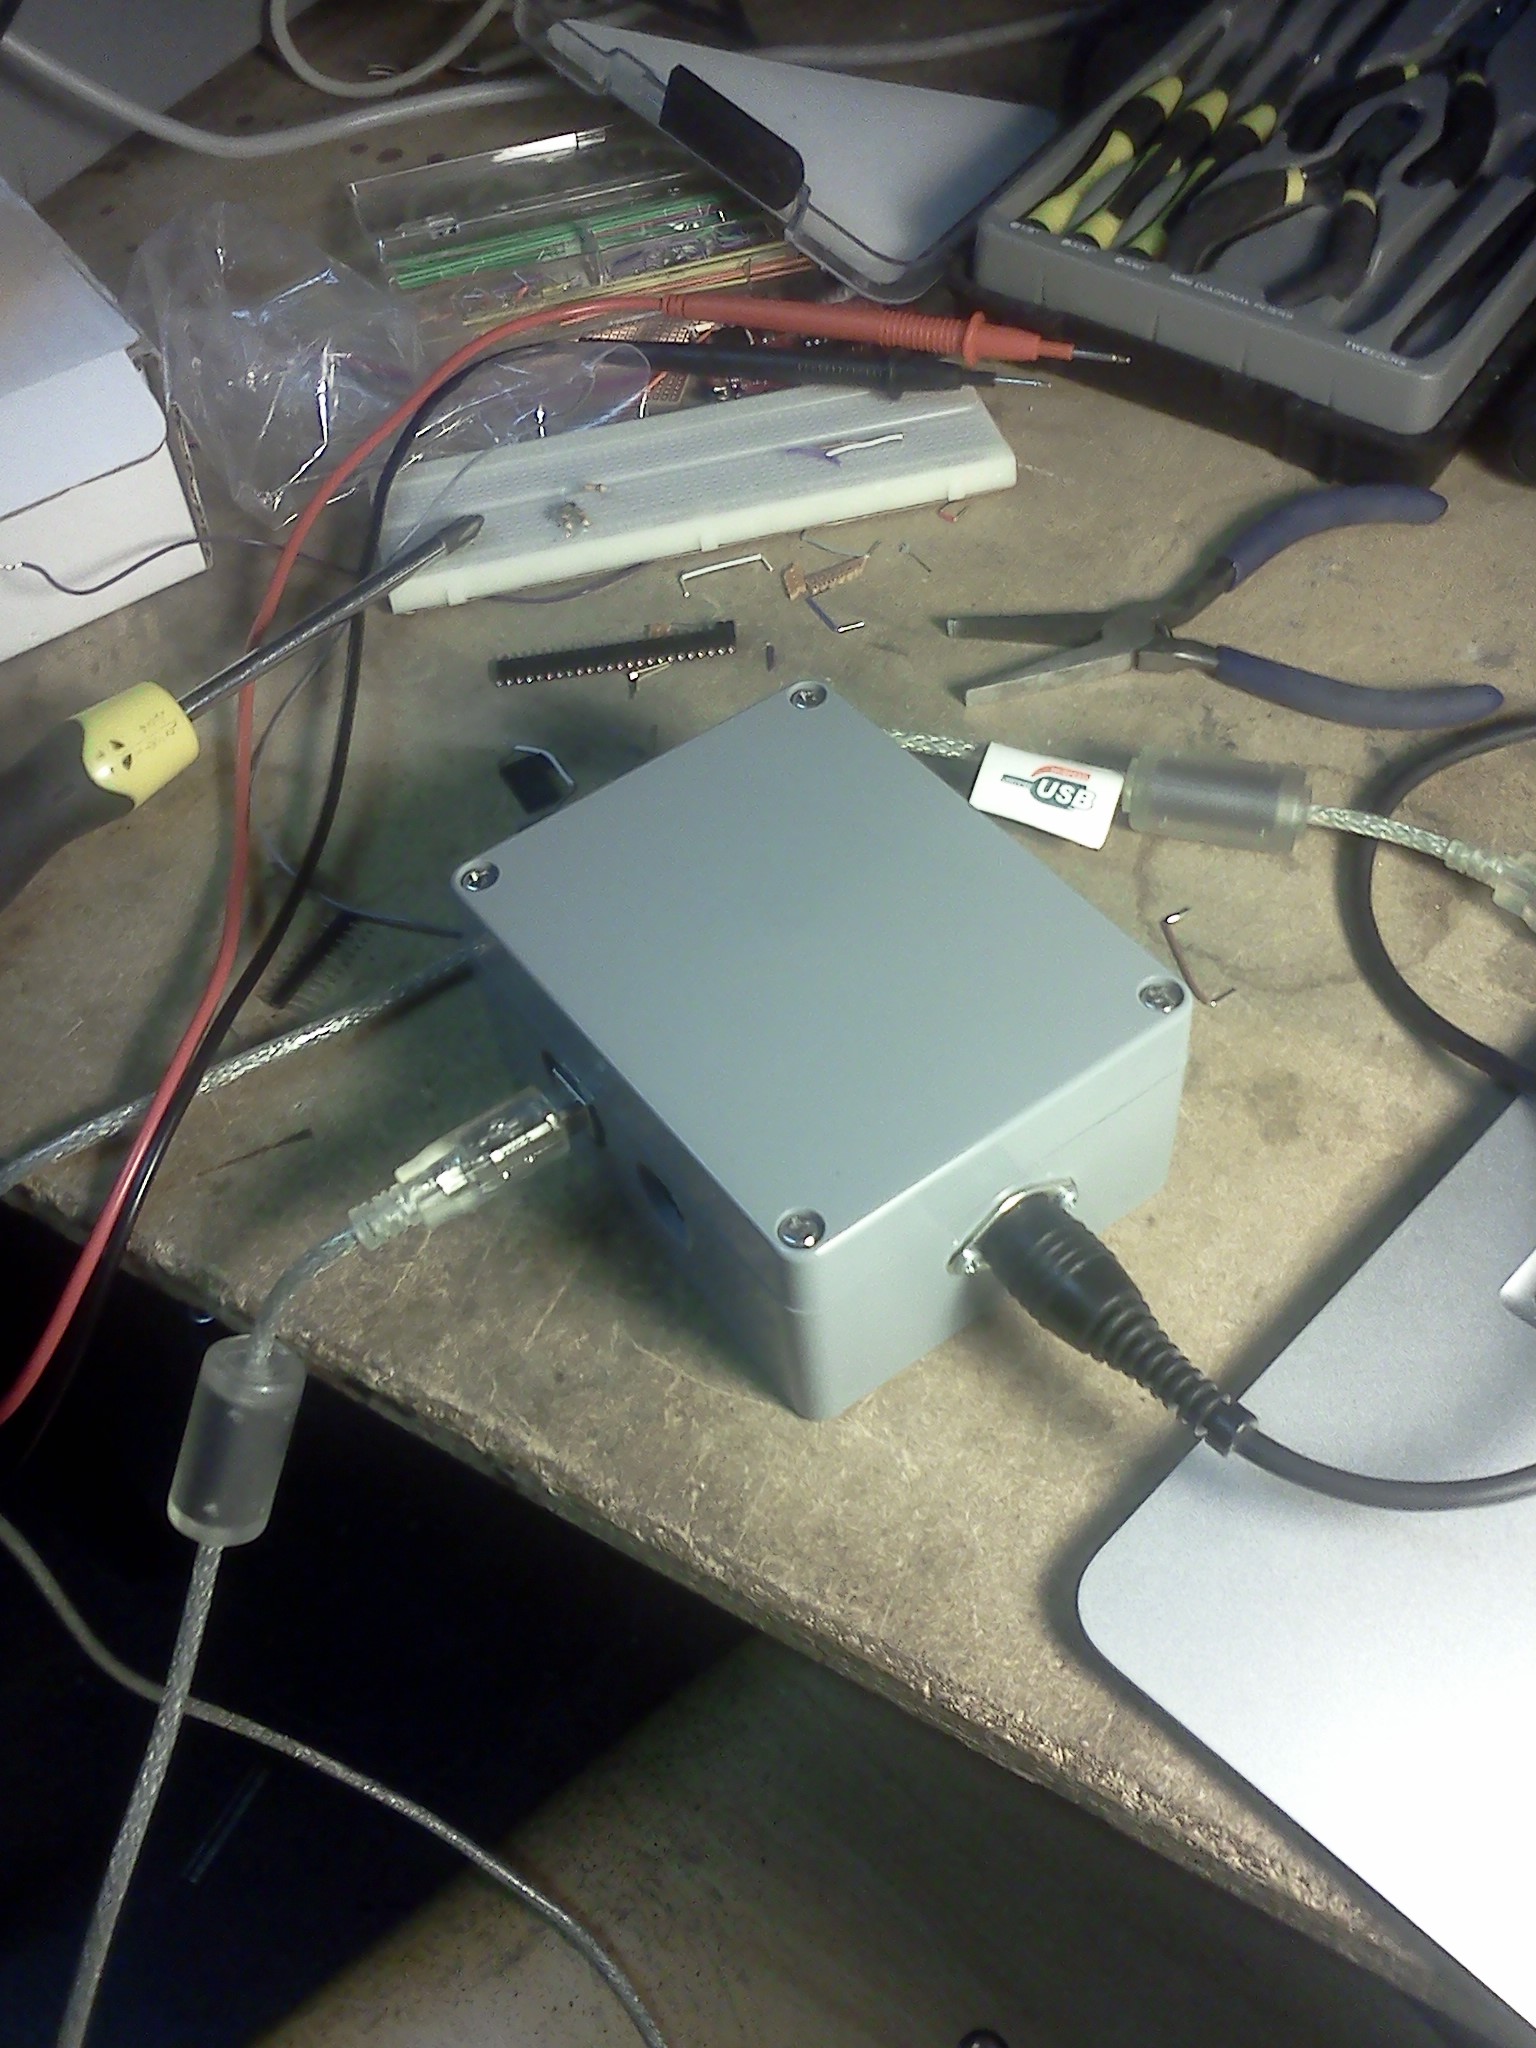
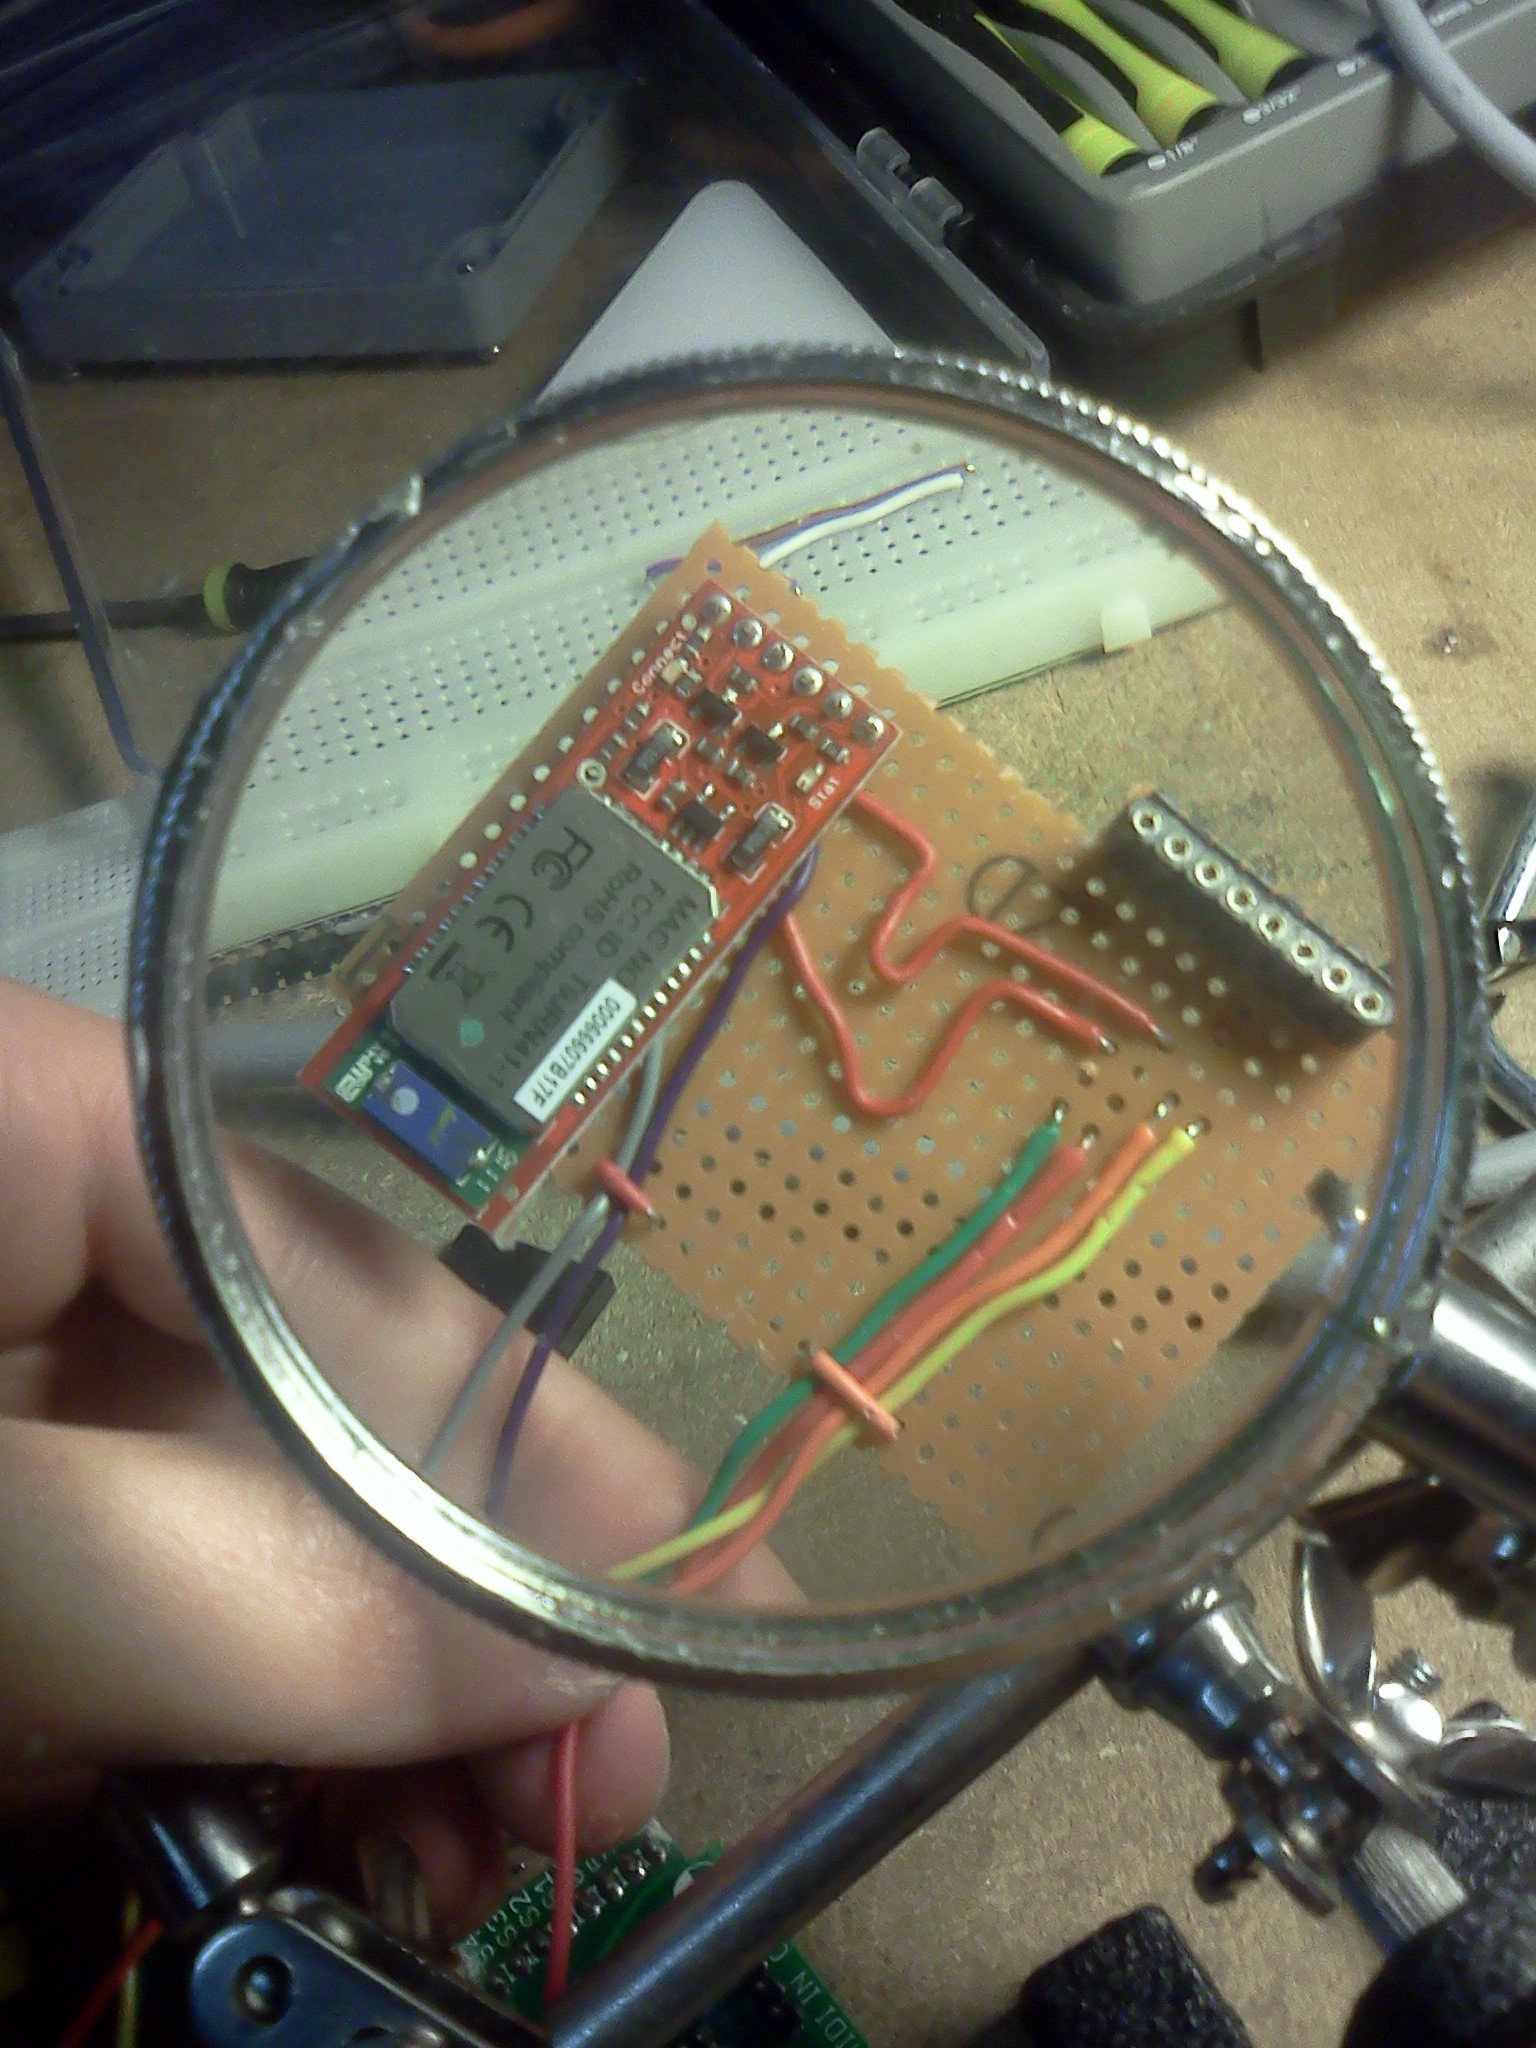
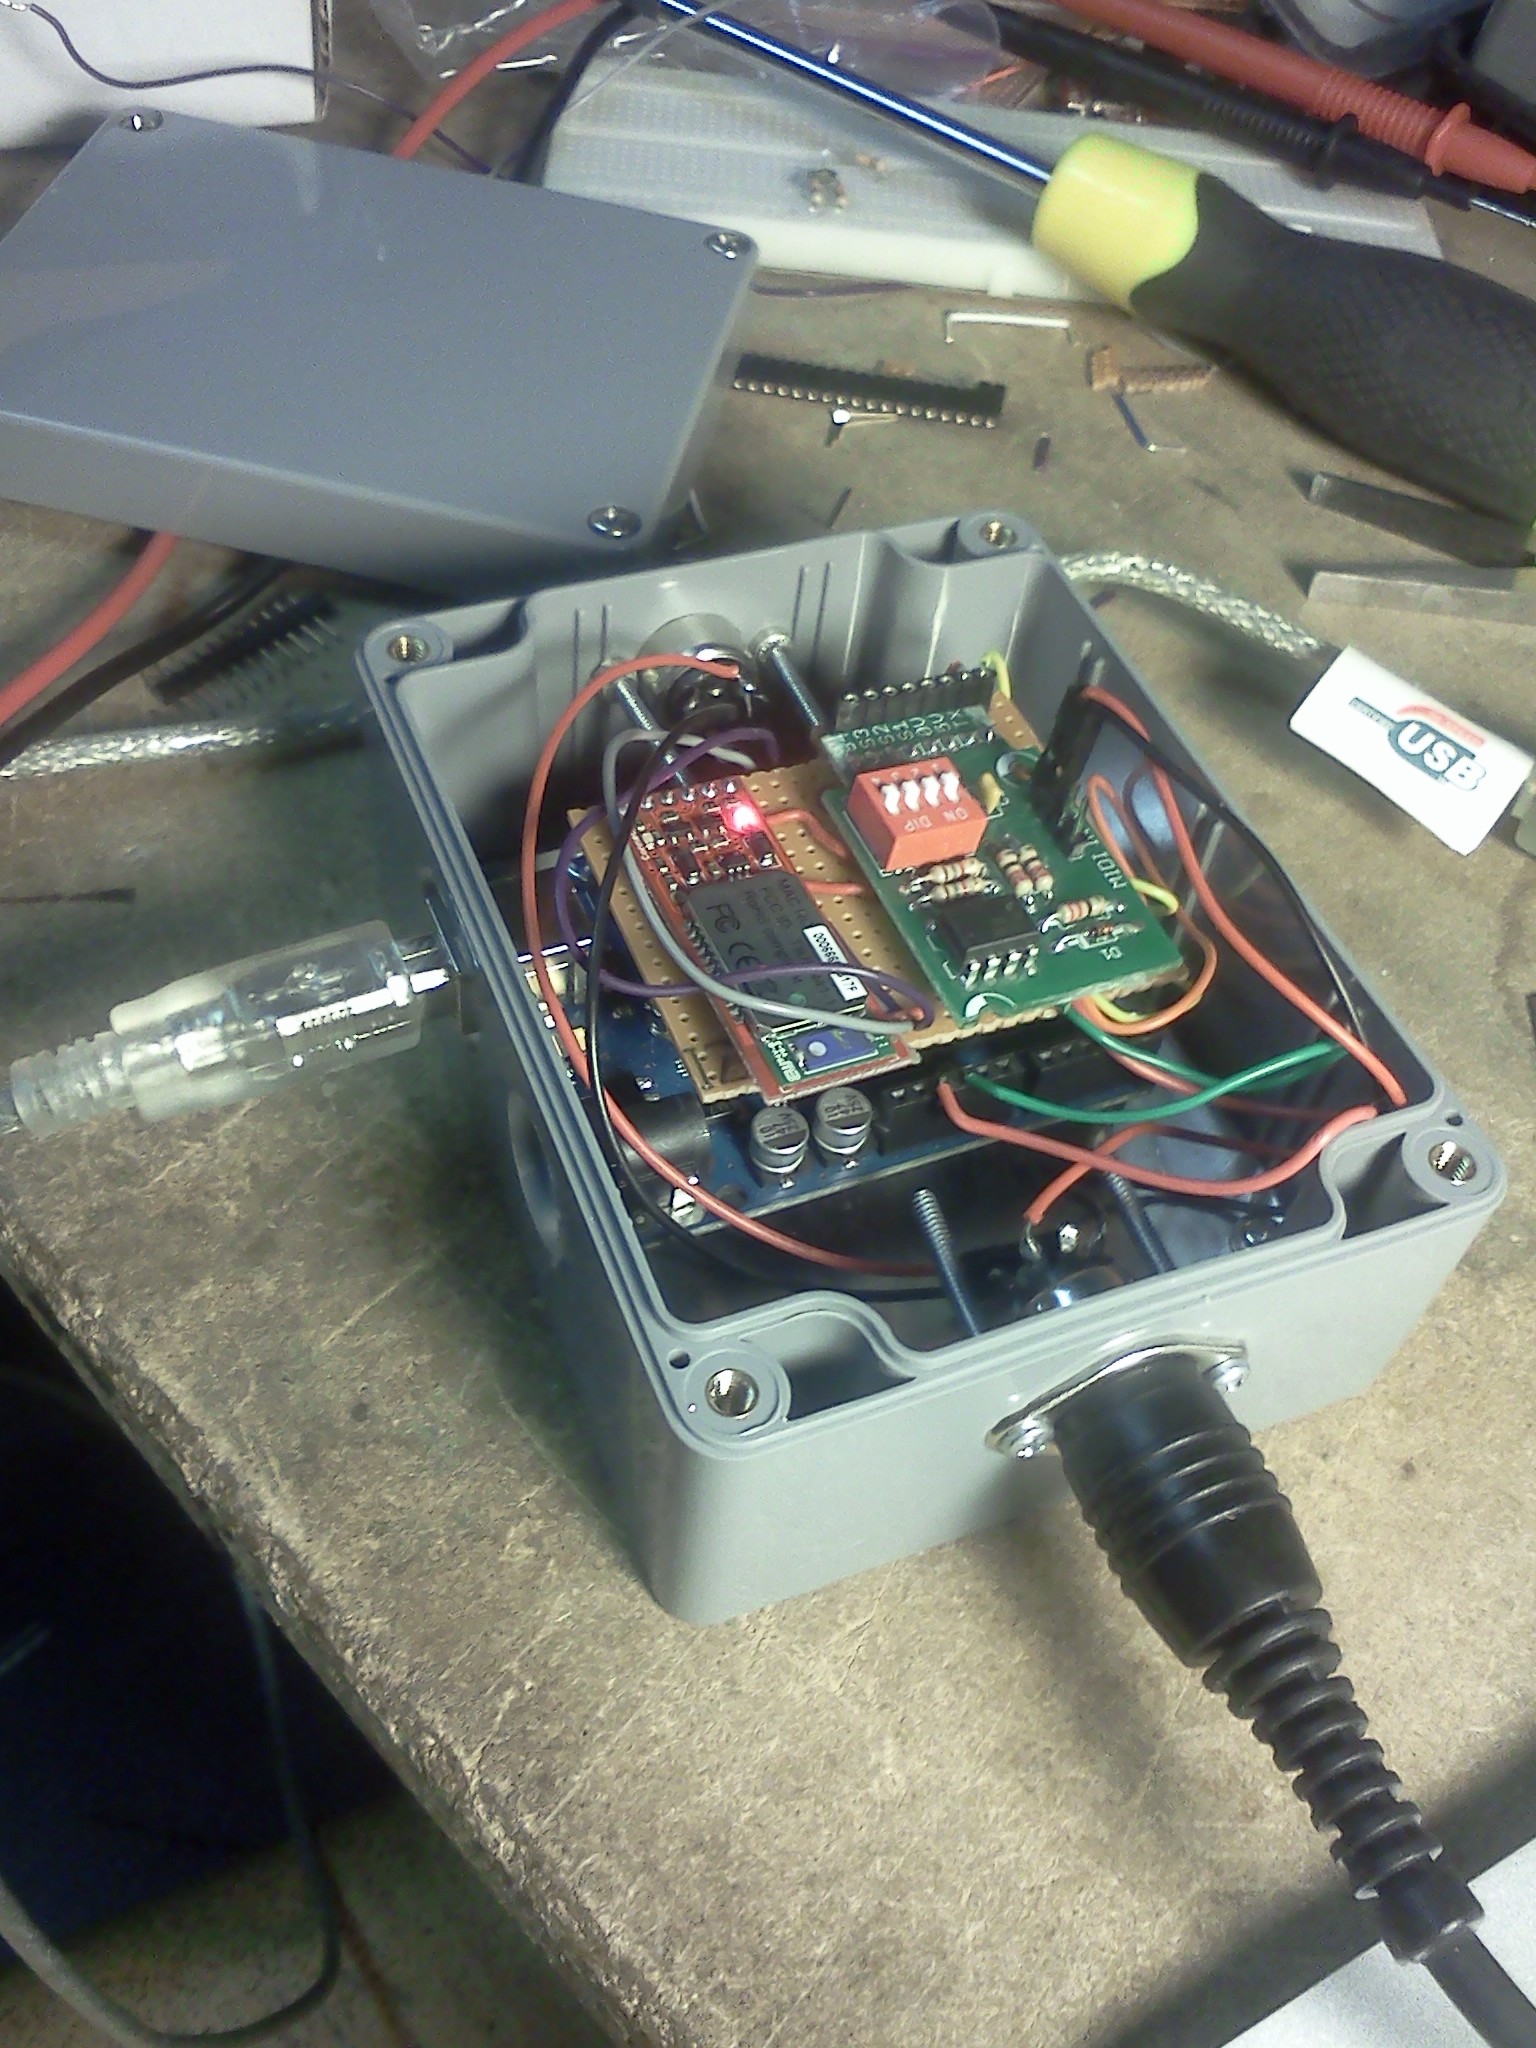
The implementation of the hardware is based on the open-source electronic prototyping platform Arduino. Optocoupled MIDI ports (IN/OUT) and the BlueSMiRF Bluetooth module were attached to the main board, as can be seen in the middle left block of the schema. The BlueTooth module is configured to use the Serial Port Profile (SPP) which emulates RS-232. The software on the Arduino manages bi-directional, low latency message passing between three serial ports: USB (through an FTDI chip), BlueTooth and the hardware MIDI-IN and OUT port.
The standard Arduino firmware has been replaced with firmware that implements the "Universal Serial Bus Device Class Definition for MIDI Devices": when attached to a computer via USB, the Arduino shows up as a standard MIDI device, which makes it compatible with all available MIDI software. The software client currently works on the Android smartphone platform. It is represented using the middle right block in the schema. The client can send and receive MIDI events over its Bluetooth port. Pairing, connecting and communicating with the device is done using the [Amarino software library](http://www.amarino-toolkit.net/). The client communicates with the Peachnote Piano server using TCP sockets implemented on the Dalvik Java runtime.
---
## [Makam Recognition with the Tarsos API](https://0110.be/posts/Makam_Recognition_with_the_Tarsos_API.md)
- Published: 2011-09-01T08:13:21Z
- Updated: 2013-12-05T18:19:15Z
- Author: Joren
- ID: 406
- Canonical: https://0110.be/posts/Makam_Recognition_with_the_Tarsos_API
- Tags: [Code](https://0110.be/tags/Code.md), [Computational ethnomusicology](https://0110.be/tags/Computational%20ethnomusicology.md), [HoGent](https://0110.be/tags/HoGent.md), [Java](https://0110.be/tags/Java.md), [Music Information Retrieval](https://0110.be/tags/Music%20Information%20Retrieval.md), [Tarsos](https://0110.be/tags/Tarsos.md)
This article describes how to do makam recognition with a script that uses the Tarsos API.
The task we want to do is to find the tone scales most similar to the one used in recorded music. To complete this task you need a small set of theoretical scales and a large set of music, each brought in one of the scales. To make it more concrete, an example of Turkish classical music is used.
In an [article by Bozkurt](http://dl.acm.org/citation.cfm?id=1688013) pitch histograms are used for - amongst other tasks - makam recognition. A maqam defines rules for a composition or performance of classical Turkish music. It specifies melodic shapes and pitch intervals, the scale. The task is to identify which of nine makams is used in a specific song. A simplified, generalized implementation of this task is shown here. In our implementation there is no tonic detection step. Also here we use only theoretical descriptions of the tone scales as a template and do not construct a template using the audio itself, as is done by Bozkurt. Ioannidis Leonidas wrote an interesting [master thesis about makam recognition](http://www.mtg.upf.edu/static/media/Ioannidis-Leonidas-Master-Thesis-2010.pdf). Since no knowledge of the music itself is used the approach is generally applicable.
The following is an implementation in [Scala](http://scala-lang.org) a general purpose programming language that is interoperable with Jave . The first step is to write the Scala header. This is just some boilerplate code to be able to run the script from the command line - it assumes a UNIX-like environment and tarsos.jar in the same directory:
\`\`\`ruby\
#!/bin/sh\
exec scala -cp tarsos.jar -savecompiled "\$0" "\$@"\
!#\
import be.hogent.tarsos.util.\_\
//other import statements\
\`\`\`
The second step constructs the templates the capability of Tarsos to create\
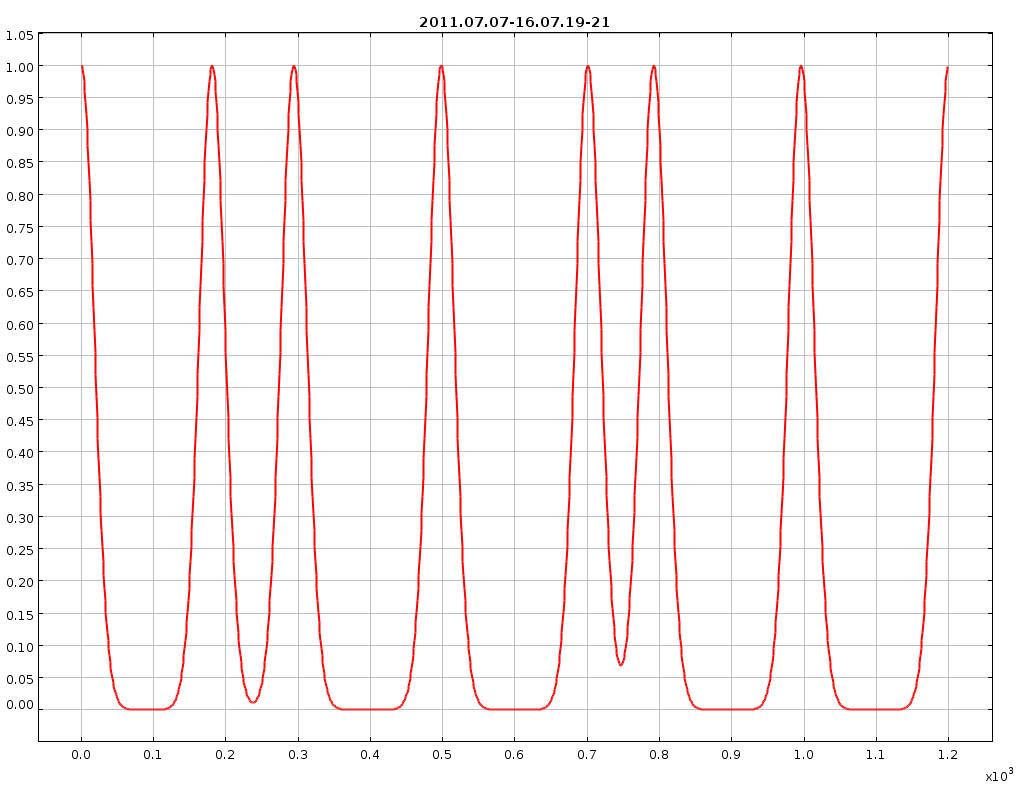
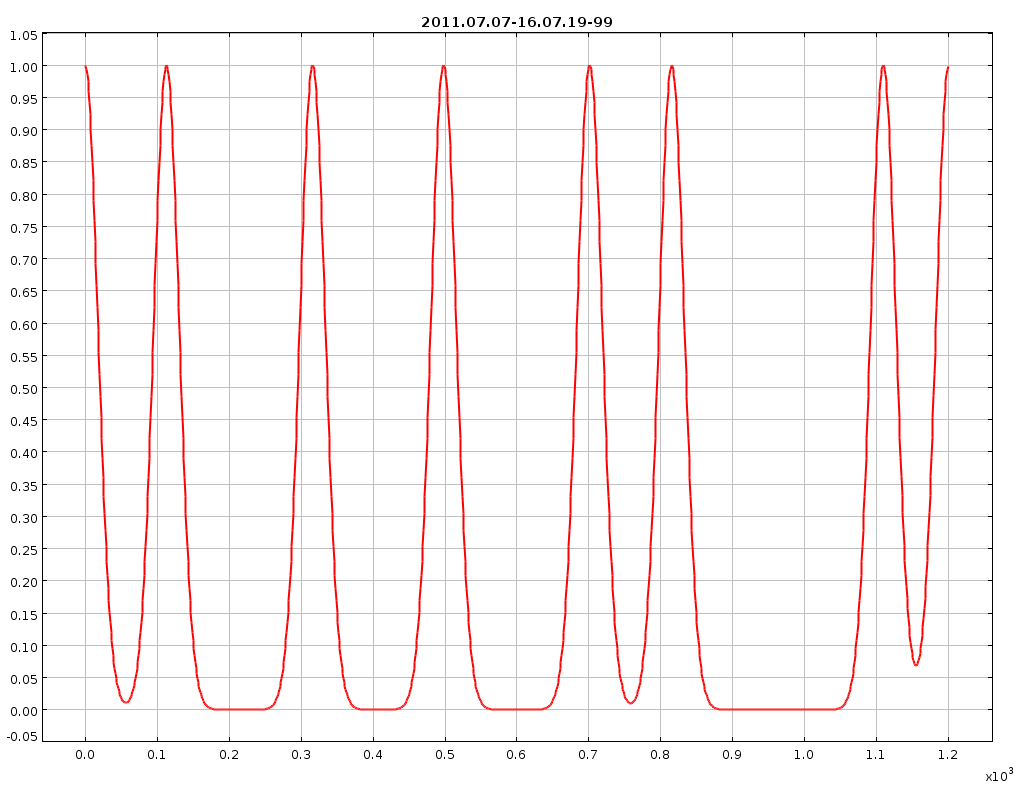
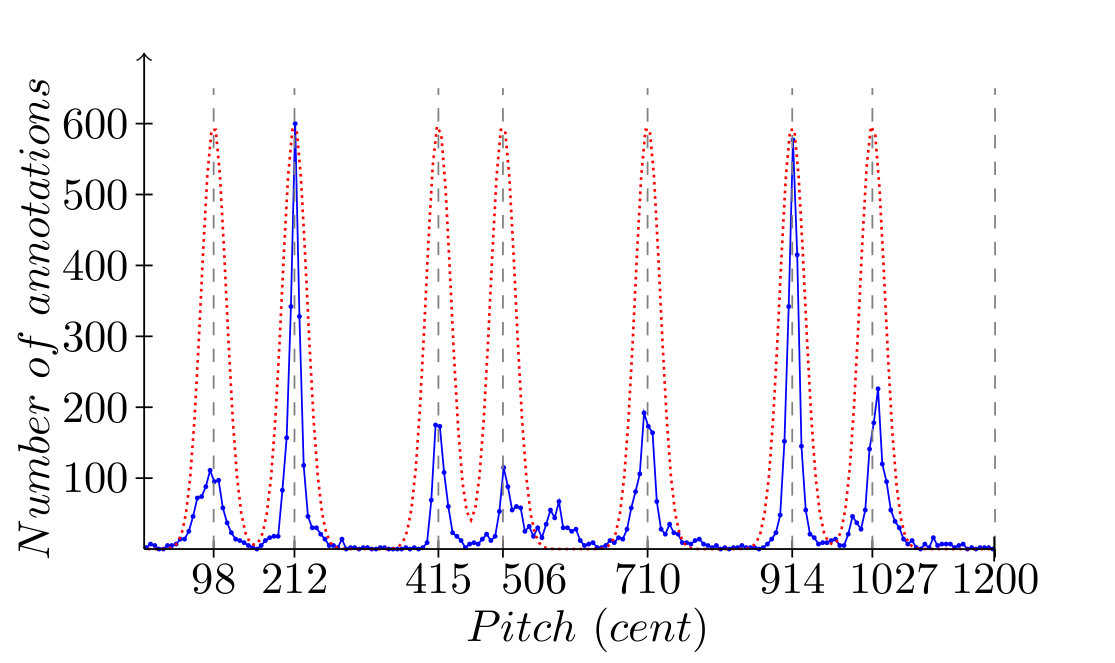
theoretical tone scale templates using Gaussian kernels is used, line 8. See the attached images for some examples.
\`\`\`ruby\
val makams = List( "hicaz","huseyni","huzzam","kurdili_hicazar",\
"nihavend","rast","saba","segah","ussak")
var theoreticKDEs = Map\[java.lang.String,KernelDensityEstimate\]()\
makams.foreach{ makam =\>\
val scalaFile = makam + ".scl"\
val scalaObject = new ScalaFile(scalaFile);\
val kde = HistogramFactory.createPichClassKDE(scalaObject,35)\
kde.normalize\
theoreticKDEs = theoreticKDEs + (makam -\> kde)\
}\
\`\`\`
The third and last step is matching. First a list of audio\
files is created by recursively iterating a directory and matching each file to\
a regular expression. Next, starting from line 4, each audio file is processed.\
The internal implementation of the YIN pitch detection\
algorithm is used on the audio file and a pitch class histogram is created\
(line 6,7). On line 10 normalization of the histogram is done, to\
make the correlation calculation meaningful. Line 11 until 15 compare the\
created histogram from the audio file with the templates calculated beforehand.\
The results are stored, ordered and eventually printed on line 19.
\`\`\`ruby\
val directory = "/home/joren/turkish_makams/"\
val audio_pattern = ".\*.(mp3\|wav\|ogg\|flac)"\
val audioFiles = FileUtils.glob(directory,audio_pattern,true).toList
audioFiles.foreach{ file =\>\
val audioFile = new AudioFile(file)\
val detectorYin = PitchDetectionMode.TARSOS_YIN.getPitchDetector(audioFile)\
val annotations = detectorYin.executePitchDetection()\
val actualKDE = HistogramFactory.createPichClassKDE(annotations,15);\
actualKDE.normalize\
var resultList = List\[Tuple2\[java.lang.String,Double\]\]()\
for ((name, theoreticKDE) \<- theoreticKDEs){\
val shift = actualKDE.shiftForOptimalCorrelation(theoreticKDE)\
val currentCorrelation = actualKDE.correlation(theoreticKDE,shift)\
resultList = (name -\> currentCorrelation) :: resultList\
}\
//order by correlation\
resultList = resultList.sortBy{\_.\_2}.reverse\
Console.println(file + " is brought in tone scale " + resultList(0).\_1)\
}\
\`\`\`
A complete version of this script can is available: "Tone scale matching script":\[guess_makam.scala\] Results of the script when ran on Bozkurt's dataset can be seen in the attached spreadsheet ("openoffice format":\[makam_recognition_results.ods\] or "excel format":\[makam_recognition_results.xls\]).
- [guess\_makam.scala](https://0110.be/files/attachments/406/guess_makam.scala)
- [makams.zip](https://0110.be/files/attachments/406/makams.zip)
- [makam\_recognition\_results.ods](https://0110.be/files/attachments/406/makam_recognition_results.ods)
- [makam\_recognition\_results.xls](https://0110.be/files/attachments/406/makam_recognition_results.xls)
---
## [Tarsos at 'ISMIR 2011'](https://0110.be/posts/Tarsos_at_%27ISMIR_2011%27.md)
- Published: 2011-08-22T08:26:09Z
- Updated: 2013-12-05T18:19:15Z
- Author: Joren
- ID: 405
- Canonical: https://0110.be/posts/Tarsos_at_%27ISMIR_2011%27
- Tags: [Code](https://0110.be/tags/Code.md), [Computational ethnomusicology](https://0110.be/tags/Computational%20ethnomusicology.md), [HoGent](https://0110.be/tags/HoGent.md), [ISMIR](https://0110.be/tags/ISMIR.md), [Music Information Retrieval](https://0110.be/tags/Music%20Information%20Retrieval.md), [Research papers](https://0110.be/tags/Research%20papers.md), [Tarsos](https://0110.be/tags/Tarsos.md), [featured](https://0110.be/tags/featured.md)
A paper about Tarsos was submitted for review at the [12th International Society for Music Information Retrieval Conference](http://ismir2011.ismir.net/) which will be held in Miami. The paper "Tarsos - a Platform to Explore Pitch Scales in Non-Western and Western Music":\[tarsos_ismir_2011.pdf\] was reviewed and accepted, it will be published in this year's proceedings of the ISMIR conference. It can be read below as well.
An oral presentation about Tarsos is going to take place Tuesday, the 25 of October during the afternoon, as can be seen on the [ISMIR preliminary program schedule](http://ismir2011.ismir.net/program.html#OS2).
If you want to cite our work, please use the following data:
\`\`\`ruby\
\@inproceedings{six2011tarsos,\
author = {Joren Six and Olmo Cornelis},\
title = {Tarsos - a Platform to Explore Pitch Scales\
in Non-Western and Western Music},\
booktitle = {Proceedings of the 12th International\
Society for Music Information Retrieval Conference,\
ISMIR 2011},\
year = {2011},\
publisher = {International Society for Music Information Retrieval}\
}\
\`\`\`
- [tarsos\_ismir\_paper.bibtex.txt](https://0110.be/files/attachments/405/tarsos_ismir_paper.bibtex.txt)
- [tarsos\_ismir\_2011.pdf](https://0110.be/files/attachments/405/tarsos_ismir_2011.pdf)
---
## [Resynthesis of Pitch Detection Annotations on a Flute Piece](https://0110.be/posts/Resynthesis_of_Pitch_Detection_Annotations_on_a_Flute_Piece.md)
- Published: 2011-06-16T14:43:10Z
- Updated: 2013-12-05T18:19:15Z
- Author: Joren
- ID: 403
- Canonical: https://0110.be/posts/Resynthesis_of_Pitch_Detection_Annotations_on_a_Flute_Piece
- Tags: [Code](https://0110.be/tags/Code.md), [Computational ethnomusicology](https://0110.be/tags/Computational%20ethnomusicology.md), [HoGent](https://0110.be/tags/HoGent.md), [Java](https://0110.be/tags/Java.md), [Music Information Retrieval](https://0110.be/tags/Music%20Information%20Retrieval.md), [Tarsos](https://0110.be/tags/Tarsos.md)
Tarsos, a software package to analyse pitch organization in music, contains a new output modality. Now it is possible to export resynthesized pitch annotations, detected by a pitch detection algorithm and compare those with the original sound. This can be interesting to see which errors a pitch detection algorithm makes.
Below you can listen to an example of synthesized pitch detection results compared with the original flute piece. The file starts with only the original flute sound (on the right channel) and gradually changes so only the synthesized annotations (on the left channel) can be heard.
Resynthesis of Pitch Detection Annotations on a Flute Piece by Joren Six
- [flute\_resynth.wav](https://0110.be/files/attachments/403/flute_resynth.wav)
---
## [PulseAudio Support for Sun Java 6 on Ubuntu](https://0110.be/posts/PulseAudio_Support_for_Sun_Java_6_on_Ubuntu.md)
- Published: 2011-05-27T09:59:31Z
- Updated: 2013-12-05T18:19:15Z
- Author: Joren
- ID: 394
- Canonical: https://0110.be/posts/PulseAudio_Support_for_Sun_Java_6_on_Ubuntu
- Tags: [Code](https://0110.be/tags/Code.md), [HoGent](https://0110.be/tags/HoGent.md), [Java](https://0110.be/tags/Java.md)
This article describes how to make sun-java6 play nice with the PulseAudio sound sytem on Ubuntu with an x64 processor architecture. With some changes the method should also work with other operating systems and other platforms.
The default way sun-java6 operates with respect to sound on Ubuntu is, well unrespectfull. When playing audio it claims an audio device, which then can not be used any more by other applications trying to access the same device. This is far from ideal. Also changing audio interfaces (by e.g. plugging in a USB audio interface) goes wrong most of the time.
These problems are addressed by PulseAudio and there is a way to make sun-java6 aware of PulseAudio on Ubuntu. The OpenJDK does this automatically but it has some other, unrelated, issues. If you want to use PulseAudio with java6 on Ubuntu x64 you need copy "pulse-java.jar":\[pulse-java.jar\] and platform dependent "libpulse-java.so":\[libpulse-java.so\] file to correct JVM directories. To make it easy you can execute these commands:
\`\`\`ruby\
wget http://tarsos.0110.be/attachment/cons/255/libpulse-java.so\
sudo cp libpulse-java.so /usr/lib/jvm/java-6-sun/jre/lib/amd64
wget http://tarsos.0110.be/attachment/cons/256/pulse-java.jar\
sudo cp pulse-java.jar /usr/lib/jvm/java-6-sun/jre/lib/ext\
\`\`\`
From this moment on the "PulseAudio Mixer" is available for Java applications. Sharing, switching and assigning audio devices to Java programs is as a result smooth. To use the PulseAudio Mixer by default you need to change sound.properties which can be found at `/usr/lib/jvm/java-6-sun/jre/lib/sound.properties`. Details can be found [here](http://www.mail-archive.com/universe-bugs@lists.ubuntu.com/msg146425.html).
- [libpulse-java.so](https://0110.be/files/attachments/394/libpulse-java.so)
- [pulse-java.jar](https://0110.be/files/attachments/394/pulse-java.jar)
- [pulseaudio\_logo.png](https://0110.be/files/attachments/394/pulseaudio_logo.png)
---
## [TwinSeats heeft Apps For Ghent gewonnen!](https://0110.be/posts/TwinSeats_heeft_Apps_For_Ghent_gewonnen%21.md)
- Published: 2011-05-18T00:00:00Z
- Updated: 2013-12-05T18:19:15Z
- Author: Joren
- ID: 320
- Canonical: https://0110.be/posts/TwinSeats_heeft_Apps_For_Ghent_gewonnen%21
- Tags: [0110.be](https://0110.be/tags/0110.be.md), [Code](https://0110.be/tags/Code.md), [Hackerspace Ghent](https://0110.be/tags/Hackerspace%20Ghent.md), [Portfolio](https://0110.be/tags/Portfolio.md), [Projecten](https://0110.be/tags/Projecten.md)
Vorige zaterdag werd [Apps For Ghent](http://appsforghent.be/) georganiseerd: een activiteit om het belang van open data te onderstrepen in navolging van onder meer [Apps For Amsterdam](http://www.appsforamsterdam.nl/) en [New York City Big App](http://nycbigapps.com/). Tijdens de voormiddag kwamen er verschillende organisaties hun open gestelde data voorstellen de namiddag werd gereserveerd voor een wedstrijd. Het doel van de wedstrijd was om in enkele uren een concept uit te werken en meteen voor te stellen. Het uitgewerkte prototype moest gedeeltelijk functioneren en gebruik maken van (Gentse) open data.
Luk Verhelst en ikzelf hebben er TwinSeats voorgesteld.
> TwinSeats is een website / online initiatief om nieuwe mensen te leren kennen. Met hen deel je dezelfde culturele interesse en ga je vervolgens samen naar deze of gene voorstelling. Door events centraal te stellen kan TwinSeats uitzonderlijke cultuurburen zoeken. Leden vinden die cultuurburen dankzij een gezamenlijke voorliefde voor een artiest of attractie of eender welke bezigheid in de vrijetijdssfeer.
Het prototype is ondertussen terug te vinden op [TwinSeats.be](http://twinseats.be). Let wel dit is in enkele uren in elkaar geflanst en is verre van 'af', het achterliggende concept is belangrijker.
Samen met Wa Kank Doen van SumoCoders werden we door de jury tot winnaar uitgeroepen. Maandag verscheen er [een artikel in de Standaard over AppsForGhent met een vermelding van TwinSeats](http://www.standaard.be/artikel/detail.aspx?artikelid=IV3A3TCU). Op de Apps For Ghent site is uiteraard ook iets te vinden [over TwinSeats](http://appsforghent.be/?post_type=apps&p=161) ook het [juryverslag](http://appsforghent.be/?page_id=223) is er te vinden. Zoals het hoort bij die categorie evenementen werd ook wat [afgetweet](http://search.twitter.com/search?q=AppsforGhent).
Er is ook een publieksprijs verbonden aan AppsForGhent die wordt over enkele weken uitgereikt.
---
## [TarsosDSP: a small JAVA audio processing library](https://0110.be/posts/TarsosDSP%3A_a_small_JAVA_audio_processing_library.md)
- Published: 2011-03-25T15:58:59Z
- Updated: 2013-12-05T18:19:15Z
- Author: Joren
- ID: 392
- Canonical: https://0110.be/posts/TarsosDSP%3A_a_small_JAVA_audio_processing_library
- Tags: [Code](https://0110.be/tags/Code.md), [HoGent](https://0110.be/tags/HoGent.md), [Java](https://0110.be/tags/Java.md), [Tarsos](https://0110.be/tags/Tarsos.md), [TarsosDSP](https://0110.be/tags/TarsosDSP.md), [featured](https://0110.be/tags/featured.md)
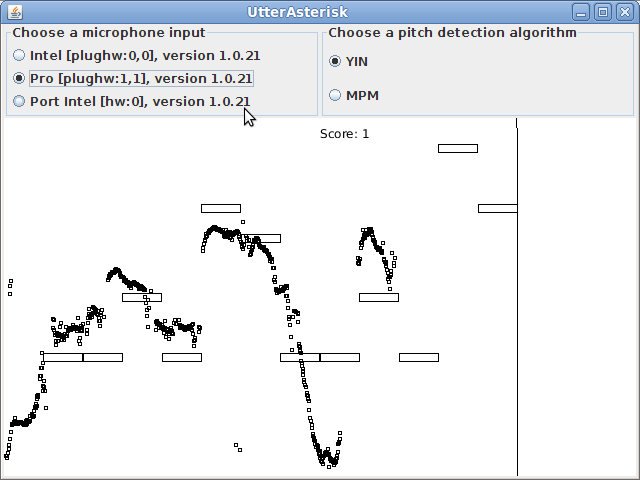
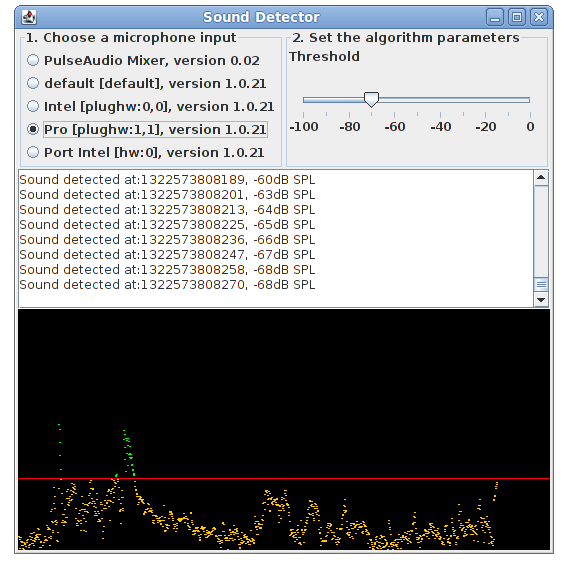
TarsosDSP is a collection of classes to do simple audio processing. It features an implementation of a percussion onset detector and two pitch detection algorithms: Yin and the Mcleod Pitch method.
Its aim is to provide a simple interface to some audio (signal) processing algorithms implemented in JAVA.
To make some of the possibilities clear I coded some examples.
- "TarsosDSP UtterAsterisk":\[UtterAsterisk.jar\] a game that shows real-time pitch detection with YIN.
- "TarsosDSP Sound Detector":\[SoundDetector.jar\] is simply to show how to react when (loud) sound is available.
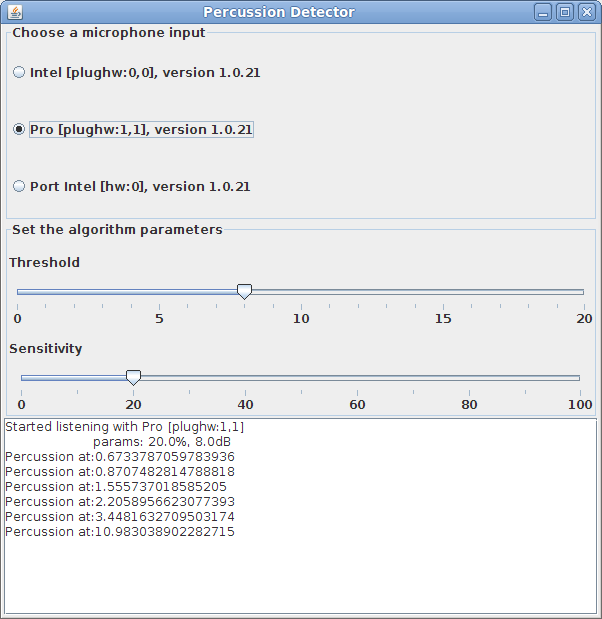
- "TarsosDSP Percussion Detector":\[PercussionDetector.jar\] is capable of detecting percussion onsets using the method described [here](http://arrow.dit.ie/cgi/viewcontent.cgi?article=1018&context=argcon). It plays a sound from [freesound.org](http://freesound.org) when percussion is detected.
The [source code of TarsosDSP](https://github.com/JorenSix/TarsosDSP) is available on github.
### Presentation at Newline
Saturday the 25th of March TarsosDSP was presented at [Newline](http://0x20.be/Newline/Schedule), a small conference organized by [whitespace](http://0x20.be). Here you can download "the slides I used to present TarsosDSP":\[tarsosDSP_presentation.pdf\], I also created "an introductory text on sound and Java":\[sound_and_java.pdf\].
- [PitchDetector.jar](https://0110.be/files/attachments/392/PitchDetector.jar)
- [PercussionDetector.jar](https://0110.be/files/attachments/392/PercussionDetector.jar)
- [tarsosDSP\_presentation.pdf](https://0110.be/files/attachments/392/tarsosDSP_presentation.pdf)
- [sound\_and\_java.pdf](https://0110.be/files/attachments/392/sound_and_java.pdf)
- [UtterAsterisk.jar](https://0110.be/files/attachments/392/UtterAsterisk.jar)
- [SoundDetector.jar](https://0110.be/files/attachments/392/SoundDetector.jar)
---
## [Remote Port Forwarding with Ubuntu 8.04 and OpenSSH 4.7](https://0110.be/posts/Remote_Port_Forwarding_with_Ubuntu_8.04_and_OpenSSH_4.7.md)
- Published: 2011-01-10T00:00:00Z
- Updated: 2013-12-05T18:19:15Z
- Author: Joren
- ID: 315
- Canonical: https://0110.be/posts/Remote_Port_Forwarding_with_Ubuntu_8.04_and_OpenSSH_4.7
- Tags: [0110.be](https://0110.be/tags/0110.be.md), [Code](https://0110.be/tags/Code.md)
With this post I would like to draw attention to the fact that remote port forwarding with OpenSSH 4.7 on Ubuntu 8.04.1 does not work as expected.
If you follow the instructions of a [SSH remote port forwarding tutorial](http://www.debianadmin.com/howto-use-ssh-local-and-remote-port-forwarding.html) everything goes well until you want to allow everyone to access the forwarded port (not just localhost). The problem arises when binding the forwarded port to an interface. Even with `GatewayPorts yes` present in `/etc/ssh/sshd_config` the following command shows that it went wrong:
\`\`\`ruby\
user@local\$ssh -R 2222:localhost:22 user@remote\
user@remote\$sudo netstat -lntp #on the remote server\
Active Internet connections (only servers)\
Proto Recv-Q Send-Q Local Address Foreign Address State\
tcp6 0 0 ::1:2222 :::\* LISTEN\
\`\`\`
It listens only via IPv6 and only on localhost an not on every interface (as per request by defining `GatewayPorts yes`). The `netstat` command should yield this output:
\`\`\`ruby\
user@local\$ssh -R 2222:localhost:22 user@remote\
user@remote\$sudo netstat -lntp #on the remote server\
Active Internet connections (only servers)\
Proto Recv-Q Send-Q Local Address Foreign Address State\
tcp 0 0 0.0.0.0:2222 0.0.0.0:\* LISTEN\
\`\`\`
I do not really know here it goes wrong but there is an easy workaround. By defining both
\`\`\`ruby\
GatewayPorts yes\
AddressFamily inet\
\`\`\`
in `/etc/ssh/sshd_config` remote port forwarding works fine but you lose IPv6 connectivity (this due to the `AddressFamily` setting). Another solution is to use more up to date software: the bug is not present in Ubuntu 10.04 with OpenSSH 5.3 (I don't know if it is an Ubuntu or OpenSSH bug, or even a configuration issue.
I have been struggling with this issue for a couple of hours and, with this blog post, I hope I can prevent someone else from doing the same.
---
## [Oneliner to Install ssh-copy-id on Mac OS X](https://0110.be/posts/Oneliner_to_Install_ssh-copy-id_on_Mac_OS_X.md)
- Published: 2010-12-25T00:00:00Z
- Updated: 2013-12-05T18:19:15Z
- Author: Joren
- ID: 314
- Canonical: https://0110.be/posts/Oneliner_to_Install_ssh-copy-id_on_Mac_OS_X
- Tags: [0110.be](https://0110.be/tags/0110.be.md), [Code](https://0110.be/tags/Code.md), [Mac OS X](https://0110.be/tags/Mac%20OS%20X.md)
`ssh-copy-id` is a practical bash script, installed by default on Ubuntu. The script is used to distribute public keys. The following oneliner makes it available on Mac OS X:
\`\`\`ruby\
sudo bash \< \<( curl ---silent http://0110.be\[install-ssh-copy-id.bash\] )\
\`\`\`\
This oneliner does three things:
1. It copies `ssh-copy-id` from this website to `/bin/ssh-copy-id`.
2. It makes sure that `ssh-copy-id` is executable, using `chmod`.
3. There is no three
The install procedure needs superuser rights because it writes in the `/bin` folder. Executing scripts from untrusted sources with superuser rights is actually really, really, extremely dangerous. But in this case it is rather innocent.
The `ssh-copy-id` script is the one provided with Ubuntu and Debian, I assume it is GPL'ed. I have not modified it for Mac OS X but it seems to behave as expected. I have only tested the install script and behavior on 10.6.5, YMMV (Your Mileage May Vary).
- [ssh-copy-id.txt](https://0110.be/files/attachments/314/ssh-copy-id.txt)
- [install-ssh-copy-id.bash](https://0110.be/files/attachments/314/install-ssh-copy-id.bash)
- [install-ssh-copy-id.bash](https://0110.be/files/attachments/314/install-ssh-copy-id.bash)
---
## [Groovy Tarsos Scripting](https://0110.be/posts/Groovy_Tarsos_Scripting.md)
- Published: 2010-11-09T00:00:00Z
- Updated: 2020-11-17T09:12:42Z
- Author: Joren
- ID: 346
- Canonical: https://0110.be/posts/Groovy_Tarsos_Scripting
- Tags: [Code](https://0110.be/tags/Code.md), [HoGent](https://0110.be/tags/HoGent.md), [Java](https://0110.be/tags/Java.md), [Tarsos](https://0110.be/tags/Tarsos.md), [featured](https://0110.be/tags/featured.md)
There is more to Tarsos then meets te eye. The graphical user interface only exposes some functionality; the API (Application Programmer Interface) exposes all of Tarsos' capabilities.
Tarsos is programmed in Java so the API is accessible trough Java and other programming languages targeting the JVM (Java Virtual Machine) like JRuby, Scala and Groovy. The following examples use [the Groovy programming language](http://groovy.codehaus.org/) because I find it the most aesthetically pleasing with regards to interoperability and it gets the job done without getting in your way.
To run the examples a copy of the [Tarsos JAR-file](http://0110.be/releases/Tarsos) needs to be added to the Classpath and the Groovy runtime must be installed correctly. I'll leave this as an exercise for the reader: godspeed to you, brave soul. Quick protip: placing a copy of the jar in the extensions directory seems to work best, e.g. see [important java directories on mac OS X.](http://developer.apple.com/library/mac/#qa/qa2001/qa1170.html)
The first example extracts pitch class histograms from a bunch of files and saves them as EPS (Encapsulated PostScript)-files. It iterates a directory recursively and handles each file that matches a given regular expression. In this example the regular expression matches all WAV-files. Batch processing is one of those things scripting is ideal for, doing the same thing with the user interface would be tedious or even mind-numbingly boring, not groovy at all indeed.
\`\`\`ruby\
import be.hogent.tarsos.\*\
import be.hogent.tarsos.util.\*\
import be.hogent.tarsos.util.histogram.ToneScaleHistogram\
import be.hogent.tarsos.sampled.pitch.Annotation\
import be.hogent.tarsos.sampled.pitch.PitchDetectionMode
dir = "/home/joren/audio"
FileUtils.glob(dir,".\*.wav",true).each { file -\>\
audioFile = new AudioFile(file)\
pitchDetector = PitchDetectionMode.TARSOS_YIN.getPitchDetector(audioFile)\
pitchDetector.executePitchDetection()\
//get some annotations\
annotations = pitchDetector.getAnnotations()\
//create an ambitus and tone scale histogram\
ambitusHistogram = Annotation.ambitusHistogram(annotations)\
toneScaleHisto = ambitusHistogram.toneScaleHistogram()\
//plot a smoothed version of the histogram\
p = new SimplePlot()\
p.addData 0, toneScaleHisto.gaussianSmooth(0.2)\
p.save FileUtils.basename( file) + ".eps"\
}\
\`\`\`
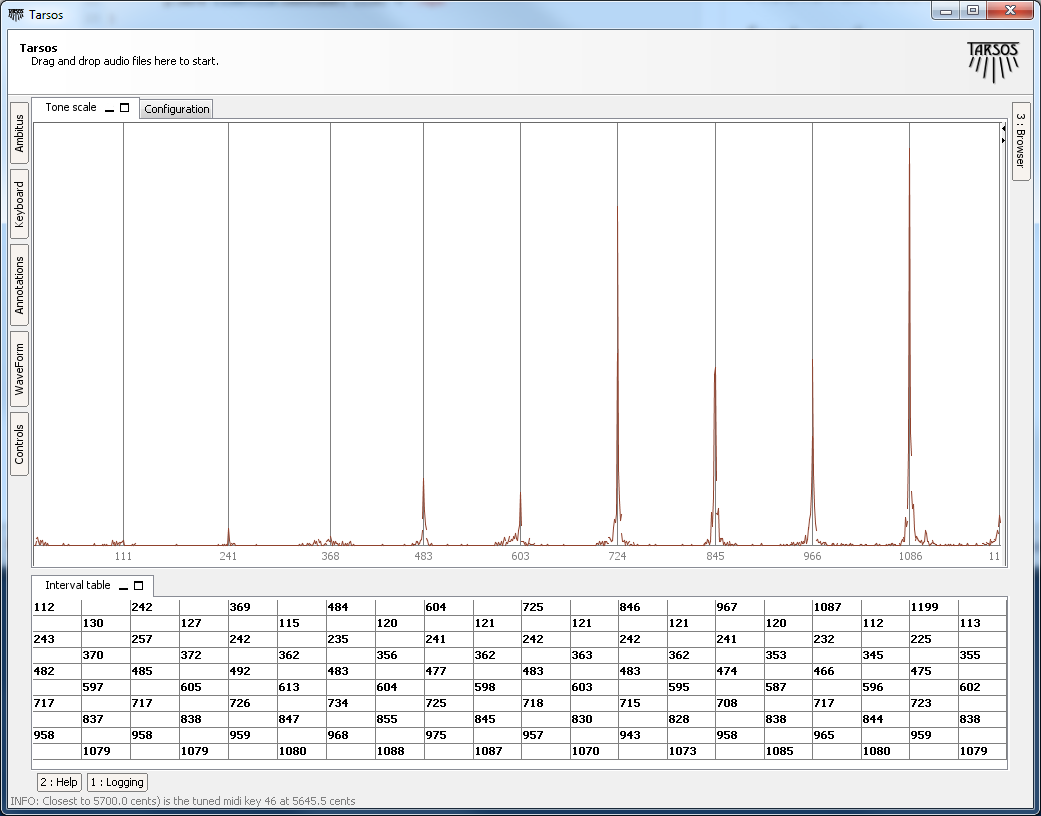
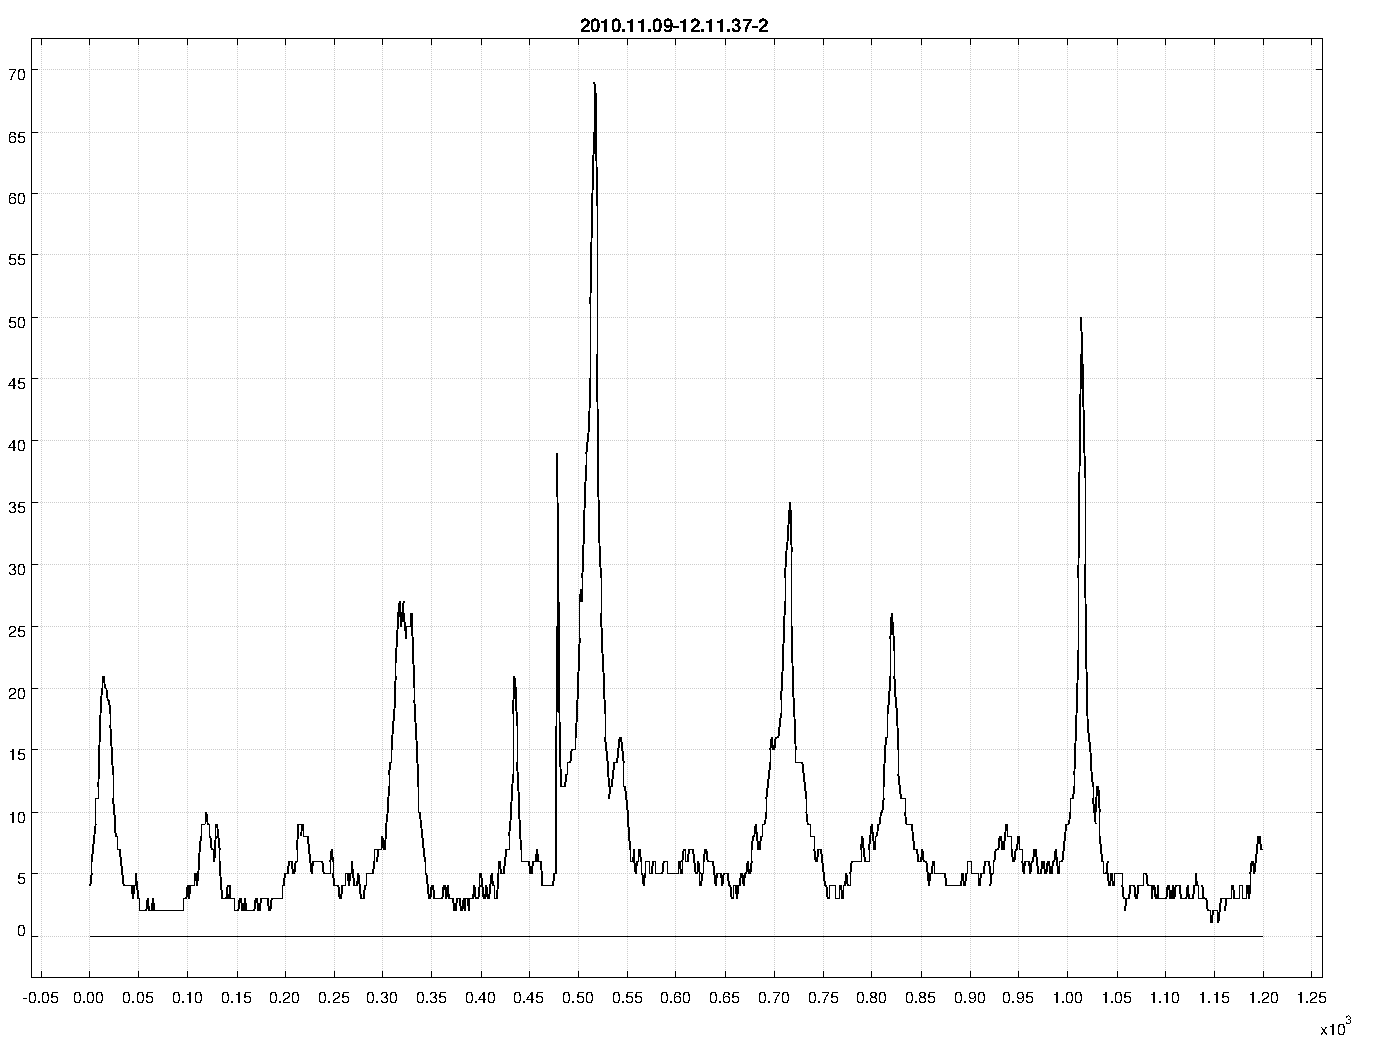
The second example uses functionality that is currently only available trough the API. It takes a MIDI-file and synthesizes it to a wave file using an arbitrary scale. In this case 10-TET. The heavy-work is done by the [Gervill synthesizer](https://gervill.dev.java.net/). The resulting file is available for download, micro---macro?---tonal Bach is great: "BWV 1013 in 10-TET":\[BWV_1013_10-TET.mp3\]. The result of "an analysis with Tarsos on the synthesized audio":\[120.png\] clearly shows an interval of 120 cents with some deviations.
\`\`\`ruby\
import java.io.File\
import be.hogent.tarsos.midi.MidiToWavRenderer\
import be.hogent.tarsos.util.ScalaFile
midiFile = new File("BWV_1013.mid")\
outFile = new File("out.wav")
tuning = \[0,120,240,360,480,600,720,840,960,1080\] as double \[\]
MidiToWavRenderer renderer\
renderer = new MidiToWavRenderer()\
renderer.setTuning(tuning)\
renderer.createWavFile(midiFile, outFile)\
\`\`\`
An extended version of this second example script could be used to generate a dataset with audio and corresponding tone scale information on the fly. The dataset could then be used as a baseline.
The API is not yet well documented and is still in flux or more correctly: superflux. Note to self: I will provide documentation and a number of useful examples when the dust settles down. I'm not even sure if I will stick with Groovy. Scala has a nice Lispy feel to it and seems more developed. Groovy has a less steep learning curve, especially if you have some experience with Ruby. JRuby is also nice but the interoperability with legacy Java looks like an ugly hack.
- [medium.png](https://0110.be/files/attachments/346/medium.png)
- [120.png](https://0110.be/files/attachments/346/120.png)
- [BWV\_1013\_10-TET.mp3](https://0110.be/files/attachments/346/BWV_1013_10-TET.mp3)
---
## [How to Develop for LG GT540 Optimus on Ubuntu](https://0110.be/posts/How_to_Develop_for_LG_GT540_Optimus_on_Ubuntu.md)
- Published: 2010-09-17T00:00:00Z
- Updated: 2013-12-05T18:19:15Z
- Author: Joren
- ID: 312
- Canonical: https://0110.be/posts/How_to_Develop_for_LG_GT540_Optimus_on_Ubuntu
- Tags: [0110.be](https://0110.be/tags/0110.be.md), [Code](https://0110.be/tags/Code.md), [Hackerspace Ghent](https://0110.be/tags/Hackerspace%20Ghent.md)
This post describes a crucial aspect of how to connect an android phone, the LG GT540 Optimus, to an Ubunu Linux computer. The method is probably similar on different UNIX like platforms with different phones.
To recognize the phone when it is connected via usb you need to create an UDEV rule. Create the file `/etc/udev/rules.d/29.lg545.rules` with following contents:
\`\`\`ruby\
SUBSYSTEM\"usb\",ATTRS{idVendor}"1004",ATTRS{idProduct}=="61b4",MODE="0666"\
\`\`\`
On the phone you need to enable debugging using the settings and (this is rather important) make sure that the "mass storage only" setting is disabled.
[Rooting](http://android.modaco.com/content/lg-gt540-optimus-gt540-modaco-com/310737/how-to-root-your-lg-gt540/) the device makes sure you have superuser rights. Installing the android SDK is [well documented](http://developer.android.com/sdk/index.html).
Good luck!
---
## [Static Code Analysis For Java Using Eclipse](https://0110.be/posts/Static_Code_Analysis_For_Java_Using_Eclipse.md)
- Published: 2010-06-03T00:00:00Z
- Updated: 2020-11-17T09:04:00Z
- Author: Joren
- ID: 358
- Canonical: https://0110.be/posts/Static_Code_Analysis_For_Java_Using_Eclipse
- Tags: [Code](https://0110.be/tags/Code.md), [HoGent](https://0110.be/tags/HoGent.md), [Java](https://0110.be/tags/Java.md), [featured](https://0110.be/tags/featured.md)
This post is about the tools I use to keep the source code of [Tarsos](http://0110.be) reasonably clean, consistent and readable. Static code analysis can be of great help if you want to maintain strict coding standards and follow language idioms. Some of the [patterns they can detect for you](http://pmd.sourceforge.net/):
- Dead code - unused variables, parameters, methods
- Suboptimal code - wasteful resource usage
- Overcomplicated expressions - unnecessary if statements, for loops that could be while loops
- Duplicate code - copied/pasted code is a code smell.
- Formatting inconsistencies, e.g. variable modifier order
And even more subtle, but equally important:
- Resource management: is a resource handled (closed) correctly on all possible code paths?
- Abstraction level: is it needed to expose the concrete type of an object or could an (abstract) supertype or even an interface be used instead?
- ...
In a previous life I used .NET and the static code analysis tools FxCop & StyleCop. FxCop operates on bytecode (or intermediate language in .NET parlance) level, StyleCop analyses the source code itself. Tarsos uses JAVA so I looked for JAVA alternatives and found a few.
- PMD & Checkstyle both operate on source code level.
- FindBugs operates on bytecode level.
On freesoftwaremagazine.com there is an [article series on JAVA static code analysis software](http://www.freesoftwaremagazine.com/columns/destroy_annoying_bugs_part_1). It covers PMD and FixBugs and integration in Eclipse. It does not cover Checkstyle. Checkstyle is essentialy the same as PMD but it is better integrated in eclipse: it checks code on save and uses the standard 'Problems' interface, PMD does not.
To fix problems *Eclipse save actions* can save you some time. IBM has an article on [how to keep your code clean using Eclipse](http://www.ibm.com/developerworks/library/os-eclipse-clean/).
Continuous testing is also a really nice thing to have: detecting unexpected behavior while refactoring/programming can prevent unnecessary bug hunts. A [video about immediate feedback using continuous testing](http://improvingworks.com/products/infinitest/) makes this clear.
Another tip is a more philosophical one: making your code and code revisions publicly available makes you think twice before implementing (and subsequently publishing) a quick and dirty hack. Tarsos is available on github.
## References
- [FxCop](http://msdn.microsoft.com/en-us/library/bb429476(VS.80).aspx) & [StyleCop](http://code.msdn.microsoft.com/sourceanalysis)
- [Checkstyle](http://checkstyle.sourceforge.net/)
- [Find bugs](http://findbugs.sourceforge.net/)
- [PDM](http://pmd.sourceforge.net/)
- [Infinitest](http://improvingworks.com/products/infinitest/)
- [Github](http://github.com)


---
## [Doorhacking: Opening a Door With Your Cellphone](https://0110.be/posts/Doorhacking%3A_Opening_a_Door_With_Your_Cellphone.md)
- Published: 2010-04-22T00:00:00Z
- Updated: 2013-12-05T18:19:15Z
- Author: Joren
- ID: 71
- Canonical: https://0110.be/posts/Doorhacking%3A_Opening_a_Door_With_Your_Cellphone
- Tags: [0110.be](https://0110.be/tags/0110.be.md), [Code](https://0110.be/tags/Code.md), [Hackerspace Ghent](https://0110.be/tags/Hackerspace%20Ghent.md), [Projecten](https://0110.be/tags/Projecten.md)
**The problem:** There is a group of people that want access to [Hackerspace Ghent](http://0x20.be) but there is only one remote to open the gate.
**The solution:** Build a system that reacts to a phone call by opening the gate if the number of the caller is whitelisted.
**What you need:**
- A [BeagleBoard](http://beagleboard.org/) or some [BeagleBoard alternative](http://beagleboard.org/breeds) with a Linux distribution running on it. Any server running a unix like operating system should be usable.
- A Huaweii e220 or an alternative GSM that supports (a subset of) AT commands and has a USB port.
- A team of hackers that know how to solder something togeher. E.g. The hardware guys of hackerspace Ghent.
- A "python script":\[gatekeeper.py\] that reacts to calls.
**The Hack**: First of all try to get caller id working by following the [Caller ID with Linux and Huawei e220 tutorial](http://0110.be/artikels/lees/Caller_ID_with_Linux_and_Huawei_e220). If this works you can listen to the serial communication using [pySerial](http://pyserial.sourceforge.net/) and react to a call. The following python code shows the wait for call method:
\`\`\`ruby\
def wait_for_call(self):\
self.data_channel.open()\
call_id_pattern = re.compile('.**CLIP.**"\\+(\[0-9\]+)",.\*')\
while True:\
bytes = self.data_channel.inWaiting()\
buffer = self.data_channel.readline(bytes)\
call_id_match = call_id_pattern.match(buffer)\
if call_id_match:\
number = call_id_match.group(1)\
self.handle_call(number)\
\`\`\`
The `handle_call` method ... handles the call.
The second thing that is needed is [a way to send a signal from the beagle board](http://blog.makezine.com/archive/2009/02/blinking_leds_with_the_beagle_board.html) to the remote. Sending a signal from the beagle board using Linux is really simple. The following bash commands initialize, activate and deactivate a pin.
\`\`\`ruby\
echo 168 \> /sys/class/gpio/export\
echo "high" \> /sys/class/gpio/gpio168/direction\
echo "low" \> /sys/class/gpio/gpio168/direction\
\`\`\`
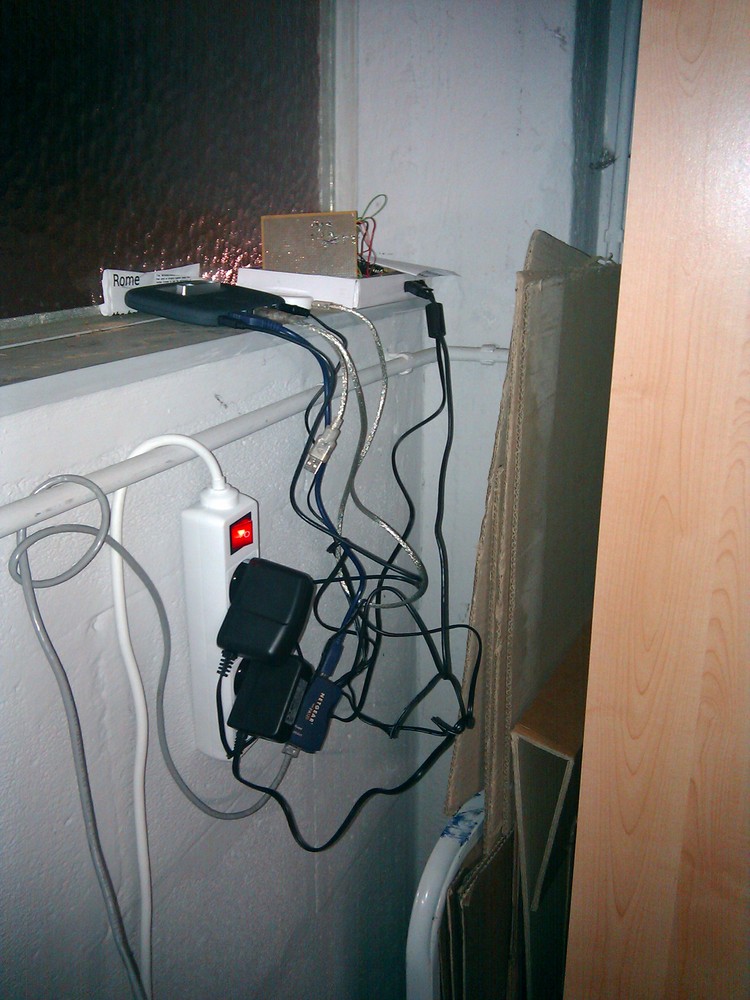
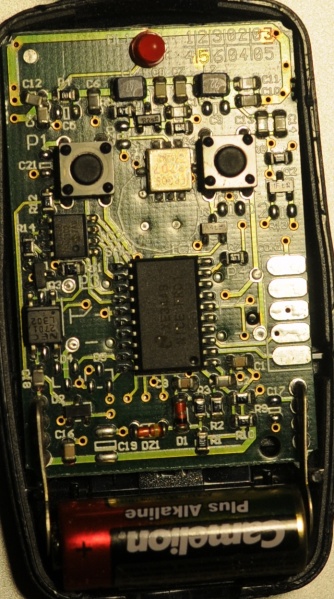
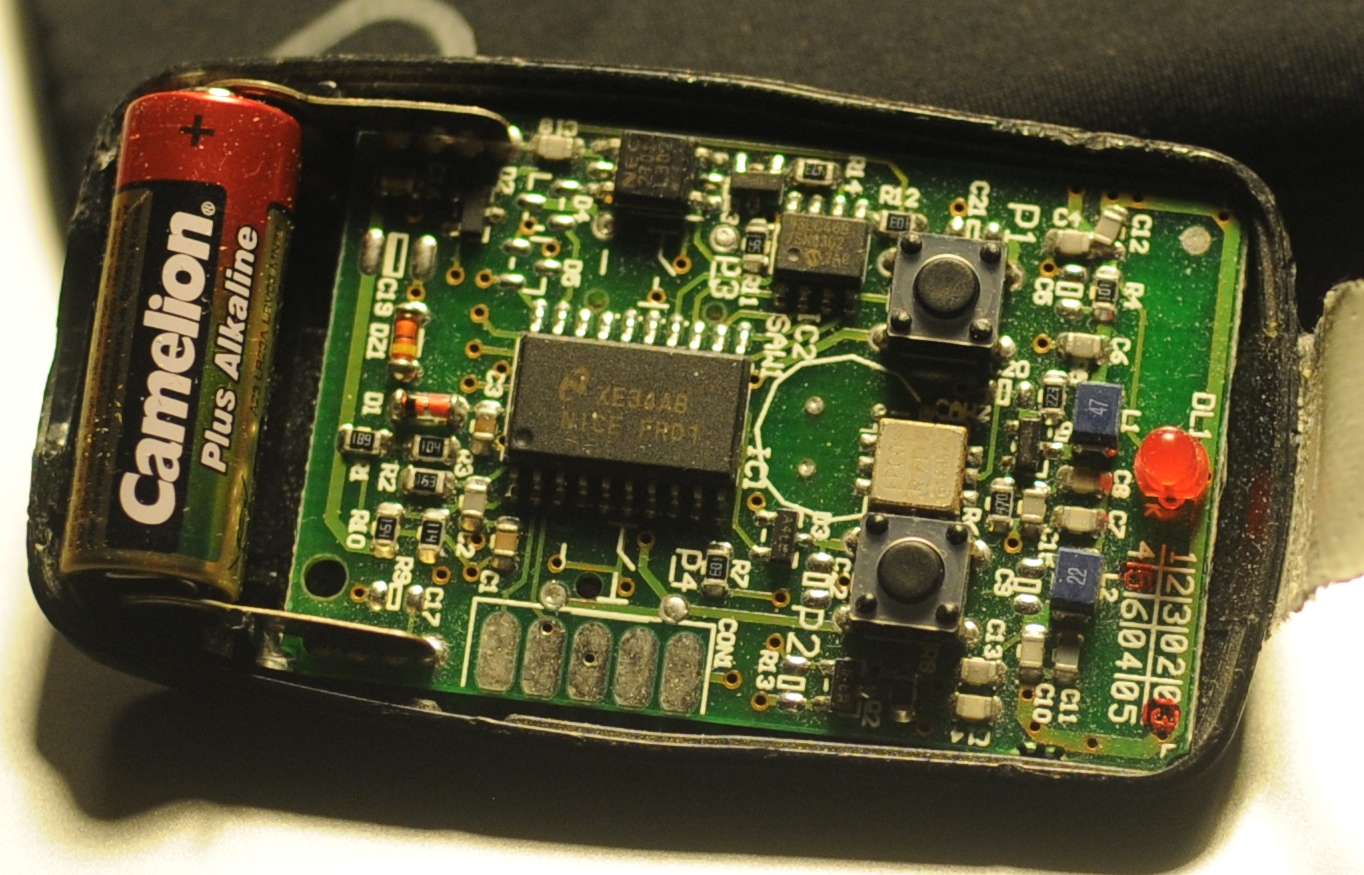
- [gatekeeper.py](https://0110.be/files/attachments/71/gatekeeper.py)
---
## [Tarsos Spectrogram](https://0110.be/posts/Tarsos_Spectrogram.md)
- Published: 2010-04-13T14:02:33Z
- Updated: 2013-12-05T18:19:15Z
- Author: Joren
- ID: 348
- Canonical: https://0110.be/posts/Tarsos_Spectrogram
- Tags: [Code](https://0110.be/tags/Code.md), [Computational ethnomusicology](https://0110.be/tags/Computational%20ethnomusicology.md), [HoGent](https://0110.be/tags/HoGent.md), [Java](https://0110.be/tags/Java.md), [Music Information Retrieval](https://0110.be/tags/Music%20Information%20Retrieval.md), [Tarsos](https://0110.be/tags/Tarsos.md)
Today I created a spectrogram application using Tarsos. The application listens to an audio input, computes an FFT and at the same time calculates pitch. The expected pitch is overlaid on the spectrogram. All this happens real-time and is implemented using JAVA.
This is the most recent version of the [spectrogram implementation in java](http://github.com/JorenSix/Tarsos/blob/master/src/be/hogent/tarsos/ui/Spectrogram.java).
\`\`\`java\
float pitch = Yin.processBuffer(buffer, (float) sampleRate);\
fft.transform(buffer);\
double maxAmplitude = 0;\
for (int j = 0; j \< buffer.length / 2; j) {\
double amplitude = buffer\[j\] \* buffer\[j\] + buffer\[j +\
buffer.length/2\] \* buffer\[j+ buffer.length/2\];\
amplitude = Math.pow(amplitude, 0.5);\
colorIndexes\[j\] = amplitude;\
maxAmplitude = Math.max(amplitude, maxAmplitude);\
}\
\`\`\`
If you want to test it yourself download the "spectrogram jar package":\[spectrogram.jar\] and execute:
\`\`\`ruby\
java -jar spectrogram.jar\
\`\`\`
- [spectrum.png](https://0110.be/files/attachments/348/spectrum.png)
- [spectrogram.jar](https://0110.be/files/attachments/348/spectrogram.jar)
---
## [Caller ID with Linux and Huawei e220](https://0110.be/posts/Caller_ID_with_Linux_and_Huawei_e220.md)
- Published: 2010-04-11T00:00:00Z
- Updated: 2013-12-05T18:19:15Z
- Author: Joren
- ID: 49
- Canonical: https://0110.be/posts/Caller_ID_with_Linux_and_Huawei_e220
- Tags: [0110.be](https://0110.be/tags/0110.be.md), [Code](https://0110.be/tags/Code.md), [Hackerspace Ghent](https://0110.be/tags/Hackerspace%20Ghent.md), [Projecten](https://0110.be/tags/Projecten.md)
This is the scenario: you have a Huawei e220, a linux computer and you want to react to a call from a set of predefined numbers. E.g. [ordering a pizza](https://0110.be/artikels/lees/Order_Pizza_with_USB_Pizza_Button) when you receive a call from a certain number.
The Huawei e220 supports a subset of the [AT commands](http://en.wikipedia.org/wiki/AT_commands), which subset is [an enterprise secret](http://forum.huawei.com/jive4/thread.jspa?threadID=324487) of te Huawei company. So there is no documentation available for the device I bought, thanks Huawei. Anyhow when you attach the e220 to a Linux machine you should get two serial ports:
\`\`\`ruby\
/dev/ttyUSB0\
/dev/ttyUSB1\
\`\`\`
To connect to the devices you can use a serial client. [GNU Screen](http://www.gnu.org/software/screen/) can be used as a serial client like this: `screen /dev/ttyUSB0 115200`. The first device, `ttyUSB0` is used to control `ttyUSB1`, so to enable caller ID on te Huawei e220 you need to send this message to `ttyUSB0`:
\`\`\`ruby\
AT+CLIP=1\
\`\`\`
To check for calls you should listen to `ttyUSB1`. A serial session for `ttyUSB1` looks like:
\`\`\`ruby\
\^BOOT:44594282,0,0,0,6\
\^RSSI:18\
RING\
+CLIP: "+33499311152",145,,,,0\
\^BOOT:44594282,0,0,0,6\
\`\`\`
The `RING` and `CLIP` messages are the most interesting. The `RING` signifies an incoming call, the `CLIP` is the caller ID. The `BOOT` and `RSSI` are some kind of ping messages. The following Python script demonstrates a complete session that enables caller ID, waits for a phone call and prints the number of the caller.
\`\`\`python\
#!/usr/bin/env python\
import serial, re
command_channel = serial.Serial(\
port='/dev/ttyUSB0',\
baudrate=115200,\
parity=serial.PARITY_NONE,\
stopbits=serial.STOPBITS_ONE,\
bytesize=serial.EIGHTBITS\
)\
command_channel.open()\
#enable caller id\
command_channel.write("AT+CLIP=1" + "\\r\\n")\
command_channel.close()
ser = serial.Serial(\
port='/dev/ttyUSB1',\
baudrate=9600,\
parity=serial.PARITY_NONE,\
stopbits=serial.STOPBITS_ONE,\
bytesize=serial.EIGHTBITS\
)
ser.open()
pattern = re.compile('.**CLIP.**"\\+(\[0-9\]+)",.\*')
while 1:\
buffer = ser.read(ser.inWaiting()).strip()\
buffer = buffer.replace("\\n","")\
match = pattern.match(buffer)\
if match:\
number = match.group(1)\
print number\
\`\`\`
---
## [YIN Pitch Tracker in JAVA](https://0110.be/posts/YIN_Pitch_Tracker_in_JAVA.md)
- Published: 2010-04-09T00:00:00Z
- Updated: 2020-11-17T09:04:25Z
- Author: Joren
- ID: 66
- Canonical: https://0110.be/posts/YIN_Pitch_Tracker_in_JAVA
- Tags: [0110.be](https://0110.be/tags/0110.be.md), [Code](https://0110.be/tags/Code.md), [Cultuur](https://0110.be/tags/Cultuur.md), [Muziek](https://0110.be/tags/Muziek.md), [Projecten](https://0110.be/tags/Projecten.md)
To make [Tarsos](http://0110.be/) more portable I wrote a pitch tracker in pure JAVA using the [YIN algorithm](http://recherche.ircam.fr/equipes/pcm/cheveign/ps/2002_JASA_YIN_proof.pdf) based on the implementation in C of [aubio](http://aubio.org). The implementation also uses some code written by Karl Helgasson and Teun de Lange of the [Jazzperiments project](http://www.jazzperiments.com/jazzperiments.html).
It can be used to perform real time pitch detection or to analyse files. To use it as a real time pitch detector just start the "JAR-file":\[pitch_detector_yin.jar\] by double clicking. To analyse a file execute one of the following. The first results in a list of annotations (text), the second shows the annotations graphically.
\`\`\`ruby\
java -jar pitch_detector_yin.jar flute.novib.mf.C5B5.wav\
java -jar pitch_detector_yin.jar ---file flute.novib.mf.C5B5.wav\
\`\`\`
The provided "flute sample":\[flute.novib.mf.C5B5.wav\] is from [*The Musical Samples* library of the University of Iowa](http://theremin.music.uiowa.edu/MIS.html) and converted to mono wav. The source code of the pitch tracker can be found below.
**Update:** the Yin implementation in Java has been incorporated into the [TarsosDSP project](https://github.com/JorenSix/TarsosDSP). An open source, Real-Time Audio Processing Framework in Java.
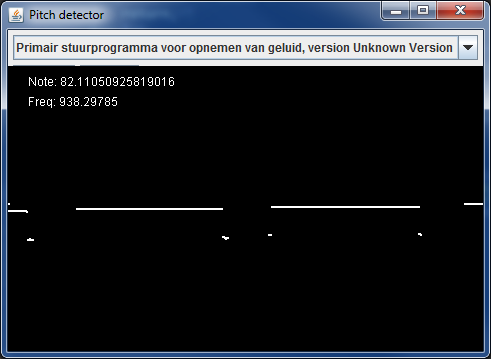
- [pitch\_detector\_yin.jar](https://0110.be/files/attachments/66/pitch_detector_yin.jar)
- [pitch\_detector\_yin\_src.zip](https://0110.be/files/attachments/66/pitch_detector_yin_src.zip)
- [flute.novib.mf.C5B5.wav](https://0110.be/files/attachments/66/flute.novib.mf.C5B5.wav)
---
## [Tarsos on GitHub](https://0110.be/posts/Tarsos_on_GitHub.md)
- Published: 2010-03-16T15:14:34Z
- Updated: 2013-12-05T18:19:15Z
- Author: Joren
- ID: 347
- Canonical: https://0110.be/posts/Tarsos_on_GitHub
- Tags: [Code](https://0110.be/tags/Code.md), [Computational ethnomusicology](https://0110.be/tags/Computational%20ethnomusicology.md), [HoGent](https://0110.be/tags/HoGent.md), [Java](https://0110.be/tags/Java.md), [Tarsos](https://0110.be/tags/Tarsos.md), [featured](https://0110.be/tags/featured.md)
The JAVA software program we are developing is called Tarsos and can now be found on [GitHub](http://github.com/JorenSix/Tarsos). GitHub is a web-based hosting service for projects that use the Git version control system.
Currently Tarsos is a collection of Java classes to create, compare and process pitch-frequency data using histograms. In it's current state it is not usable for end-users.
### Credits
Tarsos is developed at [University College Ghent, Faculty of Music](http://cons.hogent.be) and uses a number of open source libraries:
- [Gervill](https://gervill.dev.java.net/): a software sound synthesizer, supports the MIDI Tuning Standard. [API](https://gervill.dev.java.net/nonav/javadoc/index.html).
- [Jave](http://www.sauronsoftware.it/projects/jave/): a wrapper for [ffmpeg](http://ffmpeg.org/).
- [Apache Commons Math](http://commons.apache.org/math/): a library of lightweight, self-contained mathematics and statistics components [API](http://people.cs.ubc.ca/~kvdoel/jass/doc/index.html).
- [JASS](http://people.cs.ubc.ca/~kvdoel/jass/): a unit generator based audio synthesis programming environment. [API](http://people.cs.ubc.ca/~kvdoel/jass/doc/index.html).
- [Java-getopt](http://www.urbanophile.com/~arenn/hacking/download.html): a port of the GNU getopt family of functions. [API](http://www.urbanophile.com/~arenn/hacking/getopt/Package-gnu.getopt.html).
- [Ptplot](http://ptolemy.berkeley.edu/java/ptplot5.7/ptolemy/plot/doc/index.htm) a 2D plotting library. [API](http://ptolemy.berkeley.edu/java/ptplot5.7/doc/codeDoc/index.html).
---
## [Boids 3D with Processing](https://0110.be/posts/Boids_3D_with_Processing.md)
- Published: 2010-01-22T00:00:00Z
- Updated: 2013-12-05T18:19:14Z
- Author: Joren
- ID: 1
- Canonical: https://0110.be/posts/Boids_3D_with_Processing
- Tags: [0110.be](https://0110.be/tags/0110.be.md), [Code](https://0110.be/tags/Code.md), [Portfolio](https://0110.be/tags/Portfolio.md), [Projecten](https://0110.be/tags/Projecten.md)
- [boids\_windows.zip](https://0110.be/files/attachments/1/boids_windows.zip)
- [boids.png](https://0110.be/files/attachments/1/boids.png)
- [boids\_macosx.zip](https://0110.be/files/attachments/1/boids_macosx.zip)
- [boids\_linux.zip](https://0110.be/files/attachments/1/boids_linux.zip)
- [boids\_src.zip](https://0110.be/files/attachments/1/boids_src.zip)
- [peasycam.jar](https://0110.be/files/attachments/1/peasycam.jar)
- [Boids.jar](https://0110.be/files/attachments/1/Boids.jar)
- [core.jar](https://0110.be/files/attachments/1/core.jar)
- [loading.gif](https://0110.be/files/attachments/1/loading.gif)
---
## [Order Pizza with USB Pizza Button](https://0110.be/posts/Order_Pizza_with_USB_Pizza_Button.md)
- Published: 2009-11-11T00:00:00Z
- Updated: 2013-12-05T18:19:15Z
- Author: Joren
- ID: 188
- Canonical: https://0110.be/posts/Order_Pizza_with_USB_Pizza_Button
- Tags: [0110.be](https://0110.be/tags/0110.be.md), [Code](https://0110.be/tags/Code.md), [Hackerspace Ghent](https://0110.be/tags/Hackerspace%20Ghent.md), [Poging tot humor](https://0110.be/tags/Poging%20tot%20humor.md), [Projecten](https://0110.be/tags/Projecten.md)
Recently I bought a big shiny red USB-button. It is big, red and shiny. Initially I planned to use it to deploy new versions of websites to a server but I found a much better use: *ordering pizza*. Graphically the use case translates to something akin to:
If you would like to enhance your life quality leveraging the power of a USB pizza-button: you can! This is what you need:
1. A PC running Linux. This tutorial is specifically geared towards Debian-based distos. YMMV.
2. A big, shiny red USB button. Just google "USB panic button" if you want one.
3. A location where you can order pizzas via a website. I live in Ghent, Belgium and use just-eat.be. Other websites can be supported by modifying a Ruby script.
Technically we need **a driver** to check when the button was pushed, a way to **communicate** the fact that the button was pushed and lastly we need to be able to **react** to the request.
**The driver**: on the internets I found [a driver for the button](http://www.aeracode.org/2009/1/22/panic-button/). Another modification was done to make the driver process a daemon.
**The communication**: The original Python script executed another script on the local pc. A more flexible approach is possible using sockets. With sockets it is possible to notify any computer on a network.
\`\`\`ruby\
if PanicButton().pressed():\
\# create a TCP socket\
s = socket.socket(socket.AF_INET, socket.SOCK_STREAM)\
\# connect to server on the port\
s.connect((SERVER, SERVER_TCP_PORT))\
\# send the order (margherita at restaurant mario)\
s.send("mario: \[margherita_big\]\\n")\
\`\`\`
**The reaction**: a ruby TCP server waits for message from the driver. When it does it automates a HTTP session on a website. It executes a series of HTTP-GET's and POST's. It uses the [mechanize library](http://mechanize.rubyforge.org/mechanize/).
\`\`\`ruby\
login_url = "http://www.just-eat.be/pages/member/login.aspx"\
a = WWW::Mechanize.new\
a.get(login_url) do \|login_page\|\
#post login_form\
login_form = login_page.forms.first\
login_form.txtUser = "username"\
login_form.txtPass = "password"\
a.submit(login_form, login_form.buttons\[1\])\
end\
\`\`\`
Some libraries are needed. For python you need the usb library, the [python deamons lib](http://pypi.python.org/pypi/python-daemon/) needs to be installed seperatly. Setuptools are needed to install the deamons package.
\`\`\`ruby\
sudo apt-get install python-usb python-setuptools\
\`\`\`
Ruby needs rubygems to install the needed mechanize and daemons library. Mechanize needs the libxslt-dev package. You also need the build-essential package to build mechanize.
\`\`\`ruby\
sudo apt-get install rubygems libxslt-dev\
sudo gem install mechanize daemons\
\`\`\`
To automatically start the daemons on boot you can use the [crontab \@reboot directive](http://mkaz.com/ref/unix_cron.html) of the root user. E.g.:
\`\`\`ruby\
`reboot /opt/pizza_service/pizza_daemon.rb
`reboot /opt/pizza_service/pizza_button_driver.py\
\`\`\`
- [order\_pizza\_with\_panic\_button.jpg](https://0110.be/files/attachments/188/order_pizza_with_panic_button.jpg)
- [pizza\_daemon.rb.txt](https://0110.be/files/attachments/188/pizza_daemon.rb.txt)
- [pizza\_server.rb](https://0110.be/files/attachments/188/pizza_server.rb)
- [usb-panic-button.png](https://0110.be/files/attachments/188/usb-panic-button.png)
- [pizza\_button\_driver.py](https://0110.be/files/attachments/188/pizza_button_driver.py)
---
## [Touchatag RFID reader and Ubuntu Linux](https://0110.be/posts/Touchatag_RFID_reader_and_Ubuntu_Linux.md)
- Published: 2009-10-05T00:00:00Z
- Updated: 2013-12-05T18:19:15Z
- Author: Joren
- ID: 56
- Canonical: https://0110.be/posts/Touchatag_RFID_reader_and_Ubuntu_Linux
- Tags: [0110.be](https://0110.be/tags/0110.be.md), [Code](https://0110.be/tags/Code.md), [Harde waren](https://0110.be/tags/Harde%20waren.md), [Projecten](https://0110.be/tags/Projecten.md)

This blog post is about how to use the [Touchatag](http://www.touchatag.com) RFID reader hardware on Ubuntu Linux without using the Touchatag web service.
An RFID reader with tags can used to fire events. With a bit of scripting the events can be handled to do practically any task.
Normally a Touchatag reader is used together with the [Touchatag web service](http://www.touchatag.com/developer/tools/advanced-http-application) but for some RFID applications the web service is just not practical. E.g. for embedded Linux devices without an Internet connection. In this tutorial I wil document how I got the Touchatag hardware working under Ubuntu Linux.
To follow this tutorial you will need:
- Touchatag hardware: the USB reader and some tags
- A Ubuntu Linux computer (I tested 9.10 Karmic Koala and 8.04 )
- SVN to download source code from a repository
The touchatag USB reader works at 13.56MHz (High Frequency RFID) and has a readout distance of about 4 cm (1.5 inch) when used with the touchatag RFID tags. Internally it uses an ACS ACR122U reader with a SAM card. A Linux driver is readily available so when you plug it in `lsusb` you should get something like this:
\`\`\`ruby\
lsusb
Bus 007 Device 001: ID 1d6b:0001 Linux Foundation 1.1 root hub\
Bus 005 Device 004: ID 072e:90dd Advanced Card Systems, Ltd\
\`\`\`
lsusb recognizes the device incorrectly but that's [not a problem](http://code.google.com/p/tageventor/wiki/SupportedReadersAndTags). To read RFID-tags and respond to events additional software is needed: [tagEventor](http://code.google.com/p/tageventor/) is a software library that does just that. It can be downloaded using an svn command:
\`\`\`ruby\
svn export http://tageventor.googlecode.com svn/trunk/ tageventor\
\`\`\`
To compile tagEventor a couple of other software packages or header files should be available on your system. Te [tagEventor software dependencies](http://code.google.com/p/tageventor/wiki/SoftwareDependencies) are described on the [tagEventor wiki](http://code.google.com/p/tageventor/w/list). On Ubuntu (and possibly other Debian based distro's the installation is simple:
\`\`\`ruby\
sudo aptitude install build-essential libpcsclite-dev build-essential pcscd libccid\
#if you need gnome support\
#sudo aptitude install libgtk2.0-dev\
\`\`\`
Now the tricky part. Two header files of the pcsclite package need to be modified (update: this bug is fixed [see here](http://code.google.com/p/tageventor/issues/detail?id=2)). tagEventor builds and can be installed:
\`\`\`ruby\
cd tageventor\
make\
...\
tagEventor BUILT (./bin/Release/tagEventor)
sudo ./install.sh\
...\
\`\`\`
When tagEventor is correctly installed the only thing left is ... to build your application. When an event is fired tagEventor executes the `/etc/tageventor/generic` script with three parameters (see below). Using some kind of [IPC (Inter Process Communication)](http://en.wikipedia.org/wiki/Inter-process_communication) an application can react to events. A simple and flexible way to propagate events (inter-processes, over a network, platform and programming language independent) uses sockets. The code below is the `/etc/tageventor/generic` script (make sure it is executable), it communicates with the server: the second script. To run the server execute `ruby /name/of/server.rb`
\`\`\`ruby\
#!/usr/bin/ruby
1. \$1 = SAM (unique ID of the SAM chip in the smart card reader if exists, "NoSAM" otherwise
2. \$2 = UID (unique ID of the tag, as later we may use wildcard naming)
3. \$3 = Event Type (IN for new tag placed on reader, OUT for tag removed from reader)
require 'socket'
data = ARGV.join('\|')\
puts data
streamSock = TCPSocket.new( "127.0.0.1", 20000 )\
streamSock.send(data, 0)\
streamSock.close\
\`\`\`
\`\`\`ruby\
require "socket"\
dts = TCPServer.new('localhost', 20000)\
loop do\
Thread.start(dts.accept) do \|s\|\
puts s.gets\
s.close\
end\
end\
\`\`\`
The tagEventor software is made by [the Autelic Association](http://www.autelic.org/) a Non-Profit association dedicated to making technology easier to use for all. I would like to thank Andrew Mackenzie, the founder and president of the association for creating the software and the support.
---
[Newer posts](https://0110.be/Software.md?page=1)
[Older posts](https://0110.be/Software.md?page=3)
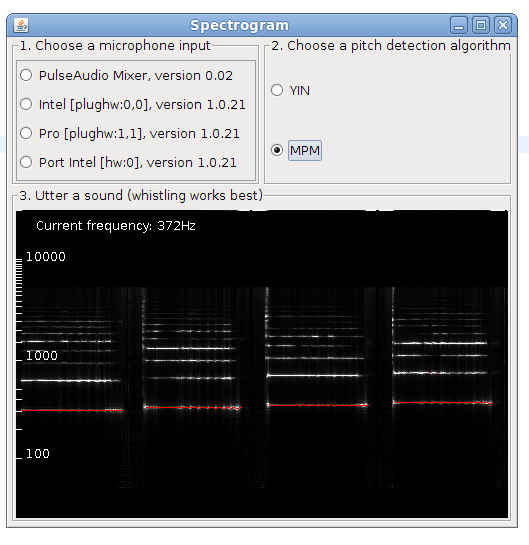
 Tarsos contains a couple of useful command line applications. They can be used to execute common tasks on lots of files. [Dowload Tarsos](http://tarsos.0110.be/attachment/tarsos.jar) and call the applications using the following format:
`java -jar tarsos.jar command [argument...] [--option [value]...]`
The first part `java -jar tarsos.jar` tells the Java Runtime to start the correct application. The first argument for Tarsos defines the command line application to execute. Depending on the command, required arguments and options can follow.
`java -jar tarsos.jar detect_pitch in.wav --detector TARSOS_YIN`
To get a list of available commands, type `java -jar tarsos.jar -h`. If you want more information about a command type `java -jar tarsos.jar command -h`
## Detect Pitch
Detects pitch for one or more input audio files using a pitch detector. If a directory is given it traverses the directory *recursively*. It writes CSV data to standard out with five columns. The first is the start of the analyzed window (seconds), the second the estimated pitch, the third the saillence of the pitch. The name of the algorithm follows and the last column shows the original filename.
Synopsis
--------
java -jar tarsos.jar detect_pitch [option] input_file...
Option Description
------ -----------
-?, -h, --help Show help
--detector
Tarsos contains a couple of useful command line applications. They can be used to execute common tasks on lots of files. [Dowload Tarsos](http://tarsos.0110.be/attachment/tarsos.jar) and call the applications using the following format:
`java -jar tarsos.jar command [argument...] [--option [value]...]`
The first part `java -jar tarsos.jar` tells the Java Runtime to start the correct application. The first argument for Tarsos defines the command line application to execute. Depending on the command, required arguments and options can follow.
`java -jar tarsos.jar detect_pitch in.wav --detector TARSOS_YIN`
To get a list of available commands, type `java -jar tarsos.jar -h`. If you want more information about a command type `java -jar tarsos.jar command -h`
## Detect Pitch
Detects pitch for one or more input audio files using a pitch detector. If a directory is given it traverses the directory *recursively*. It writes CSV data to standard out with five columns. The first is the start of the analyzed window (seconds), the second the estimated pitch, the third the saillence of the pitch. The name of the algorithm follows and the last column shows the original filename.
Synopsis
--------
java -jar tarsos.jar detect_pitch [option] input_file...
Option Description
------ -----------
-?, -h, --help Show help
--detector 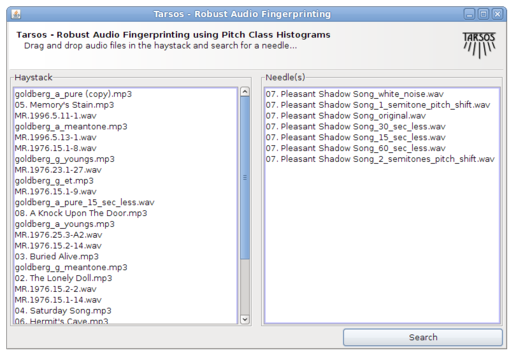
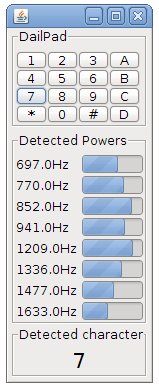 The DSP library of Tarsos, aptly named TarsosDSP, now contains an implementation of the Goertzel Algorithm. It is implemented using pure Java.
The [Goertzel algorithm](http://en.wikipedia.org/wiki/Goertzel_algorithm) can be used to detect if one or more predefined frequencies are present in a signal and it does this very efficiently. One of the classic applications of the Goertzel algorithm is decoding the tones generated on by touch tone telephones. These use [DTMF (Dual tone multi frequency)-signaling](http://en.wikipedia.org/wiki/Dual-tone_multi-frequency_signaling).
To make the algorithm visually appealing a Java Swing interface has been created(visible right). You can try this application by running the "Goertzel DTMF Jar-file":\[GoertzelDTMF.jar\]. The souce code is included in the jar and is avaliable as a separate "zip file":\[GoertzelDTMF_src.zip\]. The [TarsosDSP github page](https://github.com/JorenSix/TarsosDSP) also contains the source for the [Goertzel algorithm Java implementation](https://github.com/JorenSix/TarsosDSP/blob/master/src/be/hogent/tarsos/dsp/pitch/Goertzel.java).


- [goertzel\_DTMF\_java\_7.png](https://0110.be/files/attachments/343/goertzel_DTMF_java_7.png)
- [GoertzelDTMF.jar](https://0110.be/files/attachments/343/GoertzelDTMF.jar)
- [GoertzelDTMF\_src.zip](https://0110.be/files/attachments/343/GoertzelDTMF_src.zip)
---
## [PeachNote Piano at the ISMIR 2011 demo session](https://0110.be/posts/PeachNote_Piano_at_the_ISMIR_2011_demo_session.md)
- Published: 2011-09-26T07:32:02Z
- Updated: 2013-12-05T18:19:15Z
- Author: Joren
- ID: 340
- Canonical: https://0110.be/posts/PeachNote_Piano_at_the_ISMIR_2011_demo_session
- Tags: [Code](https://0110.be/tags/Code.md), [Computational musicology](https://0110.be/tags/Computational%20musicology.md), [HoGent](https://0110.be/tags/HoGent.md), [ISMIR](https://0110.be/tags/ISMIR.md), [Music Information Retrieval](https://0110.be/tags/Music%20Information%20Retrieval.md), [PeachNote Piano](https://0110.be/tags/PeachNote%20Piano.md), [Presentation](https://0110.be/tags/Presentation.md), [Research papers](https://0110.be/tags/Research%20papers.md)
The DSP library of Tarsos, aptly named TarsosDSP, now contains an implementation of the Goertzel Algorithm. It is implemented using pure Java.
The [Goertzel algorithm](http://en.wikipedia.org/wiki/Goertzel_algorithm) can be used to detect if one or more predefined frequencies are present in a signal and it does this very efficiently. One of the classic applications of the Goertzel algorithm is decoding the tones generated on by touch tone telephones. These use [DTMF (Dual tone multi frequency)-signaling](http://en.wikipedia.org/wiki/Dual-tone_multi-frequency_signaling).
To make the algorithm visually appealing a Java Swing interface has been created(visible right). You can try this application by running the "Goertzel DTMF Jar-file":\[GoertzelDTMF.jar\]. The souce code is included in the jar and is avaliable as a separate "zip file":\[GoertzelDTMF_src.zip\]. The [TarsosDSP github page](https://github.com/JorenSix/TarsosDSP) also contains the source for the [Goertzel algorithm Java implementation](https://github.com/JorenSix/TarsosDSP/blob/master/src/be/hogent/tarsos/dsp/pitch/Goertzel.java).


- [goertzel\_DTMF\_java\_7.png](https://0110.be/files/attachments/343/goertzel_DTMF_java_7.png)
- [GoertzelDTMF.jar](https://0110.be/files/attachments/343/GoertzelDTMF.jar)
- [GoertzelDTMF\_src.zip](https://0110.be/files/attachments/343/GoertzelDTMF_src.zip)
---
## [PeachNote Piano at the ISMIR 2011 demo session](https://0110.be/posts/PeachNote_Piano_at_the_ISMIR_2011_demo_session.md)
- Published: 2011-09-26T07:32:02Z
- Updated: 2013-12-05T18:19:15Z
- Author: Joren
- ID: 340
- Canonical: https://0110.be/posts/PeachNote_Piano_at_the_ISMIR_2011_demo_session
- Tags: [Code](https://0110.be/tags/Code.md), [Computational musicology](https://0110.be/tags/Computational%20musicology.md), [HoGent](https://0110.be/tags/HoGent.md), [ISMIR](https://0110.be/tags/ISMIR.md), [Music Information Retrieval](https://0110.be/tags/Music%20Information%20Retrieval.md), [PeachNote Piano](https://0110.be/tags/PeachNote%20Piano.md), [Presentation](https://0110.be/tags/Presentation.md), [Research papers](https://0110.be/tags/Research%20papers.md)
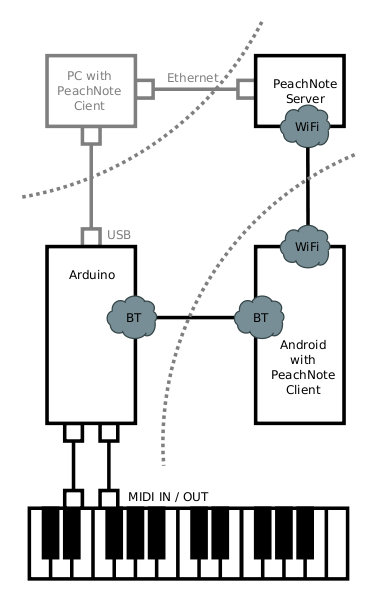 The extended abstract about PeachNote Piano has been accepted as a demonstration presentation to appear at the ISMIR (International Society for Music Information Retrieval) 2011 conference in Miami. To know more about PeachNote Piano come see us at our demo stand (during the [Late Breaking and Demo Session](http://ismir2011.ismir.net/program2011.html#demo)) or read the paper: "Peachnote Piano: Making MIDI instruments social and smart using Arduino, Android and Node.js":\[PeachNote_Piano_ISMIR_Demo.pdf\]. What follows here is the introduction of the extended abstract:
 While working on a Latex document with several collaborators some problems arise:
- Who has the latest version of the TeX-files?
- Which LaTeX distributions are in use (MiKTeX, LiveTex,...)
- Are all [LaTeX packages](http://en.wikibooks.org/wiki/LaTeX/Packages) correctly installed on each computer?
- Why is the bibliography, generated with BiBTeX, not included or incomplete?
- How does the final PDF look like when it is build by one of the collaborators, with a different LaTeX distribution?
Especially installing and maintaining LaTeX distributions on different platforms (Mac OS X, Linux, Windows) in combination with a lot of LaTeX packages can be challenging. This blog post presents a way to deal with these problems.
### Solution
The solution proposed here uses a build-server. The server is responsible for compiling the LaTeX source files and creating a PDF-file when the source files are modified. The source files should be available on the server should be in sync with the latest versions of the collaborators. Also the new PDF-file should be distributed. The syncing and distribution of files is done using a Dropbox install. Each author installs a Dropbox share (available on all platforms) which is also installed on the server. When an author modifies a file, this change is propagated to the server, which, in turn, builds a PDF and sends the resulting file back. This has the following advantages:
- Everyone always has the latest version of files;
- Only one LaTeX install needs to be maintained (on the server);
- The PDF is the same for each collaborator;
- You can modify files on every platform with Dropbox support (Linux, Mac OS X, Windows) and even smartphones;
- Compiling a large LaTeX file can be computationally intensive, a good task for a potentially beefy server.
### Implementation
The implementation of this is done with a couple of bash-scripts running on Ubuntu Linux. LaTeX compilation is handeled by the LiveTeX distribution. The first script `compile.bash` handles compilation in multiple stages: the cross referencing and BiBTeX bibliography need a couple of runs to get everything right.
\`\`\`ruby\
#!/bin/bash\
#first iteration: generate aux file\
pdflatex -interaction=nonstopmode ---src-specials article.tex\
#run bibtex on the aux file\
bibtex article.aux\
#second iteration: include bibliography\
pdflatex -interaction=nonstopmode ---src-specials article.tex\
#third iteration: fix references\
pdflatex -interaction=nonstopmode ---src-specials article.tex\
#remove unused files\
rm article.aux article.bbl article.blg article.out\
\`\`\`
The second script `watcher.bash` is more interesting. It watches the Dropbox directory for changes (only in .tex-files) using the efficient inotify library. If a modification is detected the compile script (above) is executed.
\`\`\`ruby\
#!/bin/bash\
directory=/home/user/Dropbox/article/\
#recursivly watch te directory\
while inotifywait -r \$directory; do\
#find all files changed the last minute that match tex\
#if there are matches then do something...\
if find \$directory -mmin --1 \| grep tex; then\
#tex files changed =\> recompile\
echo "Tex file changed... compiling"\
/bin/bash \$directory/compile.bash\
#sleep a minute to prevent recompilation loop\
sleep 60\
fi\
done\
\`\`\`
To summarize: a user-friendly way of collaboration on LaTeX documents was presented. Some server side configuration needs to be done but the clients only need Dropbox and a simple text editor and can start working togheter.
---
## [The Pidato Experiment: Vibrato on a Digital Piano Using an Arduino](https://0110.be/posts/The_Pidato_Experiment%3A_Vibrato_on_a_Digital_Piano_Using_an_Arduino.md)
- Published: 2011-09-21T00:00:00Z
- Updated: 2023-05-25T07:36:48Z
- Author: Joren
- ID: 410
- Canonical: https://0110.be/posts/The_Pidato_Experiment%3A_Vibrato_on_a_Digital_Piano_Using_an_Arduino
- Tags: [Code](https://0110.be/tags/Code.md), [HoGent](https://0110.be/tags/HoGent.md)
While working on a Latex document with several collaborators some problems arise:
- Who has the latest version of the TeX-files?
- Which LaTeX distributions are in use (MiKTeX, LiveTex,...)
- Are all [LaTeX packages](http://en.wikibooks.org/wiki/LaTeX/Packages) correctly installed on each computer?
- Why is the bibliography, generated with BiBTeX, not included or incomplete?
- How does the final PDF look like when it is build by one of the collaborators, with a different LaTeX distribution?
Especially installing and maintaining LaTeX distributions on different platforms (Mac OS X, Linux, Windows) in combination with a lot of LaTeX packages can be challenging. This blog post presents a way to deal with these problems.
### Solution
The solution proposed here uses a build-server. The server is responsible for compiling the LaTeX source files and creating a PDF-file when the source files are modified. The source files should be available on the server should be in sync with the latest versions of the collaborators. Also the new PDF-file should be distributed. The syncing and distribution of files is done using a Dropbox install. Each author installs a Dropbox share (available on all platforms) which is also installed on the server. When an author modifies a file, this change is propagated to the server, which, in turn, builds a PDF and sends the resulting file back. This has the following advantages:
- Everyone always has the latest version of files;
- Only one LaTeX install needs to be maintained (on the server);
- The PDF is the same for each collaborator;
- You can modify files on every platform with Dropbox support (Linux, Mac OS X, Windows) and even smartphones;
- Compiling a large LaTeX file can be computationally intensive, a good task for a potentially beefy server.
### Implementation
The implementation of this is done with a couple of bash-scripts running on Ubuntu Linux. LaTeX compilation is handeled by the LiveTeX distribution. The first script `compile.bash` handles compilation in multiple stages: the cross referencing and BiBTeX bibliography need a couple of runs to get everything right.
\`\`\`ruby\
#!/bin/bash\
#first iteration: generate aux file\
pdflatex -interaction=nonstopmode ---src-specials article.tex\
#run bibtex on the aux file\
bibtex article.aux\
#second iteration: include bibliography\
pdflatex -interaction=nonstopmode ---src-specials article.tex\
#third iteration: fix references\
pdflatex -interaction=nonstopmode ---src-specials article.tex\
#remove unused files\
rm article.aux article.bbl article.blg article.out\
\`\`\`
The second script `watcher.bash` is more interesting. It watches the Dropbox directory for changes (only in .tex-files) using the efficient inotify library. If a modification is detected the compile script (above) is executed.
\`\`\`ruby\
#!/bin/bash\
directory=/home/user/Dropbox/article/\
#recursivly watch te directory\
while inotifywait -r \$directory; do\
#find all files changed the last minute that match tex\
#if there are matches then do something...\
if find \$directory -mmin --1 \| grep tex; then\
#tex files changed =\> recompile\
echo "Tex file changed... compiling"\
/bin/bash \$directory/compile.bash\
#sleep a minute to prevent recompilation loop\
sleep 60\
fi\
done\
\`\`\`
To summarize: a user-friendly way of collaboration on LaTeX documents was presented. Some server side configuration needs to be done but the clients only need Dropbox and a simple text editor and can start working togheter.
---
## [The Pidato Experiment: Vibrato on a Digital Piano Using an Arduino](https://0110.be/posts/The_Pidato_Experiment%3A_Vibrato_on_a_Digital_Piano_Using_an_Arduino.md)
- Published: 2011-09-21T00:00:00Z
- Updated: 2023-05-25T07:36:48Z
- Author: Joren
- ID: 410
- Canonical: https://0110.be/posts/The_Pidato_Experiment%3A_Vibrato_on_a_Digital_Piano_Using_an_Arduino
- Tags: [Code](https://0110.be/tags/Code.md), [HoGent](https://0110.be/tags/HoGent.md)
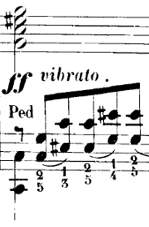 The Pidato experiment demonstrates a rather straightforward method to handle vibrato on a digital piano. It solves the age-old problem on what to do with the enigmatic "vibrato" instructions on some piano solo scores of Franz Liszt. The figure on the right is an exerpt of [*sonetto 104 del Petrarca*](http://imslp.org/wiki/3_Sonetti_del_Petrarca,_S.270_%28Liszt,_Franz%29).
Since there is no way to perform vibrato on an *analogue* piano there are all kinds of different interpretations. Interpretations of the 'vibrato' instruction include: vibrating the pedal, vibrating the key, simply ignoring it, [a vibrato like wiggling with a psychological sounding effect](http://www3.sympatico.ca/norma.barr/library/piano/tone_piano_playing.html), ... A pianist specialized in 19th century music, explains his embodied use of vibrato in a youtube video: [Brian Ganz on piano vibrato](http://www.youtube.com/watch?v=FxwBDZQslzI&feature=related). Those solutions all seem a bit halfhearted, so I created an alternative approach which resulted in the Pidato experiment.
Pidato is a portmanteau of piano and vibrato, the d, a and o hint to the use of an Arduino. Pidato is also Indonesian for speech, expression. To get a feel of what it actually does I created the video below. Please note that this is a *technical demonstration*, not an artistic performance... in any way.
The Pidato experiment demonstrates a rather straightforward method to handle vibrato on a digital piano. It solves the age-old problem on what to do with the enigmatic "vibrato" instructions on some piano solo scores of Franz Liszt. The figure on the right is an exerpt of [*sonetto 104 del Petrarca*](http://imslp.org/wiki/3_Sonetti_del_Petrarca,_S.270_%28Liszt,_Franz%29).
Since there is no way to perform vibrato on an *analogue* piano there are all kinds of different interpretations. Interpretations of the 'vibrato' instruction include: vibrating the pedal, vibrating the key, simply ignoring it, [a vibrato like wiggling with a psychological sounding effect](http://www3.sympatico.ca/norma.barr/library/piano/tone_piano_playing.html), ... A pianist specialized in 19th century music, explains his embodied use of vibrato in a youtube video: [Brian Ganz on piano vibrato](http://www.youtube.com/watch?v=FxwBDZQslzI&feature=related). Those solutions all seem a bit halfhearted, so I created an alternative approach which resulted in the Pidato experiment.
Pidato is a portmanteau of piano and vibrato, the d, a and o hint to the use of an Arduino. Pidato is also Indonesian for speech, expression. To get a feel of what it actually does I created the video below. Please note that this is a *technical demonstration*, not an artistic performance... in any way.
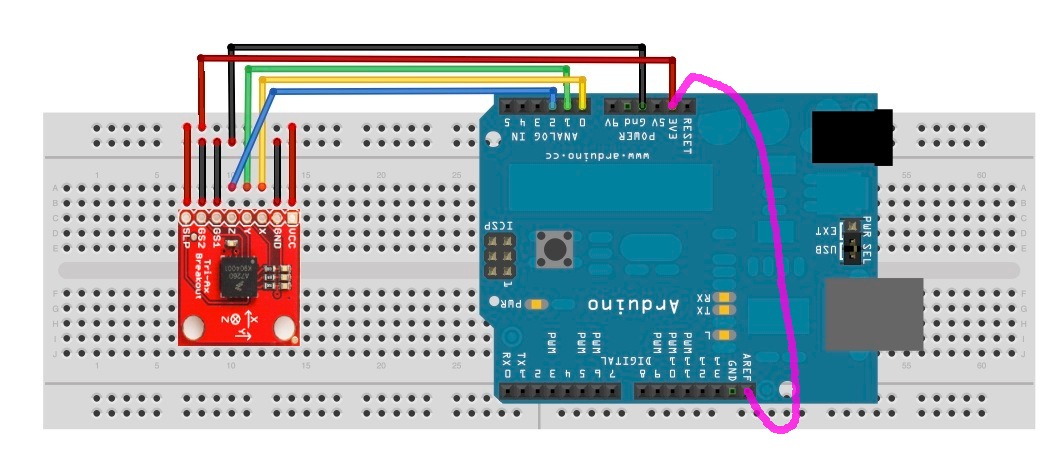 The software should know when a vibrato like movement is made and how to translate such movement to MIDI messages. The software therefore contains a periodicity estimator and frequency detector to detect how periodic a movement is and how fast the movement is repeated. This was done with the [YIN algorithm](http://audition.ens.fr/adc/pdf/2002_JASA_YIN.pdf) (more commonly used in audio signal analysis). A periodicity threshold was determined experimentally so the system does not yield false positives when playing the piano in the usual way. Another interesting bit of code is the interrupt setup that samples the accelerometer at a fixed sample rate and sends MIDI messages, also at a fixed rate.
MIDI messaging is done over a serial connection. From the Arduino sending a MIDI message is as simple as calling `Serial.print` with the correct data. For the task at hand (sending vibrato) [Pitch Bend messages](http://tomscarff.110mb.com/midi_analyser/pitch_bend.htm) were used. The standard Arduino UNO firmware is replaced with [Arduino MIDI firmware](http://hunt.net.nz/users/darran/weblog/5b7f8/Arduino_UNO_USB_MIDI_firmware.html). This makes the Arduino appear as a standard MIDI device when connected to a computer, which makes interfacing with it practical.
The YIN algorithm is encapsulated in a reusable Arduino library and can be used to detect periodicity and frequency for any signal. [This guy](http://www.youtube.com/watch?v=oGKE1vmAWCA) used his implementation to create a chromatic tuner. The source code for both the [Yin Arduino library](https://github.com/JorenSix/Pidato) and [Pidato experiment](https://github.com/JorenSix/Pidato) can be found on github or "here (zip)":\[Pidato.src.zip\].
The Pidato experiment was done with the help the friendly hackers at [Hackerspace Ghent](http://0x20.be).
This [piano vibrato](http://hackaday.com/2011/04/16/pidato-box-adds-vibrato-effect-to-digital-pianos/) hack was also covered by [hackaday.com](http://hackaday.com) and posted to the [Hackerspace Ghent blog](http://0x20.posterous.com/).





- [Pidato.src.zip](https://0110.be/files/attachments/410/Pidato.src.zip)
- [vibrato\_ff.png](https://0110.be/files/attachments/410/vibrato_ff.png)
- [accelerometer\_wire\_piano\_vibrato.jpg](https://0110.be/files/attachments/410/accelerometer_wire_piano_vibrato.jpg)
- [The\_Pidato\_experiment-Vibrato\_on\_a\_Digital\_Piano\_using\_an\_Arduino.mp4](https://0110.be/files/attachments/410/The_Pidato_experiment-Vibrato_on_a_Digital_Piano_using_an_Arduino.mp4)
- [The\_Pidato\_experiment-Vibrato\_on\_a\_Digital\_Piano\_using\_an\_Arduino.webp](https://0110.be/files/attachments/410/The_Pidato_experiment-Vibrato_on_a_Digital_Piano_using_an_Arduino.webp)
---
## [Rendering MIDI Using Arbitrary Tone Scales - Revisited](https://0110.be/posts/Rendering_MIDI_Using_Arbitrary_Tone_Scales_-_Revisited.md)
- Published: 2011-09-20T14:14:02Z
- Updated: 2013-12-05T18:19:15Z
- Author: Joren
- ID: 408
- Canonical: https://0110.be/posts/Rendering_MIDI_Using_Arbitrary_Tone_Scales_-_Revisited
- Tags: [Code](https://0110.be/tags/Code.md), [Computational musicology](https://0110.be/tags/Computational%20musicology.md), [HoGent](https://0110.be/tags/HoGent.md), [Java](https://0110.be/tags/Java.md)
Tarsos can be used to render MIDI files to audio (WAV) files using arbitrary tone scales. This functionallity can be used to (automatically) verify tone scale extraction from audio files. Since I could not find a dataset with audio and corresponding tone scales creating one using MIDI seemed a good idea.
MIDI files can be found in spades (for example on [piano-midi.de](http://www.piano-midi.de/midi_files.htm) or [kunstderfuge.com](http://kunstderfuge.com)), tone scales on the other hand are harder to find. Luckily there is one massive source, the [Scala Tone Scale Archive](http://www.huygens-fokker.org/scala/downloads.html#scales): *A large collection of over 3700 tone scales*.
Using Scala tone scale files and a midi files a *Tone Scale - Audio* dataset can be generated. The quality of the audio depends on the (software) synthesizer and the [SoundFont](http://en.wikipedia.org/wiki/SoundFont) used. Tarsos currently uses the [Gervill synthesizer](https://gervill.dev.java.net/). Gervill is a pure Java software synthesizer with support for 24bit SoundFonts and the MIDI tuning standard.\
The software should know when a vibrato like movement is made and how to translate such movement to MIDI messages. The software therefore contains a periodicity estimator and frequency detector to detect how periodic a movement is and how fast the movement is repeated. This was done with the [YIN algorithm](http://audition.ens.fr/adc/pdf/2002_JASA_YIN.pdf) (more commonly used in audio signal analysis). A periodicity threshold was determined experimentally so the system does not yield false positives when playing the piano in the usual way. Another interesting bit of code is the interrupt setup that samples the accelerometer at a fixed sample rate and sends MIDI messages, also at a fixed rate.
MIDI messaging is done over a serial connection. From the Arduino sending a MIDI message is as simple as calling `Serial.print` with the correct data. For the task at hand (sending vibrato) [Pitch Bend messages](http://tomscarff.110mb.com/midi_analyser/pitch_bend.htm) were used. The standard Arduino UNO firmware is replaced with [Arduino MIDI firmware](http://hunt.net.nz/users/darran/weblog/5b7f8/Arduino_UNO_USB_MIDI_firmware.html). This makes the Arduino appear as a standard MIDI device when connected to a computer, which makes interfacing with it practical.
The YIN algorithm is encapsulated in a reusable Arduino library and can be used to detect periodicity and frequency for any signal. [This guy](http://www.youtube.com/watch?v=oGKE1vmAWCA) used his implementation to create a chromatic tuner. The source code for both the [Yin Arduino library](https://github.com/JorenSix/Pidato) and [Pidato experiment](https://github.com/JorenSix/Pidato) can be found on github or "here (zip)":\[Pidato.src.zip\].
The Pidato experiment was done with the help the friendly hackers at [Hackerspace Ghent](http://0x20.be).
This [piano vibrato](http://hackaday.com/2011/04/16/pidato-box-adds-vibrato-effect-to-digital-pianos/) hack was also covered by [hackaday.com](http://hackaday.com) and posted to the [Hackerspace Ghent blog](http://0x20.posterous.com/).





- [Pidato.src.zip](https://0110.be/files/attachments/410/Pidato.src.zip)
- [vibrato\_ff.png](https://0110.be/files/attachments/410/vibrato_ff.png)
- [accelerometer\_wire\_piano\_vibrato.jpg](https://0110.be/files/attachments/410/accelerometer_wire_piano_vibrato.jpg)
- [The\_Pidato\_experiment-Vibrato\_on\_a\_Digital\_Piano\_using\_an\_Arduino.mp4](https://0110.be/files/attachments/410/The_Pidato_experiment-Vibrato_on_a_Digital_Piano_using_an_Arduino.mp4)
- [The\_Pidato\_experiment-Vibrato\_on\_a\_Digital\_Piano\_using\_an\_Arduino.webp](https://0110.be/files/attachments/410/The_Pidato_experiment-Vibrato_on_a_Digital_Piano_using_an_Arduino.webp)
---
## [Rendering MIDI Using Arbitrary Tone Scales - Revisited](https://0110.be/posts/Rendering_MIDI_Using_Arbitrary_Tone_Scales_-_Revisited.md)
- Published: 2011-09-20T14:14:02Z
- Updated: 2013-12-05T18:19:15Z
- Author: Joren
- ID: 408
- Canonical: https://0110.be/posts/Rendering_MIDI_Using_Arbitrary_Tone_Scales_-_Revisited
- Tags: [Code](https://0110.be/tags/Code.md), [Computational musicology](https://0110.be/tags/Computational%20musicology.md), [HoGent](https://0110.be/tags/HoGent.md), [Java](https://0110.be/tags/Java.md)
Tarsos can be used to render MIDI files to audio (WAV) files using arbitrary tone scales. This functionallity can be used to (automatically) verify tone scale extraction from audio files. Since I could not find a dataset with audio and corresponding tone scales creating one using MIDI seemed a good idea.
MIDI files can be found in spades (for example on [piano-midi.de](http://www.piano-midi.de/midi_files.htm) or [kunstderfuge.com](http://kunstderfuge.com)), tone scales on the other hand are harder to find. Luckily there is one massive source, the [Scala Tone Scale Archive](http://www.huygens-fokker.org/scala/downloads.html#scales): *A large collection of over 3700 tone scales*.
Using Scala tone scale files and a midi files a *Tone Scale - Audio* dataset can be generated. The quality of the audio depends on the (software) synthesizer and the [SoundFont](http://en.wikipedia.org/wiki/SoundFont) used. Tarsos currently uses the [Gervill synthesizer](https://gervill.dev.java.net/). Gervill is a pure Java software synthesizer with support for 24bit SoundFonts and the MIDI tuning standard.\
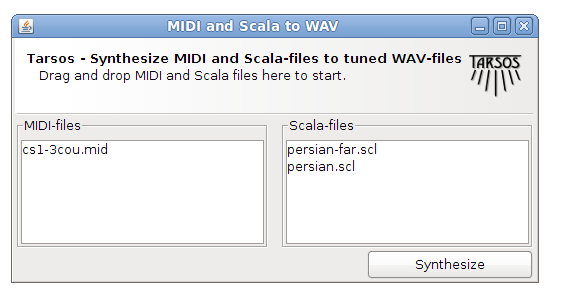

 TwinSeats is een website / online initiatief om nieuwe mensen te leren kennen. Met hen deel je dezelfde culturele interesse en ga je vervolgens samen naar deze of gene voorstelling. Door events centraal te stellen kan TwinSeats uitzonderlijke cultuurburen zoeken. Leden vinden die cultuurburen dankzij een gezamenlijke voorliefde voor een artiest of attractie of eender welke bezigheid in de vrijetijdssfeer.
Het prototype is ondertussen terug te vinden op [TwinSeats.be](http://twinseats.be). Let wel dit is in enkele uren in elkaar geflanst en is verre van 'af', het achterliggende concept is belangrijker.
Samen met Wa Kank Doen van SumoCoders werden we door de jury tot winnaar uitgeroepen. Maandag verscheen er [een artikel in de Standaard over AppsForGhent met een vermelding van TwinSeats](http://www.standaard.be/artikel/detail.aspx?artikelid=IV3A3TCU). Op de Apps For Ghent site is uiteraard ook iets te vinden [over TwinSeats](http://appsforghent.be/?post_type=apps&p=161) ook het [juryverslag](http://appsforghent.be/?page_id=223) is er te vinden. Zoals het hoort bij die categorie evenementen werd ook wat [afgetweet](http://search.twitter.com/search?q=AppsforGhent).
Er is ook een publieksprijs verbonden aan AppsForGhent die wordt over enkele weken uitgereikt.
---
## [TarsosDSP: a small JAVA audio processing library](https://0110.be/posts/TarsosDSP%3A_a_small_JAVA_audio_processing_library.md)
- Published: 2011-03-25T15:58:59Z
- Updated: 2013-12-05T18:19:15Z
- Author: Joren
- ID: 392
- Canonical: https://0110.be/posts/TarsosDSP%3A_a_small_JAVA_audio_processing_library
- Tags: [Code](https://0110.be/tags/Code.md), [HoGent](https://0110.be/tags/HoGent.md), [Java](https://0110.be/tags/Java.md), [Tarsos](https://0110.be/tags/Tarsos.md), [TarsosDSP](https://0110.be/tags/TarsosDSP.md), [featured](https://0110.be/tags/featured.md)
TarsosDSP is a collection of classes to do simple audio processing. It features an implementation of a percussion onset detector and two pitch detection algorithms: Yin and the Mcleod Pitch method.
Its aim is to provide a simple interface to some audio (signal) processing algorithms implemented in JAVA.
To make some of the possibilities clear I coded some examples.
- "TarsosDSP UtterAsterisk":\[UtterAsterisk.jar\] a game that shows real-time pitch detection with YIN.
- "TarsosDSP Sound Detector":\[SoundDetector.jar\] is simply to show how to react when (loud) sound is available.
- "TarsosDSP Percussion Detector":\[PercussionDetector.jar\] is capable of detecting percussion onsets using the method described [here](http://arrow.dit.ie/cgi/viewcontent.cgi?article=1018&context=argcon). It plays a sound from [freesound.org](http://freesound.org) when percussion is detected.
The [source code of TarsosDSP](https://github.com/JorenSix/TarsosDSP) is available on github.
### Presentation at Newline
Saturday the 25th of March TarsosDSP was presented at [Newline](http://0x20.be/Newline/Schedule), a small conference organized by [whitespace](http://0x20.be). Here you can download "the slides I used to present TarsosDSP":\[tarsosDSP_presentation.pdf\], I also created "an introductory text on sound and Java":\[sound_and_java.pdf\].



- [PitchDetector.jar](https://0110.be/files/attachments/392/PitchDetector.jar)
- [PercussionDetector.jar](https://0110.be/files/attachments/392/PercussionDetector.jar)
- [tarsosDSP\_presentation.pdf](https://0110.be/files/attachments/392/tarsosDSP_presentation.pdf)
- [sound\_and\_java.pdf](https://0110.be/files/attachments/392/sound_and_java.pdf)
- [UtterAsterisk.jar](https://0110.be/files/attachments/392/UtterAsterisk.jar)
- [SoundDetector.jar](https://0110.be/files/attachments/392/SoundDetector.jar)
---
## [Remote Port Forwarding with Ubuntu 8.04 and OpenSSH 4.7](https://0110.be/posts/Remote_Port_Forwarding_with_Ubuntu_8.04_and_OpenSSH_4.7.md)
- Published: 2011-01-10T00:00:00Z
- Updated: 2013-12-05T18:19:15Z
- Author: Joren
- ID: 315
- Canonical: https://0110.be/posts/Remote_Port_Forwarding_with_Ubuntu_8.04_and_OpenSSH_4.7
- Tags: [0110.be](https://0110.be/tags/0110.be.md), [Code](https://0110.be/tags/Code.md)
TwinSeats is een website / online initiatief om nieuwe mensen te leren kennen. Met hen deel je dezelfde culturele interesse en ga je vervolgens samen naar deze of gene voorstelling. Door events centraal te stellen kan TwinSeats uitzonderlijke cultuurburen zoeken. Leden vinden die cultuurburen dankzij een gezamenlijke voorliefde voor een artiest of attractie of eender welke bezigheid in de vrijetijdssfeer.
Het prototype is ondertussen terug te vinden op [TwinSeats.be](http://twinseats.be). Let wel dit is in enkele uren in elkaar geflanst en is verre van 'af', het achterliggende concept is belangrijker.
Samen met Wa Kank Doen van SumoCoders werden we door de jury tot winnaar uitgeroepen. Maandag verscheen er [een artikel in de Standaard over AppsForGhent met een vermelding van TwinSeats](http://www.standaard.be/artikel/detail.aspx?artikelid=IV3A3TCU). Op de Apps For Ghent site is uiteraard ook iets te vinden [over TwinSeats](http://appsforghent.be/?post_type=apps&p=161) ook het [juryverslag](http://appsforghent.be/?page_id=223) is er te vinden. Zoals het hoort bij die categorie evenementen werd ook wat [afgetweet](http://search.twitter.com/search?q=AppsforGhent).
Er is ook een publieksprijs verbonden aan AppsForGhent die wordt over enkele weken uitgereikt.
---
## [TarsosDSP: a small JAVA audio processing library](https://0110.be/posts/TarsosDSP%3A_a_small_JAVA_audio_processing_library.md)
- Published: 2011-03-25T15:58:59Z
- Updated: 2013-12-05T18:19:15Z
- Author: Joren
- ID: 392
- Canonical: https://0110.be/posts/TarsosDSP%3A_a_small_JAVA_audio_processing_library
- Tags: [Code](https://0110.be/tags/Code.md), [HoGent](https://0110.be/tags/HoGent.md), [Java](https://0110.be/tags/Java.md), [Tarsos](https://0110.be/tags/Tarsos.md), [TarsosDSP](https://0110.be/tags/TarsosDSP.md), [featured](https://0110.be/tags/featured.md)
TarsosDSP is a collection of classes to do simple audio processing. It features an implementation of a percussion onset detector and two pitch detection algorithms: Yin and the Mcleod Pitch method.
Its aim is to provide a simple interface to some audio (signal) processing algorithms implemented in JAVA.
To make some of the possibilities clear I coded some examples.
- "TarsosDSP UtterAsterisk":\[UtterAsterisk.jar\] a game that shows real-time pitch detection with YIN.
- "TarsosDSP Sound Detector":\[SoundDetector.jar\] is simply to show how to react when (loud) sound is available.
- "TarsosDSP Percussion Detector":\[PercussionDetector.jar\] is capable of detecting percussion onsets using the method described [here](http://arrow.dit.ie/cgi/viewcontent.cgi?article=1018&context=argcon). It plays a sound from [freesound.org](http://freesound.org) when percussion is detected.
The [source code of TarsosDSP](https://github.com/JorenSix/TarsosDSP) is available on github.
### Presentation at Newline
Saturday the 25th of March TarsosDSP was presented at [Newline](http://0x20.be/Newline/Schedule), a small conference organized by [whitespace](http://0x20.be). Here you can download "the slides I used to present TarsosDSP":\[tarsosDSP_presentation.pdf\], I also created "an introductory text on sound and Java":\[sound_and_java.pdf\].



- [PitchDetector.jar](https://0110.be/files/attachments/392/PitchDetector.jar)
- [PercussionDetector.jar](https://0110.be/files/attachments/392/PercussionDetector.jar)
- [tarsosDSP\_presentation.pdf](https://0110.be/files/attachments/392/tarsosDSP_presentation.pdf)
- [sound\_and\_java.pdf](https://0110.be/files/attachments/392/sound_and_java.pdf)
- [UtterAsterisk.jar](https://0110.be/files/attachments/392/UtterAsterisk.jar)
- [SoundDetector.jar](https://0110.be/files/attachments/392/SoundDetector.jar)
---
## [Remote Port Forwarding with Ubuntu 8.04 and OpenSSH 4.7](https://0110.be/posts/Remote_Port_Forwarding_with_Ubuntu_8.04_and_OpenSSH_4.7.md)
- Published: 2011-01-10T00:00:00Z
- Updated: 2013-12-05T18:19:15Z
- Author: Joren
- ID: 315
- Canonical: https://0110.be/posts/Remote_Port_Forwarding_with_Ubuntu_8.04_and_OpenSSH_4.7
- Tags: [0110.be](https://0110.be/tags/0110.be.md), [Code](https://0110.be/tags/Code.md)
 With this post I would like to draw attention to the fact that remote port forwarding with OpenSSH 4.7 on Ubuntu 8.04.1 does not work as expected.
If you follow the instructions of a [SSH remote port forwarding tutorial](http://www.debianadmin.com/howto-use-ssh-local-and-remote-port-forwarding.html) everything goes well until you want to allow everyone to access the forwarded port (not just localhost). The problem arises when binding the forwarded port to an interface. Even with `GatewayPorts yes` present in `/etc/ssh/sshd_config` the following command shows that it went wrong:
\`\`\`ruby\
user@local\$ssh -R 2222:localhost:22 user@remote\
user@remote\$sudo netstat -lntp #on the remote server\
Active Internet connections (only servers)\
Proto Recv-Q Send-Q Local Address Foreign Address State\
tcp6 0 0 ::1:2222 :::\* LISTEN\
\`\`\`
It listens only via IPv6 and only on localhost an not on every interface (as per request by defining `GatewayPorts yes`). The `netstat` command should yield this output:
\`\`\`ruby\
user@local\$ssh -R 2222:localhost:22 user@remote\
user@remote\$sudo netstat -lntp #on the remote server\
Active Internet connections (only servers)\
Proto Recv-Q Send-Q Local Address Foreign Address State\
tcp 0 0 0.0.0.0:2222 0.0.0.0:\* LISTEN\
\`\`\`
I do not really know here it goes wrong but there is an easy workaround. By defining both
\`\`\`ruby\
GatewayPorts yes\
AddressFamily inet\
\`\`\`
in `/etc/ssh/sshd_config` remote port forwarding works fine but you lose IPv6 connectivity (this due to the `AddressFamily` setting). Another solution is to use more up to date software: the bug is not present in Ubuntu 10.04 with OpenSSH 5.3 (I don't know if it is an Ubuntu or OpenSSH bug, or even a configuration issue.
I have been struggling with this issue for a couple of hours and, with this blog post, I hope I can prevent someone else from doing the same.
---
## [Oneliner to Install ssh-copy-id on Mac OS X](https://0110.be/posts/Oneliner_to_Install_ssh-copy-id_on_Mac_OS_X.md)
- Published: 2010-12-25T00:00:00Z
- Updated: 2013-12-05T18:19:15Z
- Author: Joren
- ID: 314
- Canonical: https://0110.be/posts/Oneliner_to_Install_ssh-copy-id_on_Mac_OS_X
- Tags: [0110.be](https://0110.be/tags/0110.be.md), [Code](https://0110.be/tags/Code.md), [Mac OS X](https://0110.be/tags/Mac%20OS%20X.md)
`ssh-copy-id` is a practical bash script, installed by default on Ubuntu. The script is used to distribute public keys. The following oneliner makes it available on Mac OS X:
\`\`\`ruby\
sudo bash \< \<( curl ---silent http://0110.be\[install-ssh-copy-id.bash\] )\
\`\`\`\
This oneliner does three things:
1. It copies `ssh-copy-id` from this website to `/bin/ssh-copy-id`.
2. It makes sure that `ssh-copy-id` is executable, using `chmod`.
3. There is no three
The install procedure needs superuser rights because it writes in the `/bin` folder. Executing scripts from untrusted sources with superuser rights is actually really, really, extremely dangerous. But in this case it is rather innocent.
The `ssh-copy-id` script is the one provided with Ubuntu and Debian, I assume it is GPL'ed. I have not modified it for Mac OS X but it seems to behave as expected. I have only tested the install script and behavior on 10.6.5, YMMV (Your Mileage May Vary).
- [ssh-copy-id.txt](https://0110.be/files/attachments/314/ssh-copy-id.txt)
- [install-ssh-copy-id.bash](https://0110.be/files/attachments/314/install-ssh-copy-id.bash)
- [install-ssh-copy-id.bash](https://0110.be/files/attachments/314/install-ssh-copy-id.bash)
---
## [Groovy Tarsos Scripting](https://0110.be/posts/Groovy_Tarsos_Scripting.md)
- Published: 2010-11-09T00:00:00Z
- Updated: 2020-11-17T09:12:42Z
- Author: Joren
- ID: 346
- Canonical: https://0110.be/posts/Groovy_Tarsos_Scripting
- Tags: [Code](https://0110.be/tags/Code.md), [HoGent](https://0110.be/tags/HoGent.md), [Java](https://0110.be/tags/Java.md), [Tarsos](https://0110.be/tags/Tarsos.md), [featured](https://0110.be/tags/featured.md)
With this post I would like to draw attention to the fact that remote port forwarding with OpenSSH 4.7 on Ubuntu 8.04.1 does not work as expected.
If you follow the instructions of a [SSH remote port forwarding tutorial](http://www.debianadmin.com/howto-use-ssh-local-and-remote-port-forwarding.html) everything goes well until you want to allow everyone to access the forwarded port (not just localhost). The problem arises when binding the forwarded port to an interface. Even with `GatewayPorts yes` present in `/etc/ssh/sshd_config` the following command shows that it went wrong:
\`\`\`ruby\
user@local\$ssh -R 2222:localhost:22 user@remote\
user@remote\$sudo netstat -lntp #on the remote server\
Active Internet connections (only servers)\
Proto Recv-Q Send-Q Local Address Foreign Address State\
tcp6 0 0 ::1:2222 :::\* LISTEN\
\`\`\`
It listens only via IPv6 and only on localhost an not on every interface (as per request by defining `GatewayPorts yes`). The `netstat` command should yield this output:
\`\`\`ruby\
user@local\$ssh -R 2222:localhost:22 user@remote\
user@remote\$sudo netstat -lntp #on the remote server\
Active Internet connections (only servers)\
Proto Recv-Q Send-Q Local Address Foreign Address State\
tcp 0 0 0.0.0.0:2222 0.0.0.0:\* LISTEN\
\`\`\`
I do not really know here it goes wrong but there is an easy workaround. By defining both
\`\`\`ruby\
GatewayPorts yes\
AddressFamily inet\
\`\`\`
in `/etc/ssh/sshd_config` remote port forwarding works fine but you lose IPv6 connectivity (this due to the `AddressFamily` setting). Another solution is to use more up to date software: the bug is not present in Ubuntu 10.04 with OpenSSH 5.3 (I don't know if it is an Ubuntu or OpenSSH bug, or even a configuration issue.
I have been struggling with this issue for a couple of hours and, with this blog post, I hope I can prevent someone else from doing the same.
---
## [Oneliner to Install ssh-copy-id on Mac OS X](https://0110.be/posts/Oneliner_to_Install_ssh-copy-id_on_Mac_OS_X.md)
- Published: 2010-12-25T00:00:00Z
- Updated: 2013-12-05T18:19:15Z
- Author: Joren
- ID: 314
- Canonical: https://0110.be/posts/Oneliner_to_Install_ssh-copy-id_on_Mac_OS_X
- Tags: [0110.be](https://0110.be/tags/0110.be.md), [Code](https://0110.be/tags/Code.md), [Mac OS X](https://0110.be/tags/Mac%20OS%20X.md)
`ssh-copy-id` is a practical bash script, installed by default on Ubuntu. The script is used to distribute public keys. The following oneliner makes it available on Mac OS X:
\`\`\`ruby\
sudo bash \< \<( curl ---silent http://0110.be\[install-ssh-copy-id.bash\] )\
\`\`\`\
This oneliner does three things:
1. It copies `ssh-copy-id` from this website to `/bin/ssh-copy-id`.
2. It makes sure that `ssh-copy-id` is executable, using `chmod`.
3. There is no three
The install procedure needs superuser rights because it writes in the `/bin` folder. Executing scripts from untrusted sources with superuser rights is actually really, really, extremely dangerous. But in this case it is rather innocent.
The `ssh-copy-id` script is the one provided with Ubuntu and Debian, I assume it is GPL'ed. I have not modified it for Mac OS X but it seems to behave as expected. I have only tested the install script and behavior on 10.6.5, YMMV (Your Mileage May Vary).
- [ssh-copy-id.txt](https://0110.be/files/attachments/314/ssh-copy-id.txt)
- [install-ssh-copy-id.bash](https://0110.be/files/attachments/314/install-ssh-copy-id.bash)
- [install-ssh-copy-id.bash](https://0110.be/files/attachments/314/install-ssh-copy-id.bash)
---
## [Groovy Tarsos Scripting](https://0110.be/posts/Groovy_Tarsos_Scripting.md)
- Published: 2010-11-09T00:00:00Z
- Updated: 2020-11-17T09:12:42Z
- Author: Joren
- ID: 346
- Canonical: https://0110.be/posts/Groovy_Tarsos_Scripting
- Tags: [Code](https://0110.be/tags/Code.md), [HoGent](https://0110.be/tags/HoGent.md), [Java](https://0110.be/tags/Java.md), [Tarsos](https://0110.be/tags/Tarsos.md), [featured](https://0110.be/tags/featured.md)
 There is more to Tarsos then meets te eye. The graphical user interface only exposes some functionality; the API (Application Programmer Interface) exposes all of Tarsos' capabilities.
Tarsos is programmed in Java so the API is accessible trough Java and other programming languages targeting the JVM (Java Virtual Machine) like JRuby, Scala and Groovy. The following examples use [the Groovy programming language](http://groovy.codehaus.org/) because I find it the most aesthetically pleasing with regards to interoperability and it gets the job done without getting in your way.
To run the examples a copy of the [Tarsos JAR-file](http://0110.be/releases/Tarsos) needs to be added to the Classpath and the Groovy runtime must be installed correctly. I'll leave this as an exercise for the reader: godspeed to you, brave soul. Quick protip: placing a copy of the jar in the extensions directory seems to work best, e.g. see [important java directories on mac OS X.](http://developer.apple.com/library/mac/#qa/qa2001/qa1170.html)
The first example extracts pitch class histograms from a bunch of files and saves them as EPS (Encapsulated PostScript)-files. It iterates a directory recursively and handles each file that matches a given regular expression. In this example the regular expression matches all WAV-files. Batch processing is one of those things scripting is ideal for, doing the same thing with the user interface would be tedious or even mind-numbingly boring, not groovy at all indeed.
\`\`\`ruby\
import be.hogent.tarsos.\*\
import be.hogent.tarsos.util.\*\
import be.hogent.tarsos.util.histogram.ToneScaleHistogram\
import be.hogent.tarsos.sampled.pitch.Annotation\
import be.hogent.tarsos.sampled.pitch.PitchDetectionMode
dir = "/home/joren/audio"
FileUtils.glob(dir,".\*.wav",true).each { file -\>\
audioFile = new AudioFile(file)\
pitchDetector = PitchDetectionMode.TARSOS_YIN.getPitchDetector(audioFile)\
pitchDetector.executePitchDetection()\
//get some annotations\
annotations = pitchDetector.getAnnotations()\
//create an ambitus and tone scale histogram\
ambitusHistogram = Annotation.ambitusHistogram(annotations)\
toneScaleHisto = ambitusHistogram.toneScaleHistogram()\
//plot a smoothed version of the histogram\
p = new SimplePlot()\
p.addData 0, toneScaleHisto.gaussianSmooth(0.2)\
p.save FileUtils.basename( file) + ".eps"\
}\
\`\`\`
The second example uses functionality that is currently only available trough the API. It takes a MIDI-file and synthesizes it to a wave file using an arbitrary scale. In this case 10-TET. The heavy-work is done by the [Gervill synthesizer](https://gervill.dev.java.net/). The resulting file is available for download, micro---macro?---tonal Bach is great: "BWV 1013 in 10-TET":\[BWV_1013_10-TET.mp3\]. The result of "an analysis with Tarsos on the synthesized audio":\[120.png\] clearly shows an interval of 120 cents with some deviations.
\`\`\`ruby\
import java.io.File\
import be.hogent.tarsos.midi.MidiToWavRenderer\
import be.hogent.tarsos.util.ScalaFile
midiFile = new File("BWV_1013.mid")\
outFile = new File("out.wav")
tuning = \[0,120,240,360,480,600,720,840,960,1080\] as double \[\]
MidiToWavRenderer renderer\
renderer = new MidiToWavRenderer()\
renderer.setTuning(tuning)\
renderer.createWavFile(midiFile, outFile)\
\`\`\`
An extended version of this second example script could be used to generate a dataset with audio and corresponding tone scale information on the fly. The dataset could then be used as a baseline.
The API is not yet well documented and is still in flux or more correctly: superflux. Note to self: I will provide documentation and a number of useful examples when the dust settles down. I'm not even sure if I will stick with Groovy. Scala has a nice Lispy feel to it and seems more developed. Groovy has a less steep learning curve, especially if you have some experience with Ruby. JRuby is also nice but the interoperability with legacy Java looks like an ugly hack.


- [medium.png](https://0110.be/files/attachments/346/medium.png)
- [120.png](https://0110.be/files/attachments/346/120.png)
- [BWV\_1013\_10-TET.mp3](https://0110.be/files/attachments/346/BWV_1013_10-TET.mp3)
---
## [How to Develop for LG GT540 Optimus on Ubuntu](https://0110.be/posts/How_to_Develop_for_LG_GT540_Optimus_on_Ubuntu.md)
- Published: 2010-09-17T00:00:00Z
- Updated: 2013-12-05T18:19:15Z
- Author: Joren
- ID: 312
- Canonical: https://0110.be/posts/How_to_Develop_for_LG_GT540_Optimus_on_Ubuntu
- Tags: [0110.be](https://0110.be/tags/0110.be.md), [Code](https://0110.be/tags/Code.md), [Hackerspace Ghent](https://0110.be/tags/Hackerspace%20Ghent.md)
This post describes a crucial aspect of how to connect an android phone, the LG GT540 Optimus, to an Ubunu Linux computer. The method is probably similar on different UNIX like platforms with different phones.
To recognize the phone when it is connected via usb you need to create an UDEV rule. Create the file `/etc/udev/rules.d/29.lg545.rules` with following contents:
\`\`\`ruby\
SUBSYSTEM\"usb\",ATTRS{idVendor}"1004",ATTRS{idProduct}=="61b4",MODE="0666"\
\`\`\`
On the phone you need to enable debugging using the settings and (this is rather important) make sure that the "mass storage only" setting is disabled.
[Rooting](http://android.modaco.com/content/lg-gt540-optimus-gt540-modaco-com/310737/how-to-root-your-lg-gt540/) the device makes sure you have superuser rights. Installing the android SDK is [well documented](http://developer.android.com/sdk/index.html).
Good luck!
---
## [Static Code Analysis For Java Using Eclipse](https://0110.be/posts/Static_Code_Analysis_For_Java_Using_Eclipse.md)
- Published: 2010-06-03T00:00:00Z
- Updated: 2020-11-17T09:04:00Z
- Author: Joren
- ID: 358
- Canonical: https://0110.be/posts/Static_Code_Analysis_For_Java_Using_Eclipse
- Tags: [Code](https://0110.be/tags/Code.md), [HoGent](https://0110.be/tags/HoGent.md), [Java](https://0110.be/tags/Java.md), [featured](https://0110.be/tags/featured.md)
This post is about the tools I use to keep the source code of [Tarsos](http://0110.be) reasonably clean, consistent and readable. Static code analysis can be of great help if you want to maintain strict coding standards and follow language idioms. Some of the [patterns they can detect for you](http://pmd.sourceforge.net/):
- Dead code - unused variables, parameters, methods
- Suboptimal code - wasteful resource usage
- Overcomplicated expressions - unnecessary if statements, for loops that could be while loops
- Duplicate code - copied/pasted code is a code smell.
- Formatting inconsistencies, e.g. variable modifier order
And even more subtle, but equally important:
- Resource management: is a resource handled (closed) correctly on all possible code paths?
- Abstraction level: is it needed to expose the concrete type of an object or could an (abstract) supertype or even an interface be used instead?
- ...
In a previous life I used .NET and the static code analysis tools FxCop & StyleCop. FxCop operates on bytecode (or intermediate language in .NET parlance) level, StyleCop analyses the source code itself. Tarsos uses JAVA so I looked for JAVA alternatives and found a few.
- PMD & Checkstyle both operate on source code level.
- FindBugs operates on bytecode level.
On freesoftwaremagazine.com there is an [article series on JAVA static code analysis software](http://www.freesoftwaremagazine.com/columns/destroy_annoying_bugs_part_1). It covers PMD and FixBugs and integration in Eclipse. It does not cover Checkstyle. Checkstyle is essentialy the same as PMD but it is better integrated in eclipse: it checks code on save and uses the standard 'Problems' interface, PMD does not.
To fix problems *Eclipse save actions* can save you some time. IBM has an article on [how to keep your code clean using Eclipse](http://www.ibm.com/developerworks/library/os-eclipse-clean/).
Continuous testing is also a really nice thing to have: detecting unexpected behavior while refactoring/programming can prevent unnecessary bug hunts. A [video about immediate feedback using continuous testing](http://improvingworks.com/products/infinitest/) makes this clear.
Another tip is a more philosophical one: making your code and code revisions publicly available makes you think twice before implementing (and subsequently publishing) a quick and dirty hack. Tarsos is available on github.
## References
- [FxCop](http://msdn.microsoft.com/en-us/library/bb429476(VS.80).aspx) & [StyleCop](http://code.msdn.microsoft.com/sourceanalysis)
- [Checkstyle](http://checkstyle.sourceforge.net/)
- [Find bugs](http://findbugs.sourceforge.net/)
- [PDM](http://pmd.sourceforge.net/)
- [Infinitest](http://improvingworks.com/products/infinitest/)
- [Github](http://github.com)


---
## [Doorhacking: Opening a Door With Your Cellphone](https://0110.be/posts/Doorhacking%3A_Opening_a_Door_With_Your_Cellphone.md)
- Published: 2010-04-22T00:00:00Z
- Updated: 2013-12-05T18:19:15Z
- Author: Joren
- ID: 71
- Canonical: https://0110.be/posts/Doorhacking%3A_Opening_a_Door_With_Your_Cellphone
- Tags: [0110.be](https://0110.be/tags/0110.be.md), [Code](https://0110.be/tags/Code.md), [Hackerspace Ghent](https://0110.be/tags/Hackerspace%20Ghent.md), [Projecten](https://0110.be/tags/Projecten.md)
**The problem:** There is a group of people that want access to [Hackerspace Ghent](http://0x20.be) but there is only one remote to open the gate.
**The solution:** Build a system that reacts to a phone call by opening the gate if the number of the caller is whitelisted.
**What you need:**
- A [BeagleBoard](http://beagleboard.org/) or some [BeagleBoard alternative](http://beagleboard.org/breeds) with a Linux distribution running on it. Any server running a unix like operating system should be usable.
- A Huaweii e220 or an alternative GSM that supports (a subset of) AT commands and has a USB port.
- A team of hackers that know how to solder something togeher. E.g. The hardware guys of hackerspace Ghent.
- A "python script":\[gatekeeper.py\] that reacts to calls.
**The Hack**: First of all try to get caller id working by following the [Caller ID with Linux and Huawei e220 tutorial](http://0110.be/artikels/lees/Caller_ID_with_Linux_and_Huawei_e220). If this works you can listen to the serial communication using [pySerial](http://pyserial.sourceforge.net/) and react to a call. The following python code shows the wait for call method:
\`\`\`ruby\
def wait_for_call(self):\
self.data_channel.open()\
call_id_pattern = re.compile('.**CLIP.**"\\+(\[0-9\]+)",.\*')\
while True:\
bytes = self.data_channel.inWaiting()\
buffer = self.data_channel.readline(bytes)\
call_id_match = call_id_pattern.match(buffer)\
if call_id_match:\
number = call_id_match.group(1)\
self.handle_call(number)\
\`\`\`
The `handle_call` method ... handles the call.
The second thing that is needed is [a way to send a signal from the beagle board](http://blog.makezine.com/archive/2009/02/blinking_leds_with_the_beagle_board.html) to the remote. Sending a signal from the beagle board using Linux is really simple. The following bash commands initialize, activate and deactivate a pin.
\`\`\`ruby\
echo 168 \> /sys/class/gpio/export\
echo "high" \> /sys/class/gpio/gpio168/direction\
echo "low" \> /sys/class/gpio/gpio168/direction\
\`\`\`



- [gatekeeper.py](https://0110.be/files/attachments/71/gatekeeper.py)
---
## [Tarsos Spectrogram](https://0110.be/posts/Tarsos_Spectrogram.md)
- Published: 2010-04-13T14:02:33Z
- Updated: 2013-12-05T18:19:15Z
- Author: Joren
- ID: 348
- Canonical: https://0110.be/posts/Tarsos_Spectrogram
- Tags: [Code](https://0110.be/tags/Code.md), [Computational ethnomusicology](https://0110.be/tags/Computational%20ethnomusicology.md), [HoGent](https://0110.be/tags/HoGent.md), [Java](https://0110.be/tags/Java.md), [Music Information Retrieval](https://0110.be/tags/Music%20Information%20Retrieval.md), [Tarsos](https://0110.be/tags/Tarsos.md)
Today I created a spectrogram application using Tarsos. The application listens to an audio input, computes an FFT and at the same time calculates pitch. The expected pitch is overlaid on the spectrogram. All this happens real-time and is implemented using JAVA.
There is more to Tarsos then meets te eye. The graphical user interface only exposes some functionality; the API (Application Programmer Interface) exposes all of Tarsos' capabilities.
Tarsos is programmed in Java so the API is accessible trough Java and other programming languages targeting the JVM (Java Virtual Machine) like JRuby, Scala and Groovy. The following examples use [the Groovy programming language](http://groovy.codehaus.org/) because I find it the most aesthetically pleasing with regards to interoperability and it gets the job done without getting in your way.
To run the examples a copy of the [Tarsos JAR-file](http://0110.be/releases/Tarsos) needs to be added to the Classpath and the Groovy runtime must be installed correctly. I'll leave this as an exercise for the reader: godspeed to you, brave soul. Quick protip: placing a copy of the jar in the extensions directory seems to work best, e.g. see [important java directories on mac OS X.](http://developer.apple.com/library/mac/#qa/qa2001/qa1170.html)
The first example extracts pitch class histograms from a bunch of files and saves them as EPS (Encapsulated PostScript)-files. It iterates a directory recursively and handles each file that matches a given regular expression. In this example the regular expression matches all WAV-files. Batch processing is one of those things scripting is ideal for, doing the same thing with the user interface would be tedious or even mind-numbingly boring, not groovy at all indeed.
\`\`\`ruby\
import be.hogent.tarsos.\*\
import be.hogent.tarsos.util.\*\
import be.hogent.tarsos.util.histogram.ToneScaleHistogram\
import be.hogent.tarsos.sampled.pitch.Annotation\
import be.hogent.tarsos.sampled.pitch.PitchDetectionMode
dir = "/home/joren/audio"
FileUtils.glob(dir,".\*.wav",true).each { file -\>\
audioFile = new AudioFile(file)\
pitchDetector = PitchDetectionMode.TARSOS_YIN.getPitchDetector(audioFile)\
pitchDetector.executePitchDetection()\
//get some annotations\
annotations = pitchDetector.getAnnotations()\
//create an ambitus and tone scale histogram\
ambitusHistogram = Annotation.ambitusHistogram(annotations)\
toneScaleHisto = ambitusHistogram.toneScaleHistogram()\
//plot a smoothed version of the histogram\
p = new SimplePlot()\
p.addData 0, toneScaleHisto.gaussianSmooth(0.2)\
p.save FileUtils.basename( file) + ".eps"\
}\
\`\`\`
The second example uses functionality that is currently only available trough the API. It takes a MIDI-file and synthesizes it to a wave file using an arbitrary scale. In this case 10-TET. The heavy-work is done by the [Gervill synthesizer](https://gervill.dev.java.net/). The resulting file is available for download, micro---macro?---tonal Bach is great: "BWV 1013 in 10-TET":\[BWV_1013_10-TET.mp3\]. The result of "an analysis with Tarsos on the synthesized audio":\[120.png\] clearly shows an interval of 120 cents with some deviations.
\`\`\`ruby\
import java.io.File\
import be.hogent.tarsos.midi.MidiToWavRenderer\
import be.hogent.tarsos.util.ScalaFile
midiFile = new File("BWV_1013.mid")\
outFile = new File("out.wav")
tuning = \[0,120,240,360,480,600,720,840,960,1080\] as double \[\]
MidiToWavRenderer renderer\
renderer = new MidiToWavRenderer()\
renderer.setTuning(tuning)\
renderer.createWavFile(midiFile, outFile)\
\`\`\`
An extended version of this second example script could be used to generate a dataset with audio and corresponding tone scale information on the fly. The dataset could then be used as a baseline.
The API is not yet well documented and is still in flux or more correctly: superflux. Note to self: I will provide documentation and a number of useful examples when the dust settles down. I'm not even sure if I will stick with Groovy. Scala has a nice Lispy feel to it and seems more developed. Groovy has a less steep learning curve, especially if you have some experience with Ruby. JRuby is also nice but the interoperability with legacy Java looks like an ugly hack.


- [medium.png](https://0110.be/files/attachments/346/medium.png)
- [120.png](https://0110.be/files/attachments/346/120.png)
- [BWV\_1013\_10-TET.mp3](https://0110.be/files/attachments/346/BWV_1013_10-TET.mp3)
---
## [How to Develop for LG GT540 Optimus on Ubuntu](https://0110.be/posts/How_to_Develop_for_LG_GT540_Optimus_on_Ubuntu.md)
- Published: 2010-09-17T00:00:00Z
- Updated: 2013-12-05T18:19:15Z
- Author: Joren
- ID: 312
- Canonical: https://0110.be/posts/How_to_Develop_for_LG_GT540_Optimus_on_Ubuntu
- Tags: [0110.be](https://0110.be/tags/0110.be.md), [Code](https://0110.be/tags/Code.md), [Hackerspace Ghent](https://0110.be/tags/Hackerspace%20Ghent.md)
This post describes a crucial aspect of how to connect an android phone, the LG GT540 Optimus, to an Ubunu Linux computer. The method is probably similar on different UNIX like platforms with different phones.
To recognize the phone when it is connected via usb you need to create an UDEV rule. Create the file `/etc/udev/rules.d/29.lg545.rules` with following contents:
\`\`\`ruby\
SUBSYSTEM\"usb\",ATTRS{idVendor}"1004",ATTRS{idProduct}=="61b4",MODE="0666"\
\`\`\`
On the phone you need to enable debugging using the settings and (this is rather important) make sure that the "mass storage only" setting is disabled.
[Rooting](http://android.modaco.com/content/lg-gt540-optimus-gt540-modaco-com/310737/how-to-root-your-lg-gt540/) the device makes sure you have superuser rights. Installing the android SDK is [well documented](http://developer.android.com/sdk/index.html).
Good luck!
---
## [Static Code Analysis For Java Using Eclipse](https://0110.be/posts/Static_Code_Analysis_For_Java_Using_Eclipse.md)
- Published: 2010-06-03T00:00:00Z
- Updated: 2020-11-17T09:04:00Z
- Author: Joren
- ID: 358
- Canonical: https://0110.be/posts/Static_Code_Analysis_For_Java_Using_Eclipse
- Tags: [Code](https://0110.be/tags/Code.md), [HoGent](https://0110.be/tags/HoGent.md), [Java](https://0110.be/tags/Java.md), [featured](https://0110.be/tags/featured.md)
This post is about the tools I use to keep the source code of [Tarsos](http://0110.be) reasonably clean, consistent and readable. Static code analysis can be of great help if you want to maintain strict coding standards and follow language idioms. Some of the [patterns they can detect for you](http://pmd.sourceforge.net/):
- Dead code - unused variables, parameters, methods
- Suboptimal code - wasteful resource usage
- Overcomplicated expressions - unnecessary if statements, for loops that could be while loops
- Duplicate code - copied/pasted code is a code smell.
- Formatting inconsistencies, e.g. variable modifier order
And even more subtle, but equally important:
- Resource management: is a resource handled (closed) correctly on all possible code paths?
- Abstraction level: is it needed to expose the concrete type of an object or could an (abstract) supertype or even an interface be used instead?
- ...
In a previous life I used .NET and the static code analysis tools FxCop & StyleCop. FxCop operates on bytecode (or intermediate language in .NET parlance) level, StyleCop analyses the source code itself. Tarsos uses JAVA so I looked for JAVA alternatives and found a few.
- PMD & Checkstyle both operate on source code level.
- FindBugs operates on bytecode level.
On freesoftwaremagazine.com there is an [article series on JAVA static code analysis software](http://www.freesoftwaremagazine.com/columns/destroy_annoying_bugs_part_1). It covers PMD and FixBugs and integration in Eclipse. It does not cover Checkstyle. Checkstyle is essentialy the same as PMD but it is better integrated in eclipse: it checks code on save and uses the standard 'Problems' interface, PMD does not.
To fix problems *Eclipse save actions* can save you some time. IBM has an article on [how to keep your code clean using Eclipse](http://www.ibm.com/developerworks/library/os-eclipse-clean/).
Continuous testing is also a really nice thing to have: detecting unexpected behavior while refactoring/programming can prevent unnecessary bug hunts. A [video about immediate feedback using continuous testing](http://improvingworks.com/products/infinitest/) makes this clear.
Another tip is a more philosophical one: making your code and code revisions publicly available makes you think twice before implementing (and subsequently publishing) a quick and dirty hack. Tarsos is available on github.
## References
- [FxCop](http://msdn.microsoft.com/en-us/library/bb429476(VS.80).aspx) & [StyleCop](http://code.msdn.microsoft.com/sourceanalysis)
- [Checkstyle](http://checkstyle.sourceforge.net/)
- [Find bugs](http://findbugs.sourceforge.net/)
- [PDM](http://pmd.sourceforge.net/)
- [Infinitest](http://improvingworks.com/products/infinitest/)
- [Github](http://github.com)


---
## [Doorhacking: Opening a Door With Your Cellphone](https://0110.be/posts/Doorhacking%3A_Opening_a_Door_With_Your_Cellphone.md)
- Published: 2010-04-22T00:00:00Z
- Updated: 2013-12-05T18:19:15Z
- Author: Joren
- ID: 71
- Canonical: https://0110.be/posts/Doorhacking%3A_Opening_a_Door_With_Your_Cellphone
- Tags: [0110.be](https://0110.be/tags/0110.be.md), [Code](https://0110.be/tags/Code.md), [Hackerspace Ghent](https://0110.be/tags/Hackerspace%20Ghent.md), [Projecten](https://0110.be/tags/Projecten.md)
**The problem:** There is a group of people that want access to [Hackerspace Ghent](http://0x20.be) but there is only one remote to open the gate.
**The solution:** Build a system that reacts to a phone call by opening the gate if the number of the caller is whitelisted.
**What you need:**
- A [BeagleBoard](http://beagleboard.org/) or some [BeagleBoard alternative](http://beagleboard.org/breeds) with a Linux distribution running on it. Any server running a unix like operating system should be usable.
- A Huaweii e220 or an alternative GSM that supports (a subset of) AT commands and has a USB port.
- A team of hackers that know how to solder something togeher. E.g. The hardware guys of hackerspace Ghent.
- A "python script":\[gatekeeper.py\] that reacts to calls.
**The Hack**: First of all try to get caller id working by following the [Caller ID with Linux and Huawei e220 tutorial](http://0110.be/artikels/lees/Caller_ID_with_Linux_and_Huawei_e220). If this works you can listen to the serial communication using [pySerial](http://pyserial.sourceforge.net/) and react to a call. The following python code shows the wait for call method:
\`\`\`ruby\
def wait_for_call(self):\
self.data_channel.open()\
call_id_pattern = re.compile('.**CLIP.**"\\+(\[0-9\]+)",.\*')\
while True:\
bytes = self.data_channel.inWaiting()\
buffer = self.data_channel.readline(bytes)\
call_id_match = call_id_pattern.match(buffer)\
if call_id_match:\
number = call_id_match.group(1)\
self.handle_call(number)\
\`\`\`
The `handle_call` method ... handles the call.
The second thing that is needed is [a way to send a signal from the beagle board](http://blog.makezine.com/archive/2009/02/blinking_leds_with_the_beagle_board.html) to the remote. Sending a signal from the beagle board using Linux is really simple. The following bash commands initialize, activate and deactivate a pin.
\`\`\`ruby\
echo 168 \> /sys/class/gpio/export\
echo "high" \> /sys/class/gpio/gpio168/direction\
echo "low" \> /sys/class/gpio/gpio168/direction\
\`\`\`



- [gatekeeper.py](https://0110.be/files/attachments/71/gatekeeper.py)
---
## [Tarsos Spectrogram](https://0110.be/posts/Tarsos_Spectrogram.md)
- Published: 2010-04-13T14:02:33Z
- Updated: 2013-12-05T18:19:15Z
- Author: Joren
- ID: 348
- Canonical: https://0110.be/posts/Tarsos_Spectrogram
- Tags: [Code](https://0110.be/tags/Code.md), [Computational ethnomusicology](https://0110.be/tags/Computational%20ethnomusicology.md), [HoGent](https://0110.be/tags/HoGent.md), [Java](https://0110.be/tags/Java.md), [Music Information Retrieval](https://0110.be/tags/Music%20Information%20Retrieval.md), [Tarsos](https://0110.be/tags/Tarsos.md)
Today I created a spectrogram application using Tarsos. The application listens to an audio input, computes an FFT and at the same time calculates pitch. The expected pitch is overlaid on the spectrogram. All this happens real-time and is implemented using JAVA.
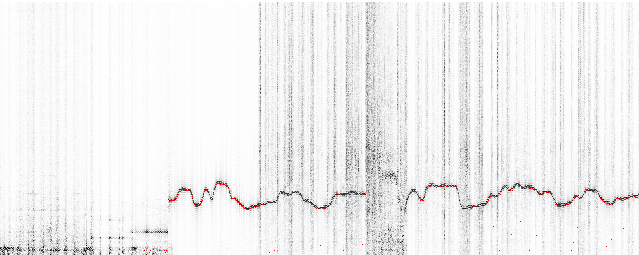 This is the most recent version of the [spectrogram implementation in java](http://github.com/JorenSix/Tarsos/blob/master/src/be/hogent/tarsos/ui/Spectrogram.java).
\`\`\`java\
float pitch = Yin.processBuffer(buffer, (float) sampleRate);\
fft.transform(buffer);\
double maxAmplitude = 0;\
for (int j = 0; j \< buffer.length / 2; j) {\
double amplitude = buffer\[j\] \* buffer\[j\] + buffer\[j +\
buffer.length/2\] \* buffer\[j+ buffer.length/2\];\
amplitude = Math.pow(amplitude, 0.5);\
colorIndexes\[j\] = amplitude;\
maxAmplitude = Math.max(amplitude, maxAmplitude);\
}\
\`\`\`
If you want to test it yourself download the "spectrogram jar package":\[spectrogram.jar\] and execute:
\`\`\`ruby\
java -jar spectrogram.jar\
\`\`\`
- [spectrum.png](https://0110.be/files/attachments/348/spectrum.png)
- [spectrogram.jar](https://0110.be/files/attachments/348/spectrogram.jar)
---
## [Caller ID with Linux and Huawei e220](https://0110.be/posts/Caller_ID_with_Linux_and_Huawei_e220.md)
- Published: 2010-04-11T00:00:00Z
- Updated: 2013-12-05T18:19:15Z
- Author: Joren
- ID: 49
- Canonical: https://0110.be/posts/Caller_ID_with_Linux_and_Huawei_e220
- Tags: [0110.be](https://0110.be/tags/0110.be.md), [Code](https://0110.be/tags/Code.md), [Hackerspace Ghent](https://0110.be/tags/Hackerspace%20Ghent.md), [Projecten](https://0110.be/tags/Projecten.md)
This is the most recent version of the [spectrogram implementation in java](http://github.com/JorenSix/Tarsos/blob/master/src/be/hogent/tarsos/ui/Spectrogram.java).
\`\`\`java\
float pitch = Yin.processBuffer(buffer, (float) sampleRate);\
fft.transform(buffer);\
double maxAmplitude = 0;\
for (int j = 0; j \< buffer.length / 2; j) {\
double amplitude = buffer\[j\] \* buffer\[j\] + buffer\[j +\
buffer.length/2\] \* buffer\[j+ buffer.length/2\];\
amplitude = Math.pow(amplitude, 0.5);\
colorIndexes\[j\] = amplitude;\
maxAmplitude = Math.max(amplitude, maxAmplitude);\
}\
\`\`\`
If you want to test it yourself download the "spectrogram jar package":\[spectrogram.jar\] and execute:
\`\`\`ruby\
java -jar spectrogram.jar\
\`\`\`
- [spectrum.png](https://0110.be/files/attachments/348/spectrum.png)
- [spectrogram.jar](https://0110.be/files/attachments/348/spectrogram.jar)
---
## [Caller ID with Linux and Huawei e220](https://0110.be/posts/Caller_ID_with_Linux_and_Huawei_e220.md)
- Published: 2010-04-11T00:00:00Z
- Updated: 2013-12-05T18:19:15Z
- Author: Joren
- ID: 49
- Canonical: https://0110.be/posts/Caller_ID_with_Linux_and_Huawei_e220
- Tags: [0110.be](https://0110.be/tags/0110.be.md), [Code](https://0110.be/tags/Code.md), [Hackerspace Ghent](https://0110.be/tags/Hackerspace%20Ghent.md), [Projecten](https://0110.be/tags/Projecten.md)
 This is the scenario: you have a Huawei e220, a linux computer and you want to react to a call from a set of predefined numbers. E.g. [ordering a pizza](https://0110.be/artikels/lees/Order_Pizza_with_USB_Pizza_Button) when you receive a call from a certain number.
The Huawei e220 supports a subset of the [AT commands](http://en.wikipedia.org/wiki/AT_commands), which subset is [an enterprise secret](http://forum.huawei.com/jive4/thread.jspa?threadID=324487) of te Huawei company. So there is no documentation available for the device I bought, thanks Huawei. Anyhow when you attach the e220 to a Linux machine you should get two serial ports:
\`\`\`ruby\
/dev/ttyUSB0\
/dev/ttyUSB1\
\`\`\`
To connect to the devices you can use a serial client. [GNU Screen](http://www.gnu.org/software/screen/) can be used as a serial client like this: `screen /dev/ttyUSB0 115200`. The first device, `ttyUSB0` is used to control `ttyUSB1`, so to enable caller ID on te Huawei e220 you need to send this message to `ttyUSB0`:
\`\`\`ruby\
AT+CLIP=1\
\`\`\`
To check for calls you should listen to `ttyUSB1`. A serial session for `ttyUSB1` looks like:
\`\`\`ruby\
\^BOOT:44594282,0,0,0,6\
\^RSSI:18\
RING\
+CLIP: "+33499311152",145,,,,0\
\^BOOT:44594282,0,0,0,6\
\`\`\`
The `RING` and `CLIP` messages are the most interesting. The `RING` signifies an incoming call, the `CLIP` is the caller ID. The `BOOT` and `RSSI` are some kind of ping messages. The following Python script demonstrates a complete session that enables caller ID, waits for a phone call and prints the number of the caller.
\`\`\`python\
#!/usr/bin/env python\
import serial, re
command_channel = serial.Serial(\
port='/dev/ttyUSB0',\
baudrate=115200,\
parity=serial.PARITY_NONE,\
stopbits=serial.STOPBITS_ONE,\
bytesize=serial.EIGHTBITS\
)\
command_channel.open()\
#enable caller id\
command_channel.write("AT+CLIP=1" + "\\r\\n")\
command_channel.close()
ser = serial.Serial(\
port='/dev/ttyUSB1',\
baudrate=9600,\
parity=serial.PARITY_NONE,\
stopbits=serial.STOPBITS_ONE,\
bytesize=serial.EIGHTBITS\
)
ser.open()
pattern = re.compile('.**CLIP.**"\\+(\[0-9\]+)",.\*')
while 1:\
buffer = ser.read(ser.inWaiting()).strip()\
buffer = buffer.replace("\\n","")\
match = pattern.match(buffer)\
if match:\
number = match.group(1)\
print number\
\`\`\`
---
## [YIN Pitch Tracker in JAVA](https://0110.be/posts/YIN_Pitch_Tracker_in_JAVA.md)
- Published: 2010-04-09T00:00:00Z
- Updated: 2020-11-17T09:04:25Z
- Author: Joren
- ID: 66
- Canonical: https://0110.be/posts/YIN_Pitch_Tracker_in_JAVA
- Tags: [0110.be](https://0110.be/tags/0110.be.md), [Code](https://0110.be/tags/Code.md), [Cultuur](https://0110.be/tags/Cultuur.md), [Muziek](https://0110.be/tags/Muziek.md), [Projecten](https://0110.be/tags/Projecten.md)
To make [Tarsos](http://0110.be/) more portable I wrote a pitch tracker in pure JAVA using the [YIN algorithm](http://recherche.ircam.fr/equipes/pcm/cheveign/ps/2002_JASA_YIN_proof.pdf) based on the implementation in C of [aubio](http://aubio.org). The implementation also uses some code written by Karl Helgasson and Teun de Lange of the [Jazzperiments project](http://www.jazzperiments.com/jazzperiments.html).
It can be used to perform real time pitch detection or to analyse files. To use it as a real time pitch detector just start the "JAR-file":\[pitch_detector_yin.jar\] by double clicking. To analyse a file execute one of the following. The first results in a list of annotations (text), the second shows the annotations graphically.
\`\`\`ruby\
java -jar pitch_detector_yin.jar flute.novib.mf.C5B5.wav\
java -jar pitch_detector_yin.jar ---file flute.novib.mf.C5B5.wav\
\`\`\`
The provided "flute sample":\[flute.novib.mf.C5B5.wav\] is from [*The Musical Samples* library of the University of Iowa](http://theremin.music.uiowa.edu/MIS.html) and converted to mono wav. The source code of the pitch tracker can be found below.
**Update:** the Yin implementation in Java has been incorporated into the [TarsosDSP project](https://github.com/JorenSix/TarsosDSP). An open source, Real-Time Audio Processing Framework in Java.

- [pitch\_detector\_yin.jar](https://0110.be/files/attachments/66/pitch_detector_yin.jar)
- [pitch\_detector\_yin\_src.zip](https://0110.be/files/attachments/66/pitch_detector_yin_src.zip)
- [flute.novib.mf.C5B5.wav](https://0110.be/files/attachments/66/flute.novib.mf.C5B5.wav)
---
## [Tarsos on GitHub](https://0110.be/posts/Tarsos_on_GitHub.md)
- Published: 2010-03-16T15:14:34Z
- Updated: 2013-12-05T18:19:15Z
- Author: Joren
- ID: 347
- Canonical: https://0110.be/posts/Tarsos_on_GitHub
- Tags: [Code](https://0110.be/tags/Code.md), [Computational ethnomusicology](https://0110.be/tags/Computational%20ethnomusicology.md), [HoGent](https://0110.be/tags/HoGent.md), [Java](https://0110.be/tags/Java.md), [Tarsos](https://0110.be/tags/Tarsos.md), [featured](https://0110.be/tags/featured.md)
The JAVA software program we are developing is called Tarsos and can now be found on [GitHub](http://github.com/JorenSix/Tarsos). GitHub is a web-based hosting service for projects that use the Git version control system.
Currently Tarsos is a collection of Java classes to create, compare and process pitch-frequency data using histograms. In it's current state it is not usable for end-users.
### Credits
Tarsos is developed at [University College Ghent, Faculty of Music](http://cons.hogent.be) and uses a number of open source libraries:
- [Gervill](https://gervill.dev.java.net/): a software sound synthesizer, supports the MIDI Tuning Standard. [API](https://gervill.dev.java.net/nonav/javadoc/index.html).
- [Jave](http://www.sauronsoftware.it/projects/jave/): a wrapper for [ffmpeg](http://ffmpeg.org/).
- [Apache Commons Math](http://commons.apache.org/math/): a library of lightweight, self-contained mathematics and statistics components [API](http://people.cs.ubc.ca/~kvdoel/jass/doc/index.html).
- [JASS](http://people.cs.ubc.ca/~kvdoel/jass/): a unit generator based audio synthesis programming environment. [API](http://people.cs.ubc.ca/~kvdoel/jass/doc/index.html).
- [Java-getopt](http://www.urbanophile.com/~arenn/hacking/download.html): a port of the GNU getopt family of functions. [API](http://www.urbanophile.com/~arenn/hacking/getopt/Package-gnu.getopt.html).
- [Ptplot](http://ptolemy.berkeley.edu/java/ptplot5.7/ptolemy/plot/doc/index.htm) a 2D plotting library. [API](http://ptolemy.berkeley.edu/java/ptplot5.7/doc/codeDoc/index.html).
---
## [Boids 3D with Processing](https://0110.be/posts/Boids_3D_with_Processing.md)
- Published: 2010-01-22T00:00:00Z
- Updated: 2013-12-05T18:19:14Z
- Author: Joren
- ID: 1
- Canonical: https://0110.be/posts/Boids_3D_with_Processing
- Tags: [0110.be](https://0110.be/tags/0110.be.md), [Code](https://0110.be/tags/Code.md), [Portfolio](https://0110.be/tags/Portfolio.md), [Projecten](https://0110.be/tags/Projecten.md)
- [boids\_windows.zip](https://0110.be/files/attachments/1/boids_windows.zip)
- [boids.png](https://0110.be/files/attachments/1/boids.png)
- [boids\_macosx.zip](https://0110.be/files/attachments/1/boids_macosx.zip)
- [boids\_linux.zip](https://0110.be/files/attachments/1/boids_linux.zip)
- [boids\_src.zip](https://0110.be/files/attachments/1/boids_src.zip)
- [peasycam.jar](https://0110.be/files/attachments/1/peasycam.jar)
- [Boids.jar](https://0110.be/files/attachments/1/Boids.jar)
- [core.jar](https://0110.be/files/attachments/1/core.jar)
- [loading.gif](https://0110.be/files/attachments/1/loading.gif)
---
## [Order Pizza with USB Pizza Button](https://0110.be/posts/Order_Pizza_with_USB_Pizza_Button.md)
- Published: 2009-11-11T00:00:00Z
- Updated: 2013-12-05T18:19:15Z
- Author: Joren
- ID: 188
- Canonical: https://0110.be/posts/Order_Pizza_with_USB_Pizza_Button
- Tags: [0110.be](https://0110.be/tags/0110.be.md), [Code](https://0110.be/tags/Code.md), [Hackerspace Ghent](https://0110.be/tags/Hackerspace%20Ghent.md), [Poging tot humor](https://0110.be/tags/Poging%20tot%20humor.md), [Projecten](https://0110.be/tags/Projecten.md)
Recently I bought a big shiny red USB-button. It is big, red and shiny. Initially I planned to use it to deploy new versions of websites to a server but I found a much better use: *ordering pizza*. Graphically the use case translates to something akin to:
This is the scenario: you have a Huawei e220, a linux computer and you want to react to a call from a set of predefined numbers. E.g. [ordering a pizza](https://0110.be/artikels/lees/Order_Pizza_with_USB_Pizza_Button) when you receive a call from a certain number.
The Huawei e220 supports a subset of the [AT commands](http://en.wikipedia.org/wiki/AT_commands), which subset is [an enterprise secret](http://forum.huawei.com/jive4/thread.jspa?threadID=324487) of te Huawei company. So there is no documentation available for the device I bought, thanks Huawei. Anyhow when you attach the e220 to a Linux machine you should get two serial ports:
\`\`\`ruby\
/dev/ttyUSB0\
/dev/ttyUSB1\
\`\`\`
To connect to the devices you can use a serial client. [GNU Screen](http://www.gnu.org/software/screen/) can be used as a serial client like this: `screen /dev/ttyUSB0 115200`. The first device, `ttyUSB0` is used to control `ttyUSB1`, so to enable caller ID on te Huawei e220 you need to send this message to `ttyUSB0`:
\`\`\`ruby\
AT+CLIP=1\
\`\`\`
To check for calls you should listen to `ttyUSB1`. A serial session for `ttyUSB1` looks like:
\`\`\`ruby\
\^BOOT:44594282,0,0,0,6\
\^RSSI:18\
RING\
+CLIP: "+33499311152",145,,,,0\
\^BOOT:44594282,0,0,0,6\
\`\`\`
The `RING` and `CLIP` messages are the most interesting. The `RING` signifies an incoming call, the `CLIP` is the caller ID. The `BOOT` and `RSSI` are some kind of ping messages. The following Python script demonstrates a complete session that enables caller ID, waits for a phone call and prints the number of the caller.
\`\`\`python\
#!/usr/bin/env python\
import serial, re
command_channel = serial.Serial(\
port='/dev/ttyUSB0',\
baudrate=115200,\
parity=serial.PARITY_NONE,\
stopbits=serial.STOPBITS_ONE,\
bytesize=serial.EIGHTBITS\
)\
command_channel.open()\
#enable caller id\
command_channel.write("AT+CLIP=1" + "\\r\\n")\
command_channel.close()
ser = serial.Serial(\
port='/dev/ttyUSB1',\
baudrate=9600,\
parity=serial.PARITY_NONE,\
stopbits=serial.STOPBITS_ONE,\
bytesize=serial.EIGHTBITS\
)
ser.open()
pattern = re.compile('.**CLIP.**"\\+(\[0-9\]+)",.\*')
while 1:\
buffer = ser.read(ser.inWaiting()).strip()\
buffer = buffer.replace("\\n","")\
match = pattern.match(buffer)\
if match:\
number = match.group(1)\
print number\
\`\`\`
---
## [YIN Pitch Tracker in JAVA](https://0110.be/posts/YIN_Pitch_Tracker_in_JAVA.md)
- Published: 2010-04-09T00:00:00Z
- Updated: 2020-11-17T09:04:25Z
- Author: Joren
- ID: 66
- Canonical: https://0110.be/posts/YIN_Pitch_Tracker_in_JAVA
- Tags: [0110.be](https://0110.be/tags/0110.be.md), [Code](https://0110.be/tags/Code.md), [Cultuur](https://0110.be/tags/Cultuur.md), [Muziek](https://0110.be/tags/Muziek.md), [Projecten](https://0110.be/tags/Projecten.md)
To make [Tarsos](http://0110.be/) more portable I wrote a pitch tracker in pure JAVA using the [YIN algorithm](http://recherche.ircam.fr/equipes/pcm/cheveign/ps/2002_JASA_YIN_proof.pdf) based on the implementation in C of [aubio](http://aubio.org). The implementation also uses some code written by Karl Helgasson and Teun de Lange of the [Jazzperiments project](http://www.jazzperiments.com/jazzperiments.html).
It can be used to perform real time pitch detection or to analyse files. To use it as a real time pitch detector just start the "JAR-file":\[pitch_detector_yin.jar\] by double clicking. To analyse a file execute one of the following. The first results in a list of annotations (text), the second shows the annotations graphically.
\`\`\`ruby\
java -jar pitch_detector_yin.jar flute.novib.mf.C5B5.wav\
java -jar pitch_detector_yin.jar ---file flute.novib.mf.C5B5.wav\
\`\`\`
The provided "flute sample":\[flute.novib.mf.C5B5.wav\] is from [*The Musical Samples* library of the University of Iowa](http://theremin.music.uiowa.edu/MIS.html) and converted to mono wav. The source code of the pitch tracker can be found below.
**Update:** the Yin implementation in Java has been incorporated into the [TarsosDSP project](https://github.com/JorenSix/TarsosDSP). An open source, Real-Time Audio Processing Framework in Java.

- [pitch\_detector\_yin.jar](https://0110.be/files/attachments/66/pitch_detector_yin.jar)
- [pitch\_detector\_yin\_src.zip](https://0110.be/files/attachments/66/pitch_detector_yin_src.zip)
- [flute.novib.mf.C5B5.wav](https://0110.be/files/attachments/66/flute.novib.mf.C5B5.wav)
---
## [Tarsos on GitHub](https://0110.be/posts/Tarsos_on_GitHub.md)
- Published: 2010-03-16T15:14:34Z
- Updated: 2013-12-05T18:19:15Z
- Author: Joren
- ID: 347
- Canonical: https://0110.be/posts/Tarsos_on_GitHub
- Tags: [Code](https://0110.be/tags/Code.md), [Computational ethnomusicology](https://0110.be/tags/Computational%20ethnomusicology.md), [HoGent](https://0110.be/tags/HoGent.md), [Java](https://0110.be/tags/Java.md), [Tarsos](https://0110.be/tags/Tarsos.md), [featured](https://0110.be/tags/featured.md)
The JAVA software program we are developing is called Tarsos and can now be found on [GitHub](http://github.com/JorenSix/Tarsos). GitHub is a web-based hosting service for projects that use the Git version control system.
Currently Tarsos is a collection of Java classes to create, compare and process pitch-frequency data using histograms. In it's current state it is not usable for end-users.
### Credits
Tarsos is developed at [University College Ghent, Faculty of Music](http://cons.hogent.be) and uses a number of open source libraries:
- [Gervill](https://gervill.dev.java.net/): a software sound synthesizer, supports the MIDI Tuning Standard. [API](https://gervill.dev.java.net/nonav/javadoc/index.html).
- [Jave](http://www.sauronsoftware.it/projects/jave/): a wrapper for [ffmpeg](http://ffmpeg.org/).
- [Apache Commons Math](http://commons.apache.org/math/): a library of lightweight, self-contained mathematics and statistics components [API](http://people.cs.ubc.ca/~kvdoel/jass/doc/index.html).
- [JASS](http://people.cs.ubc.ca/~kvdoel/jass/): a unit generator based audio synthesis programming environment. [API](http://people.cs.ubc.ca/~kvdoel/jass/doc/index.html).
- [Java-getopt](http://www.urbanophile.com/~arenn/hacking/download.html): a port of the GNU getopt family of functions. [API](http://www.urbanophile.com/~arenn/hacking/getopt/Package-gnu.getopt.html).
- [Ptplot](http://ptolemy.berkeley.edu/java/ptplot5.7/ptolemy/plot/doc/index.htm) a 2D plotting library. [API](http://ptolemy.berkeley.edu/java/ptplot5.7/doc/codeDoc/index.html).
---
## [Boids 3D with Processing](https://0110.be/posts/Boids_3D_with_Processing.md)
- Published: 2010-01-22T00:00:00Z
- Updated: 2013-12-05T18:19:14Z
- Author: Joren
- ID: 1
- Canonical: https://0110.be/posts/Boids_3D_with_Processing
- Tags: [0110.be](https://0110.be/tags/0110.be.md), [Code](https://0110.be/tags/Code.md), [Portfolio](https://0110.be/tags/Portfolio.md), [Projecten](https://0110.be/tags/Projecten.md)
- [boids\_windows.zip](https://0110.be/files/attachments/1/boids_windows.zip)
- [boids.png](https://0110.be/files/attachments/1/boids.png)
- [boids\_macosx.zip](https://0110.be/files/attachments/1/boids_macosx.zip)
- [boids\_linux.zip](https://0110.be/files/attachments/1/boids_linux.zip)
- [boids\_src.zip](https://0110.be/files/attachments/1/boids_src.zip)
- [peasycam.jar](https://0110.be/files/attachments/1/peasycam.jar)
- [Boids.jar](https://0110.be/files/attachments/1/Boids.jar)
- [core.jar](https://0110.be/files/attachments/1/core.jar)
- [loading.gif](https://0110.be/files/attachments/1/loading.gif)
---
## [Order Pizza with USB Pizza Button](https://0110.be/posts/Order_Pizza_with_USB_Pizza_Button.md)
- Published: 2009-11-11T00:00:00Z
- Updated: 2013-12-05T18:19:15Z
- Author: Joren
- ID: 188
- Canonical: https://0110.be/posts/Order_Pizza_with_USB_Pizza_Button
- Tags: [0110.be](https://0110.be/tags/0110.be.md), [Code](https://0110.be/tags/Code.md), [Hackerspace Ghent](https://0110.be/tags/Hackerspace%20Ghent.md), [Poging tot humor](https://0110.be/tags/Poging%20tot%20humor.md), [Projecten](https://0110.be/tags/Projecten.md)
Recently I bought a big shiny red USB-button. It is big, red and shiny. Initially I planned to use it to deploy new versions of websites to a server but I found a much better use: *ordering pizza*. Graphically the use case translates to something akin to:

 **The communication**: The original Python script executed another script on the local pc. A more flexible approach is possible using sockets. With sockets it is possible to notify any computer on a network.
\`\`\`ruby\
if PanicButton().pressed():\
\# create a TCP socket\
s = socket.socket(socket.AF_INET, socket.SOCK_STREAM)\
\# connect to server on the port\
s.connect((SERVER, SERVER_TCP_PORT))\
\# send the order (margherita at restaurant mario)\
s.send("mario: \[margherita_big\]\\n")\
\`\`\`
**The reaction**: a ruby TCP server waits for message from the driver. When it does it automates a HTTP session on a website. It executes a series of HTTP-GET's and POST's. It uses the [mechanize library](http://mechanize.rubyforge.org/mechanize/).
\`\`\`ruby\
login_url = "http://www.just-eat.be/pages/member/login.aspx"\
a = WWW::Mechanize.new\
a.get(login_url) do \|login_page\|\
#post login_form\
login_form = login_page.forms.first\
login_form.txtUser = "username"\
login_form.txtPass = "password"\
a.submit(login_form, login_form.buttons\[1\])\
end\
\`\`\`
Some libraries are needed. For python you need the usb library, the [python deamons lib](http://pypi.python.org/pypi/python-daemon/) needs to be installed seperatly. Setuptools are needed to install the deamons package.
\`\`\`ruby\
sudo apt-get install python-usb python-setuptools\
\`\`\`
Ruby needs rubygems to install the needed mechanize and daemons library. Mechanize needs the
**The communication**: The original Python script executed another script on the local pc. A more flexible approach is possible using sockets. With sockets it is possible to notify any computer on a network.
\`\`\`ruby\
if PanicButton().pressed():\
\# create a TCP socket\
s = socket.socket(socket.AF_INET, socket.SOCK_STREAM)\
\# connect to server on the port\
s.connect((SERVER, SERVER_TCP_PORT))\
\# send the order (margherita at restaurant mario)\
s.send("mario: \[margherita_big\]\\n")\
\`\`\`
**The reaction**: a ruby TCP server waits for message from the driver. When it does it automates a HTTP session on a website. It executes a series of HTTP-GET's and POST's. It uses the [mechanize library](http://mechanize.rubyforge.org/mechanize/).
\`\`\`ruby\
login_url = "http://www.just-eat.be/pages/member/login.aspx"\
a = WWW::Mechanize.new\
a.get(login_url) do \|login_page\|\
#post login_form\
login_form = login_page.forms.first\
login_form.txtUser = "username"\
login_form.txtPass = "password"\
a.submit(login_form, login_form.buttons\[1\])\
end\
\`\`\`
Some libraries are needed. For python you need the usb library, the [python deamons lib](http://pypi.python.org/pypi/python-daemon/) needs to be installed seperatly. Setuptools are needed to install the deamons package.
\`\`\`ruby\
sudo apt-get install python-usb python-setuptools\
\`\`\`
Ruby needs rubygems to install the needed mechanize and daemons library. Mechanize needs the