~ Measuring rain water tank level with an Arduino
» By Joren on Thursday 28 March 2024
Due to the climate crisis, long droughts are becoming more common in Western Europe during the summers. Conversely, during the winters, it seems that there is more and more extreme rainfall. With record breaking droughts and rainfall, it is essential that enough rainwater buffering capacity is available. As a private citizen this means installing a large rain water tank - perhaps larger than outdated models suggest - and using the captured water effectively, if at all possible.
To effectively use rain-water, it helps to have an easy way to view the water level in the tank. This makes clear when to conserve water or when a pump might end up running dry and overheat. So I wanted to install a water level measurement device in my rain water tank.
My first attempt used sonar. This sends out a sound-wave which reflects on the water surface. The sonar measures the time it takes for the echo to return. This setup is finicky in an echoy tank but I managed to get it working. However, after couple of months the sonar stopped working in the damp environment.
Next I tried a optical, infra-red-based setup: the idea was to time the infra-red reflection on the water. After installation it appeared that water is transparent for infra-red. I basically measured the position of the floor of my tank. I took comfort in the fact that this measurement remained stable but had to look for a third option.
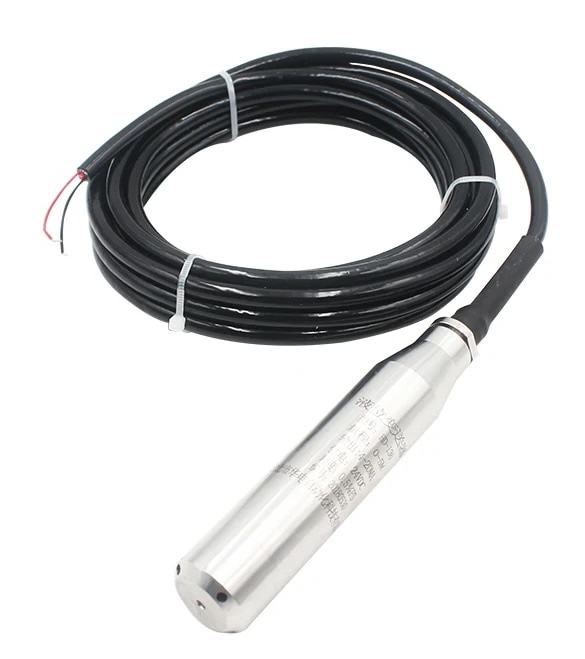
I finally became aware of sturdy, submersible pressure sensors which are designed for water level measurements. One of those is the QDY30A sensor, which is available in many versions but there is one which takes five volts as input and returns a 0 - 3.3V output: ideal to use with about any modern micro-controller. The sensor can be connected via a long cable. This helps to keep the Arduino in a dry place indoors. After recording a few measurements and the corresponding sensor depth, the sensor seems to show a very linear response: with two references, converting a sensor value to a depth in millimeters is doable. The readings ended up on a website and are visualized via a SVG sparkline.
Fig: Rain water level visualization for a few days, measured every 15 minutes. Going from 221cm to 197cm.
With the Arduino code attached you should be able to get going. Next to reading and converting a sensor value, it also includes reading the median of several values to add some smoothing. The sensor is read on request: only when a serial message arrives a measurement is done.