I have just released a Python wrapper for the Olaf acoustic fingerprinting library. Olaf is a scalable audio search system based on indexing . Olaf is programmed in C but a wrapper now makes its functionality available in Python.
The python wrapper should make it more accessible for developers to get started with it and makes it compatible with other Python libraries. A few notable libraries are the librosa python package for music and audio analysis,nnAudio, A fast GPU audio processing toolbox and other more general plotting, data processing and machine learning libraries. Despite Python’s many flaws, its rich library ecosystem is unmatched.
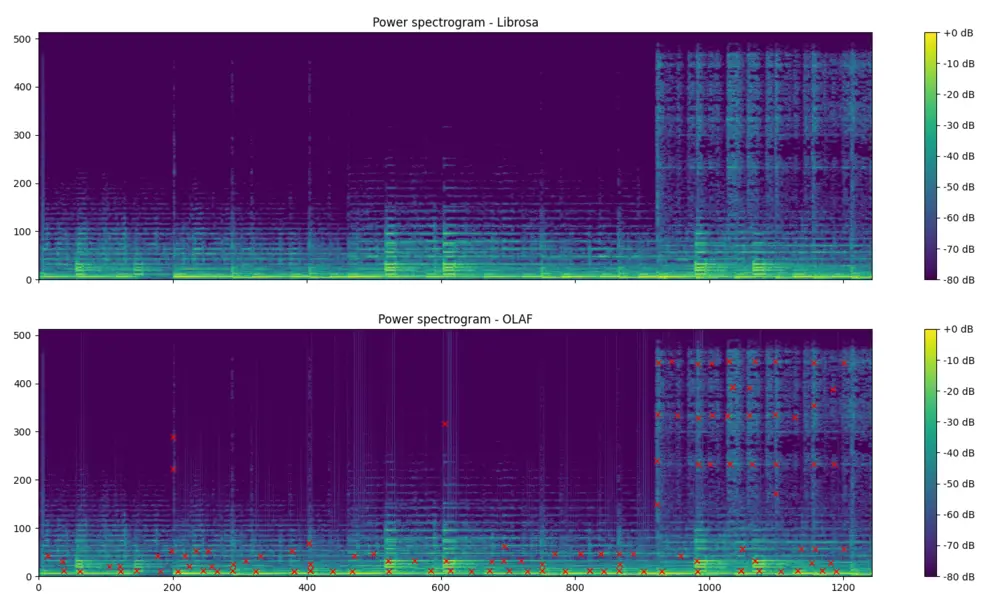
The associated GitHub repository contains documentation on how to use the Olaf python wrapper and also contains examples. The first shows how to index a song into the database and subsequently query the database. The second visualises the event points extracted by Olaf. The figure below shows shows the resulting event points, extracted with Olaf, plotted on a magnitude spectrogram, calculated with Olaf. The spectrogram on top is calculated using librosa and is meant to be very similar to Olaf.
\
Fig: *A power spectrum from librosa and one from Olaf, with event points marked*.
The wrapper was made with Python CFFI which works reasonably well. The automatically generated wrapper library support a large part of the C language but it needs a compilation step for each platform. Currently, the instructions assume a POSIX-like system, but technically, the wrapper can also function on Windows, albeit with the potential need for Windows-equivalent instructions in place of certain POSIX ones. The wrapper is wrapped in an easy to use python class called Olaf.py:
```python\
from olaf import Olaf, OlafCommand\
import librosa
Store the first ten seconds of an audio file\
audio_file = librosa.ex(‘choice’)\
Olaf(OlafCommand.STORE,audio_file).do(duration=10.0)
Query for a part of the same file (with an offset of 7 seconds), but change volume\
y, sr = librosa.load(audio_file,mono=True, sr=16000,duration=10,offset=7.0)\
y = y * 0.8 #change the volume\
results = Olaf(OlafCommand.QUERY,audio_file).do(y=y)
We expect a match between the stored and partially overlapping query\
print(results)\
```
This post is an efficient way to determine whether a predefined frequency is present in a signal. If such an algorithm can be found, it can serve as a basis for a modem. With a modem data is modulated and demodulated at the receiving side. The modulation allows data to be send over a transmission channel.
With the ability to detect the presence of audible frequencies a modem can transform symbols into a combination of frequencies and send data over sound. This is exactly what happens with DTMF in the sound below. DTMF is also used in the dailup sound.
Audio: dail tone sequence: which numbers are pressed?
Typically, determining the presence of frequencies in a signal is done with an FFT: an FFT divides a signal into e.g. 512 linearly spaced frequency bands and determines the magnitude of each of these frequencies. The annoying thing is that a probe frequency can be right in between two bands: sample rate, FFT size and the frequency to look for need to be carefully chosen to reliably detect a frequency. Also, it is computationally inefficient to calculate the magnitudes for all frequency bands if only one band is actually needed.
Luckily there is an alternative approach which looks like the calculating the FFT but for only one predetermined frequencies. This algorithm is known as the Goertzel algorithm and is used in DTMF dail tone encoding and decoding. With the standard Goertzel algorithm it is still needed to consider sample rate and the frequency of interest.
Recenlty I needed a piece of ANSI c code to detect the magnitude of an arbitrary frequency for a project. The following is a C implementation of this algorithm. It uses the C support for complex numbers in the complex.h header:
Below you can try out the algorithm. You can choose a frequency to detect and a playback frequency. The magnitude of the frequency is reported via the slider. The demo uses a javascript translation of the code above.
Dual-tone Multi-Frequency - DTMF
DTMF in the browser.
On the right you can find a demo of dual tone frequency modulation and demodulation. A combination of frequencies is played and immediately detected.
The green bars show which frequencies have been detected. If for example 1209 Hz is detected together with 770 Hz then this means that we are looking for the symbol in the first column on the second row. Both the first column and the second row are highlighted in green. At that spot we see 4 so we can decode a 4. By using 2 combinations of four frequencies a total number of 16 symbols can be encoded.
Note that this code does not simply highlight the button press directly but encodes the symbol in audio, feeds it into an Web Audio API format and decodes audio, the result of the decoding step highlights the row and column detected.
Both Ghent University’s research output tracking system and Flanders FWO academic profile do not allow to enter software as research output. The focus is still solely on papers, even when custom developed research software has become a fundamental aspect in many research areas. My role is somewhere between that of a ‘pure’ researcher and that of a research software engineer which makes this focus on papers quite relevant to me.
The paper aims to make the recent development on Olaf‘count’. Thanks to the JOSS review process the Olaf software was improved considerably: CI, unit tests, documentation, containerization,… The paper was a good reason to improve on all these areas which are all too easy to neglect. The paper itself is a short, rather general overview of Olaf:
“Olaf stands for Overly Lightweight Acoustic Fingerprinting and solves the problem of finding short audio fragments in large digital audio archives. The content-based audio search algorithm implemented in Olaf can identify a short audio query in a large database of thousands of hours of audio using an acoustic fingerprinting technique.”
The C programming language is deceptively simple. The syntax is straightforward, C has a limited amount of keywords and a small standard library. The first edition of the classic book ‘The C Programming Language’ is only about 200 pages. And yet, when programming in C, it is hard to avoid the many exiting footguns: integer type conversions, unchecked indexes and memory leaks can all cause subtle problems. This is part of the appeal of C: shooting yourself in the foot does make you feel alive. Here I want to focus on ways to check for memory leaks for C programs.
Memory leaks come about when memory is claimed but is never released again. If this is done in a loop or during a long running program, the claimed memory adds up and eventually the system may run out of memory. A memory leak is less a problem if a program forgets to free a small amount of memory it only claims once: after program shut down, the operating system reclaims all memory anyhow. However, it does feels very dirty to not clean up after oneself. And I for one, am not a dirty boy.
Another reason to look for memory use and leaks is when you are programming for embedded devices. For these systems memory is very limited: in that world 500kB RAM is considered a massive amount of memory. I have been busy programming a scalable audio search system called Olaf which targets both traditional computers, embedded systems and browsers (via WebAssembly). It is clear that memory use — and memory leaks — need to be kept in check to pull this of.
Now, these memory leaks might not be easy to spot by inspecting the code. There are tools which help to spot memory management problems. One of these is valgrind which is currently not easy to use on Apple system with ARM processors. Luckily there is an alternative which is probably already installed on macOS via the XCode Command Line Tools a command line tool aptly called leaks. To quote the apple documentation on leaks, leaks reports:
the address of the leaked memory
the size of the leak (in bytes)
the contents of the leaked buffer
The most straightforward use of leaks is to run a program and generate a report after program shutdown. See below to run a memory leak inspection, in this case for the bin/olaf_c program which indexes an audio file in a key-value store. For CI purposes it is practical to know that leaks has an exit status of zero only when no leaks have been found. The exit status can be used in an automated test script to break a build if a leak is detected. The --quiet option can be practical in such setting.
leaks --atExit -- bin/olaf_c store audio.raw audio
In the case of Olaf I made a classic mistake: I had called free() on hash table but I needed to call the hash table destructor: hash_table_destroy() which freed not only the hash table itself but also all memory associated with the hash table entries. After a quick fix the leaks command showed no more leaks!
Output of the `leaks` command which shows where a memory leak can be found.
General takaways
leaks is an easy to use memory leak inspector provided by Apple. It is an alternative for valgrind.
Memory leaks can be checked automatically using the leaks exit status in a CI-script. This makes spotting leaks timely and more straightforward to fix.
Programmers should at least once try to target embedded devices. It makes you conscious of the wealth of resources available when targeting modern computing devices.
This post details how I went about optimizing a C application. This is about an audio search system called Olaf which was made about 10 times faster but contains some generally applicable steps for optimizing C code or even other systems. Note that it is not the aim to provide a detailed how-to: I want to provide the reader with a more high-level understanding and enough keywords to find a good how-to for the specific tool you might want to use. I see a few general optimization steps:
The zeroth step of optimization is to properly **question the need** and balance the potential performance gains against added code complexity and maintainability.
Once ensured of the need, the first step is to **measure the systems performance**. Every optimization needs to be measured and compared with the original state, having automazation helps.
Thirdly, the second step is to **find performance bottle necks**, which should give you an idea where optimizations make sense.
The third step is to **implement and apply** an optimization and measuring its effect.
Lastly, **repeat** steps zero to three until optimization targets are reached.
More specifically, for the Olaf audio search system there is a need for optimization. Olaf indexes and searches through years of audio so a small speedup in indexing really adds up. So going for the next item on the list above: measure the performance. Olaf by default reports how quickly audio is indexed. It is expressed in the audio duration it can process in a single second: so if it reports 156 times realtime, it means that 156 seconds of audio can be indexed in a second.
The next step is to find performance bottlenecks. A profiler is a piece of software to find such bottle necks. There are many options gprof is a command line solution which is generally available. I am developing on macOS and have XCode available which includes the “Instruments - Time Profiler”. Whichever tool used, the result of a profiling session should yield the time it takes to run each functions. For Olaf it is very clear which function needs optimization:
\
Fig: The results of profiling Olaf in XCode's time profiler. Almost all time is spend in a single function which is the prime target for optimization.
The function is a max filter which is ran many, many times. The implementation is using a naive approach to max filtering. There are more efficient algorithms available. In this case looking into the literature and implementing a more efficient algorithm makes sense. A very practical paper by Lemire lists several contenders and the ‘van Herk’ algorithm hits the sweet spot between being easy to implement and needing only a tiny extra amount of memory. The Lemire paper even comes with example c max-filters. With only a slight change, the code fits in Olaf.
After implementing the change two checks need to be done: is the implementation correct and is it faster. Olaf comes with a number of functional and unit checks which provide some assurance of correctness and a built in performance indicator. Olaf improved from processing audio 156 times realtime to 583 times: a couple of times faster.
After running the profiler again, another method came up as the slowest:
//Naive implementationfloat olaf_ep_extractor_max_filter_time(float *array, size_t array_size) {
float max = -10000000;
for (size_t i = 0; i < array_size; i++) {
if (array[i] > max) max = array[i];
}
return max;
}
src: naive implementation of finding the max value of an array.
This is another part of the 2D max filter used in Olaf. Unfortunately here it is not easy to improve the algorithmic complexity: to find the maximum in a list, each value needs to be checked. It is however a good contender for SIMD optimization. With SIMD multiple data elements are processed in a single CPU instruction. With 32bit floats it can be possible to process 4 floats in a single step, potentially leading to a 4x speed increase - without including overhead by data loading.
Olaf targets microcontrollers which run an ARM instruction set. The SIMD version that makes most sense is the ARM Neon set of instructions. Apple Sillicon also provides support for ARM Neon which is a nice bonus. I asked ChatGPT to provide a ARM Neon improved version and it came up with the code below. Note that these type of simple functions are ideal for ChatGPT to generate since it is easily testable and there must be many similar functions in the ChatGPT training set. Also there are less ethical issues with ‘trivial’ functions: more involved code has a higher risk of plagiarization and improper attribution. The new average audio indexing speed is 832 times realtime.
src: a ARM Neon SIMD implementation of a function finding the max value of an array, generated by ChatGPT, licence unknown, informed consent unclear, correct attribution impossible.
Next, I asked ChatGPT for an SSE SIMD version targeting the x86 processors but this resulted in noticable slowdown. This might be related to the time it takes to load small vectors in SIMD registers. I did not pursue the SIMD SSE optimization since it is less relevant to Olaf and the first performance optimization was the most significant.
Finally, I went over the code again to see whether it would be possible exit a loop and simply skip calling olaf_ep_extractor_max_filter_time in most cases. I found a condition which prevents most of the calls without affecting the total results. This proved to be the most significant speedup: almost doubling the speed from about 800 times realtime to around 1500 times realtime. This is actually what I should have done before resorting to SIMD.
In the end Olaf was made about ten times faster with only two local, testable, targeted optimizations.
General takeways
Only think about optimization if there is a need and set a target: otherwise it is infinite.
Try to find a balance between complexity, maintainability and performance.
Changing a naive algorithm to a more intelligent one can have a significant performance increase. Check the literature for inspiration.
Check for conditions to skip hot code paths before trying fancy optimization techniques.
Profilers are crucial to identify where to optimize your code. Applying optimizations blindly is a waste of time.
Try to keep optimizations local and testable. Sprinkling your code with small, hard to test performance oriented improvements might not be worthwile.
SIMD generated by ChatGPT can be a very quick way to optimize critical, hot code paths. I would advise to only let ChatGPT generate small, common, easily testable code: e.g. finding the maximum in an array.
Basic media info: gives information about the streams and encodings used in a media file.
Fig: [audio transcodinging in the browser](/attachment/cors/ffmpeg.audio.wasm/transcode.html). A `wav` file is converted to an `mp3`.
A bit more about the rationale behind this effort: Browsers have become practical platforms for audio processing applications thanks to the combination of Web Audio API , performant Javascript environment and WebAssembly. Have a look, for example, at essentia.JS.
However, browsers only support a small subset of audio formats and container formats. Dealing with many (legacy) audio formats is often a rather painful experience since there are so many media container formats which can contain a surprising variation of audio (and video) encodings. In short, decoding audio for in-browser analysis or playback is often problematic.
Luckily there is FFmpeg which claims to be ‘a complete, cross-platform solution to record, convert and stream audio and video’. It is, indeed, capable to decode almost any audio encoding known to man from about any container. Additionally, it also contains tools to filter, manipulate, resample, stretch, … audio. FFmpeg is a must-have when working with audio. It would be ideal to have FFmpeg running in a browser…
Thanks to WebAssembly ffmpeg can be compiled for use in the browser. There have been effortstoget ffmpeg working in the browser. These efforts have been focusing on the complete ffmpeg suite. Now I have prepared an audio focused ffmpeg build for the web based on these efforts. I have selected only audio parts which makes the resulting .wasm binary four to five times smaller (from \~20MB to \~5MB). I also provided a simplified Javascript wrapper. The project brings audio decoding to the browser but also audio filtering, transcoding, pitch-shifting, sample rate conversions, audio channel manipulation, and so forth. It is also capable to extract audio streams from video container formats.
Next to the pure functionality of ffmpeg there are general advantages to run audio analysis software in the browser at client-side:
Ease-of-use: no software needs to be installed. The runtime comes with a compatible browser.
Privacy: Since media files are not transferred it is impossible for the system running the service to make unauthorised copies of these files. There is no need to trust the service since all processing happens locally, in the browser.
Speed: Downloading and especially uploading large media files takes a while. When files are kept locally, processing can start immediately and no time is wasted sending bytes over the internet. This results in a snappy user experience.
Computational load: the computational load of transcoding is distributed over the clients and not centralised on a (single) server. The server does not do any computing and only serves static files, so it can handle as many concurrent clients as its bandwidth allows.
From 11-16 October 2020 the latest instalment of the ISMIR conference series was held. Due to the pandemic, the 21st ISMIR conference was the first virtual one. As usual, participants and presenters from around the world joined the conference. For the first time, however, not all participants synchronised their circadian rhythm. By repeating most events with 12h in between, the organisers managed to put together a schedule befitting nearly all participants.
The virtual format had some clear advantages: travel was not needed, so (environmental) cost was low. Attendance fees were lower than usual since no spaces or catering was needed. This democratised the conference experience and attendance reached a record high.
The DSP library for Taros, aptly named TarsosDSP, now includes an implementation of a pitch shifting algorithm (as of version 1.4). The goal of pitch shifting is to change the pitch of a piece of audio without affecting the duration. The algorithm implemented is a combination of resampling and time stretching. Resampling changes the pitch of the audio, but affects the total duration. Consecutively, the duration of the audio is stretched to the original (without affecting pitch) with time stretching. The result is very similar to phase vocoding.
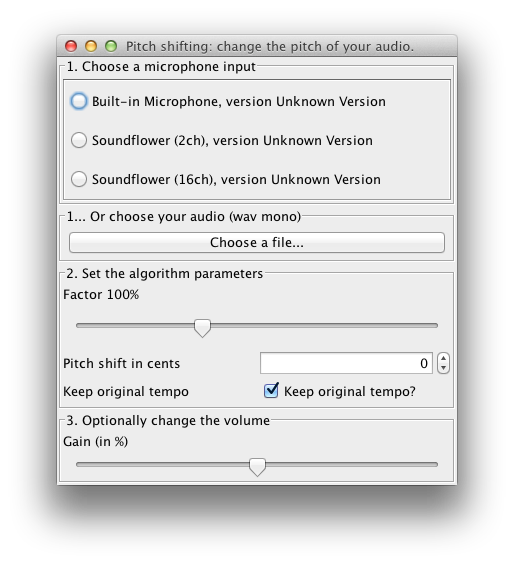
The example application below shows how to pitch shift input from the microphone in real-time, or pitch shift a recorded track with the TarsosDSP library.
To test the application, download and execute the PitchShift.jar file and load an audio file. For the moment only 44.1kHz mono wav is allowed. To get started you can try “this piece of audio”:[08._Ladrang_Kandamanyura_10s-20s.wav].
There is also a command line interface, the following command lowers the pitch of in.wav by two semitones.
java -jar in.wav out.wav -200

----------------------------------------------------
 _______                       _____   _____ _____
|__   __|                     |  __ \ / ____|  __ \
   | | __ _ _ __ ___  ___  ___| |  | | (___ | |__) |
   | |/ _` | '__/ __|/ _ \/ __| |  | |\___ \|  ___/
   | | (_| | |  \__ \ (_) \__ \ |__| |____) | |
   |_|\__,_|_|  |___/\___/|___/_____/|_____/|_|

----------------------------------------------------
Name:
    TarsosDSP Pitch shifting utility.
----------------------------------------------------
Synopsis:
    java -jar PitchShift.jar source.wav target.wav cents
----------------------------------------------------
Description:
    Change the play back speed of audio without changing the pitch.

        source.wav  A readable, mono wav file.
        target.wav  Target location for the pitch shifted file.
        cents       Pitch shifting in cents: 100 means one semitone up,
                -100 one down, 0 is no change. 1200 is one octave up.
The resampling feature was implemented with libresample4j by Laszlo Systems. libresample4j is a Java port of Dominic Mazzoni’s libresample 0.1.3, which is in turn based on Julius Smith’s Resample 1.7 library.
After about a year of development and several revisions TarsosDSP has enough features and is stable enough to slap the 1.0 tag onto it. A ‘read me’, manual, API documentation, source and binaries can be found on the TarsosDSP release directory. The source is present in the\
What follows below is the information that can be found in the read me file:
TarsosDSP is a collection of classes to do simple audio processing. It features an implementation of a percussion onset detector and two pitch detection algorithms: Yin and the Mcleod Pitch method. Also included is a Goertzel DTMF decoding algorithm and a time stretch algorithm (WSOLA).
Its aim is to provide a simple interface to some audio (signal) processing algorithms implemented in pure JAVA. Some TarsosDSP example applications are available.
The following example filters a band of frequencies of an input file testFile. It keeps the frequencies form startFrequency to stopFrequency.
Head over to the TarsosDSP release repository and download the latest TarsosDSP library. To get up to speed quickly, check the TarsosDSP Example applications for inspiration and consult the API documentation. If you, for some reason, want to build from source, you need Apache Ant and git installed on your system. The following commands fetch the source and build the library and example jars: git clone https://JorenSix@github.com/JorenSix/TarsosDSP.git
cd TarsosDSP/build
ant tarsos_dsp_library #Builds the core TarsosDSP library
ant build_examples #Builds all the TarsosDSP examples
ant javadoc #Creates the documentation in TarsosDSP/doc
\
When everything runs correctly you should be able to run all example applications and have the latest version of the TarsosDSP library for inclusion in your projects. Also the Javadoc documentation for the API should be available in TarsosDSP/doc. Drop me a line if you use TarsosDSP in your project. Always nice to hear how this software is used.
Source Code Organization and Examples of TarsosDSP
The source tree is divided in three directories:
src contains the source files of the core DSP libraries.
test contains unit tests for some of the DSP functionality.
build contains ANT build files. Either to build Java documentation or runnable JAR-files for the example applications.
examples contains a couple of example applications with a Java Swing user interface:
SoundDetector show how you loudness calculations can be done. When input sound is over a defined limit an event is fired.
PitchDetector this demo application shows real-time pitch detection. When pitch is detected the hertz value is printed together with a probability.
PercussionDetector show the percussion (onset) dectection. Clapping your hands causes an event. This demo application also shows the influence of the two parameters on the algorithm.
UtterAsterisk a game with the goal to sing as close to a melody a possible. Technically it shows real-time pitch detection with YIN or MPM.
Spectrogram in Java shows a spectrogram and detected pitch, either live or from an audio file. It is interesting to see which frequencies are picked as fundamentals.
Goertzel DTMF decoding an implementation of the Goertzel Algorithm. A fancy user interface shows what goes on under the hood.
Audio Time Stretching -- Implementation in Pure Java Using WSOLA an implementation of a time stretching algorithm. WSOLA makes it possible to change the play back speed of audio without changing the pitch. The play back speed can be changed at any moment, even when there is audio playing.
Tarsos contains a couple of useful command line applications. They can be used to execute common tasks on lots of files. Dowload Tarsos and call the applications using the following format:
The first part java -jar tarsos.jar tells the Java Runtime to start the correct application. The first argument for Tarsos defines the command line application to execute. Depending on the command, required arguments and options can follow.
To get a list of available commands, type java -jar tarsos.jar -h. If you want more information about a command type java -jar tarsos.jar command -h
Detect Pitch
Detects pitch for one or more input audio files using a pitch detector. If a directory is given it traverses the directory recursively. It writes CSV data to standard out with five columns. The first is the start of the analyzed window (seconds), the second the estimated pitch, the third the saillence of the pitch. The name of the algorithm follows and the last column shows the original filename.

 \
\
 Fig: Some AI imagining audio search.


 \
Fig: The results of profiling Olaf in XCode's time profiler. Almost all time is spend in a single function which is the prime target for optimization.
\
Fig: The results of profiling Olaf in XCode's time profiler. Almost all time is spend in a single function which is the prime target for optimization.