Naar jaarlijkse gewoonte wordt er in het Orpheus instituut de Dag van het Artistiek onderzoek georganiseerd. Hieronder volgt een tekstje over het onderzoeksproject rond Tarsos dat in het jaarboek komt. Het jaarboek is een boekje met daarin een overzicht van artistieke onderzoeksprojecten aan Vlaamse instituten. Het wordt gepubliceerd naar aanleiding van de eerder aangehaalde “Dag van het Artistiek Onderzoek”.
Het doel van dit onderzoeksproject is het ontwikkelen van een methode om een cultuuronafhankelijke kijk op muzikale parameters te verkrijgen. Meer concreet worden er technieken aangewend uit Music Information Retrieval om toonhoogte, tempo en timbre te bestuderen. Aanpassing van bestaande, meestal westers georiënteerde, MIR-methodes moet leiden tot een gestructureerde documentatie van verschillende klankkleuren, toonschalen, metrische verhoudingen en muzikale vormen. Die beschrijving kan dienen als inspiratie voor de ontwikkeling van een artistieke compsitionele taal of kan gebruikt worden als bronmateriaal voor wetenschappelijk onderzoek rond ethnische muziek. Bijvoorbeeld om (de eventuele\
teloorgang van) de eigenheid van orale muziekculturen objectief aan te tonen.
In de eerste fase van het onderzoek ligt de focus van het onderzoek op één van de meer tastbare parameters: toonhoogte. In etnische muziek is het gebruik van toonhoogte vaak radicaal anders dan westerse muziek die meestal gebaseerd is op de onderverdeling van een octaaf in twaalf gelijke delen. Om toonladders uit\
muziek te extraheren en weer te geven werd het software platform Tarsos ontwikkeld. Met Tarsos is het mogelijk om automatische toonladderanlyse uit te voeren op een grote dataset of om manueel een gedetailleerde analyse te verkrijgen van enkele muziekstukken. De cultuuronafhankelijke analysemethode waarvan Tarsos gebruik maakt kan even goed toegepast worden op Indonesische, Westerse of Afrikaanse muziek.
Onze bedoeling is om Tarsos te gebruiken om evoluties in toonladdergebruik te ontdekken in de enorme dataset van het Koninklijk Museum voor Midden-Afrika. Is toonladderdiversiteit in Afrika aan het wegkwijnen onder invloed van Westerse muziek? Zijn er specifieke kenmerken te vinden over eventueel 'uitgestorven' muziekculturen? Dit zijn vragen die kaderen in het overkoepelende onderzoeksproject van Olmo Cornelis en waar we met behulp van Tarsos een antwoord op proberen te vinden.
Later krijgen de twee overige muzikale parameters, tempo en timbre, een gelijkaardige behandeling. In de laatste fase van dit toch wel ambitieuze onderzoekproject wordt de relatie tussen de parameters onderzocht.
With this post I would like to draw attention to the fact that remote port forwarding with OpenSSH 4.7 on Ubuntu 8.04.1 does not work as expected.
If you follow the instructions of a SSH remote port forwarding tutorial everything goes well until you want to allow everyone to access the forwarded port (not just localhost). The problem arises when binding the forwarded port to an interface. Even with GatewayPorts yes present in /etc/ssh/sshd_config the following command shows that it went wrong:
```ruby\
user@local$ssh -R 2222:localhost:22 user@remote\
user@remote$sudo netstat -lntp #on the remote server\
Active Internet connections (only servers)\
Proto Recv-Q Send-Q Local Address Foreign Address State\
tcp6 0 0 ::1:2222 :::* LISTEN\
```
It listens only via IPv6 and only on localhost an not on every interface (as per request by defining GatewayPorts yes). The netstat command should yield this output:
```ruby\
user@local$ssh -R 2222:localhost:22 user@remote\
user@remote$sudo netstat -lntp #on the remote server\
Active Internet connections (only servers)\
Proto Recv-Q Send-Q Local Address Foreign Address State\
tcp 0 0 0.0.0.0:2222 0.0.0.0:* LISTEN\
```
I do not really know here it goes wrong but there is an easy workaround. By defining both
in /etc/ssh/sshd_config remote port forwarding works fine but you lose IPv6 connectivity (this due to the AddressFamily setting). Another solution is to use more up to date software: the bug is not present in Ubuntu 10.04 with OpenSSH 5.3 (I don’t know if it is an Ubuntu or OpenSSH bug, or even a configuration issue.
I have been struggling with this issue for a couple of hours and, with this blog post, I hope I can prevent someone else from doing the same.
ssh-copy-id is a practical bash script, installed by default on Ubuntu. The script is used to distribute public keys. The following oneliner makes it available on Mac OS X:
```ruby\
sudo bash < <( curl —silent http://0110.be[install-ssh-copy-id.bash] )\
```\
This oneliner does three things:
It copies ssh-copy-id from this website to /bin/ssh-copy-id.
It makes sure that ssh-copy-id is executable, using chmod.
There is no three
The install procedure needs superuser rights because it writes in the /bin folder. Executing scripts from untrusted sources with superuser rights is actually really, really, extremely dangerous. But in this case it is rather innocent.
The ssh-copy-id script is the one provided with Ubuntu and Debian, I assume it is GPL’ed. I have not modified it for Mac OS X but it seems to behave as expected. I have only tested the install script and behavior on 10.6.5, YMMV (Your Mileage May Vary).
At the workshop I had an interesting meeting with Dan Tidhar. He researches harpsichord temperament estimation at QMUL (Queen Mary University of London). Together they created the Tempest web service where you can upload harpsichord audio and let the system guess the temperament. The process is described in the paper “High precision frequency estimation for harpsichord tuning classification”. Although Tarsos was not officially part of the programme I hijacked the poster sessions to show a live demo of Tarsos with Dan’s dataset.
Another interesting talk was about 2032, a tunable synthesizer with definable Harmonics. It elaborates on the ideas of Sethares about tone scales .
Monday, I’ll give a small presentation about Latex and Version Control for the research team at the University College Gent, Faculty of Music. The idea is to give a pragmatic overview of working with Latex and version control. The “presentation about Latex & Version control (in Dutch)”:[latex_svn_presentatie.pdf] can be downloaded. The presentation itself is created using Latex and “the source of the presentation”:[latex_svn_presentatie.zip] is also available. A good description of Latex can be found here:
LaTeX (pronounced “latech”) is a document preparation system for high-quality typesetting based on, and succeeding TeX formatting. It is a very popular format in academia, as it allows advanced document formatting capabilities not found in other common document formatting systems. Some of these capabilities include table figure notations, bibliography formatting (see BibTeX), and an advanced macro language.
Eclipse: an IDE (Integrated Development Environment) which can be used as Latex editor with version control by installing the TeXclipse and Subclipse plugins.
This post contains links to genuinely useful software to do signal based audio analysis.
Sonic Visualizer: As its name suggests Sonic Visualizer contains a lot different visualisations for audio. It can be used for analysis (pitch,beat,chroma,…) with VAMP-plugins. To quote “The aim of Sonic Visualiser is to be the first program you reach for when want to study a musical recording rather than simply listen to it”. It is the swiss army knife of audio analysis.
BeatRoot is designed specifically for one goal: beat tracking. It can be used for e.g. comparing tempi of different performances of the same piece or to track tempo deviation within one piece.
Tartini is capable to do real-time pitch analysis of sound. You can e.g. play into a microphone with a violin and see the harmonics you produce and adapt you playing style based on visual feedback. It also contains a pitch deviation measuring apparatus to analyse vibrato.
Tarsos is software for tone scale analysis. It is useful to extract tone scales from audio. Different tuning systems can be seen, extracted and compared. It also contains the ability to play along with the original song with a tuned midi keyboard .
Melodic Match is a different beast. It does not work on signal level but processes symbolic audio. More to the point it searches through MusicXML files - which can be created from MIDI-files. See its website for use cases. Melodic Match is only available for Windows.
During a lecture at the University College Gent, Faculty of Music these tools were presented with some examples. “The slides (Slides in Dutch)”:[presentatie.pdf] and “a zip-file with audio samples, slides and software”:[Tarsos-presentatie.zip] are available for reference. Most of the time was given to Tarsos, the software we developed.
Olmo Cornelis also gave a lecture about his own research and how Tarsos fits in the bigger picture. “His presentation (Slides in English)”:[lezing_Olmo_Cornelis_zonder_audio.ppt] and “the presentation with audio”:[lezing_Olmo_Cornelis_met_audio.zip] are also available here.
There is more to Tarsos then meets te eye. The graphical user interface only exposes some functionality; the API (Application Programmer Interface) exposes all of Tarsos’ capabilities.
Tarsos is programmed in Java so the API is accessible trough Java and other programming languages targeting the JVM (Java Virtual Machine) like JRuby, Scala and Groovy. The following examples use the Groovy programming language because I find it the most aesthetically pleasing with regards to interoperability and it gets the job done without getting in your way.
To run the examples a copy of the Tarsos JAR-file needs to be added to the Classpath and the Groovy runtime must be installed correctly. I’ll leave this as an exercise for the reader: godspeed to you, brave soul. Quick protip: placing a copy of the jar in the extensions directory seems to work best, e.g. see important java directories on mac OS X.
The first example extracts pitch class histograms from a bunch of files and saves them as EPS (Encapsulated PostScript)-files. It iterates a directory recursively and handles each file that matches a given regular expression. In this example the regular expression matches all WAV-files. Batch processing is one of those things scripting is ideal for, doing the same thing with the user interface would be tedious or even mind-numbingly boring, not groovy at all indeed.
FileUtils.glob(dir,”.*.wav”,true).each { file ->\
audioFile = new AudioFile(file)\
pitchDetector = PitchDetectionMode.TARSOS_YIN.getPitchDetector(audioFile)\
pitchDetector.executePitchDetection()\
//get some annotations\
annotations = pitchDetector.getAnnotations()\
//create an ambitus and tone scale histogram\
ambitusHistogram = Annotation.ambitusHistogram(annotations)\
toneScaleHisto = ambitusHistogram.toneScaleHistogram()\
//plot a smoothed version of the histogram\
p = new SimplePlot()\
p.addData 0, toneScaleHisto.gaussianSmooth(0.2)\
p.save FileUtils.basename( file) + “.eps”\
}\
```
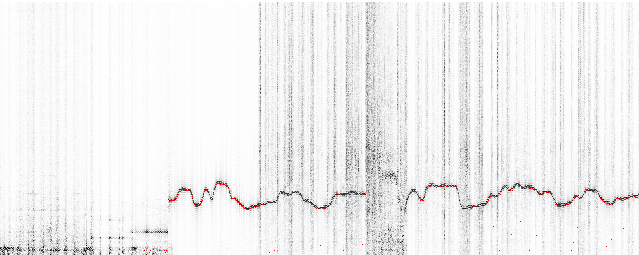
The second example uses functionality that is currently only available trough the API. It takes a MIDI-file and synthesizes it to a wave file using an arbitrary scale. In this case 10-TET. The heavy-work is done by the Gervill synthesizer. The resulting file is available for download, micro—macro?—tonal Bach is great: “BWV 1013 in 10-TET”:[BWV_1013_10-TET.mp3]. The result of “an analysis with Tarsos on the synthesized audio”:[120.png] clearly shows an interval of 120 cents with some deviations.
midiFile = new File(“BWV_1013.mid”)\
outFile = new File(“out.wav”)
tuning = [0,120,240,360,480,600,720,840,960,1080] as double []
MidiToWavRenderer renderer\
renderer = new MidiToWavRenderer()\
renderer.setTuning(tuning)\
renderer.createWavFile(midiFile, outFile)\
```
An extended version of this second example script could be used to generate a dataset with audio and corresponding tone scale information on the fly. The dataset could then be used as a baseline.
The API is not yet well documented and is still in flux or more correctly: superflux. Note to self: I will provide documentation and a number of useful examples when the dust settles down. I’m not even sure if I will stick with Groovy. Scala has a nice Lispy feel to it and seems more developed. Groovy has a less steep learning curve, especially if you have some experience with Ruby. JRuby is also nice but the interoperability with legacy Java looks like an ugly hack.
Yesterday Tarsos was publicly presented at the symposium Perspectives for Computational Musicology in Amsterdam. The first public presentation of Tarsos, excluding this website. The symposium was organized by the Meertens Institute on the occasion of Peter van Kranenburg’s PhD defense.
The presentation included a live demo of a daily build of Tarsos (a Friday evening build) which worked, surprisingly, without hiccups. The presentation was done by Olmo Cornelis. This was the small introduction:
Tarsos - a Platform for Pitch Analysis of Ethnic Music \
Ethnic music is a vulnerable cultural heritage that has received only recently more attention within the Music Information Retrieval community. However, access to ethnic music remains problematic, as this music does not always correspond to the Western concepts of music and metadata that underlie the currently available content-based methods. During this lecture, we like to present our current research on pitch analysis of African music. TARSOS, a platform for analysis, will be presented as a powerful tool that can describe and compare scales with great detail.
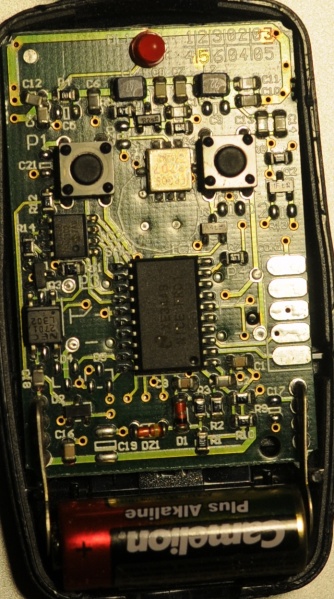
This post describes a crucial aspect of how to connect an android phone, the LG GT540 Optimus, to an Ubunu Linux computer. The method is probably similar on different UNIX like platforms with different phones.
To recognize the phone when it is connected via usb you need to create an UDEV rule. Create the file /etc/udev/rules.d/29.lg545.rules with following contents:
On the phone you need to enable debugging using the settings and (this is rather important) make sure that the “mass storage only” setting is disabled.
Rooting the device makes sure you have superuser rights. Installing the android SDK is well documented.
Drag and drop works for scala tone scale files and different kinds of audio files. Audiofiles are transcoded automagically using an embedded ffmpeg binary which is platform dependend. It works on linux and windows, on other platforms only WAV files are supported.
Some of the current features:
Scala file extraction from audio
Real time pitch tracking
Real time pitch class histogram visualization
Alignment of pitch intervals with histogram using mouse dragging
\
This blog post comments on using the Marvell OpenRD SoC(System on a Chip) as a low power multipurpose home server.
The Hardware
The specifications of the OpenRD SoC are very similar to the better known SheevaPlug devices, so it has 512MB DDR2 RAM, an 1.2GHz ARM processor and 512MB internal flash. To be more precise the OpenRD SoC is essentially a SheevaPlug in a different form factor. The main advantage of this form factor is the number of available connections: 7xUSB, SATA, eSATA, 2xGb Ethernet, VGA, Audio, … which make the device a lot more extendable and practical as a mulitpurpose home server.
The Software
Thanks to the work of Dr. Martin Michlmayr there is a Debian port for the Kirkwood platform readily available. He even wrote a tutorial on how to install Debian on a SheevaPlug. Installing Debian on an OpenRD is exactly the same except for one important detail: the arcNumber variable.
Once Debian is installed you can apt-get or aptitude almost all the software you are used to: webserver, samba, ruby, …
Tarsos can be used to render MIDI files to audio (WAV) files using arbitrary tone scales. This functionallity can be used to (automatically) verify tone scale extraction from audio files. Since I could not find a dataset with audio and corresponding tone scales creating one using MIDI seemed a good idea.
MIDI files can be found in spades, tone scales on the other hand are harder to find. Luckily there is one massive source, the Scala Tone Scale Archive: A large collection of over 3700 tone scales.
Using Scala tone scale files and a midi files a Tone Scale - Audio dataset can be generated. The quality of the audio depends on the (software) synthesizer and the SoundFont used. Tarsos currently uses the Gervill synthesizer. Gervill is a pure Java software synthesizer with support for 24bit SoundFonts and the MIDI tuning standard.\
How To Render MIDI Using Arbitrary Tone Scales with Tarsos
A recent version of the JRE (Java Runtime Environment) needs to be installed on your system if you want to use Tarsos. Tarsos itself can be downloaded in the form of the “Tarsos JAR Package”:[tarsos.jar].
Currently Tarsos has a Command Line Interface. An example with the files you can find attached:
The result of this command should yield an audio file that sounds like “the cello suites of bach in a nonsensical tone scale with steps of 120 cents”:[bach_BWV_1007_120.mp3]. Executing tone scale extraction on the generated audo yields the expected result. In the pich class histogram every 120 cents a peak can be found.
To summarize: by rendering audio with MIDI and Scala tone scale files a dataset with tone scale - audio information can be generated and tone scale extraction algorithms can be tested on the fly.
This method also has some limitations. Because audio is rendered there is no (background) noise, no fluctuations in pitch and timbre,… all of which are present in recorded audio. So testing testing tone scale extraction algorithms on recorded audio remains advised.
Tarsos is now capable of reproducing speech using MIDI. The idea to convert speech into MIDI comes from the blog of Corban Brook where the following video can be found, actually a work by Peter Ablinger:
Another example of music inspired by speech is this interview with Louis Van Gaal:
Tarsos sends out midi data based on an FFT analysis of the signal. It maps the spectrogram to MIDI Messages and uses the power spectrum to calculate the velocity of each note on message.
The implementation can run in real-time but the output has some delay: the FFT calculation, constructing MIDI messages, calculating velocity, synthesizing sound, … is not instantaneous.
To use this capability Tarsos supports the following syntax. If a MIDI file is given the MIDI messages are written to the file. If an audio file is given Tarsos uses the audio as input. If the --pitch switch is used only the F0 is considered to construct MIDI messages instead of a complete FFT.
Tarsos can be used to search for music that uses a certain tone scale or tone interval(s). Tone scales can be defined by a Scala tone scale file or an exemplifying audio file. This text explains how you can use Tarsos for this task.
Search Using Scala Tone Scale Files
Scala files are text files with information about a tone scale. It is used to share and exchange tone scales. The file format originates from the Scala program :
Scala is a powerful software tool for experimentation with musical tunings, such as just intonation scales, equal and historical temperaments, microtonal and macrotonal scales, and non-Western scales. It supports scale creation, editing, comparison, analysis, …
Tarsos also understands Scala files. It is able to create a pitch class histogram using a gaussian mixture model. A technique described in A. C. Gedik, B.Bozkurt, 2010, “Pitch Frequency Histogram Based Music Information Retrieval for Turkish Music “, Signal Processing, vol.10, pp.1049-1063. (doi:10.106/j.sigpro.2009.06.017).
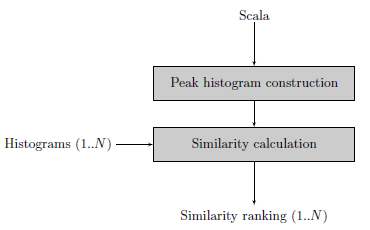
An example should make things clear. Lets search for an interval of 300 cents or exactly three semitones. A scala file with this interval is easy to define:
```ruby\
! example.scl\
! An example of a tone interval of 300 cents\
Tone interval of 300 cents\
2\
!\
900\
1200.0\
```
The next step is to create a histogram with an interval of 300 cents. In the block diagram this step is called “Peak histogram creation”. The Similarity calculation step expects a list of histograms to compare with the newly defined histogram. Feeding the similarity calculation with the western12ET tone scale and a pentatonic Indonesian Slendro tone scale shows that a 300 cents interval is used in the western tone scale but is not available in the Slendro tone scale.
This example only uses scala files, creating histograms is actually not needed: calculating intervals can be done using the scala file itself. This changes when audio files are compared with each other or with scala files.
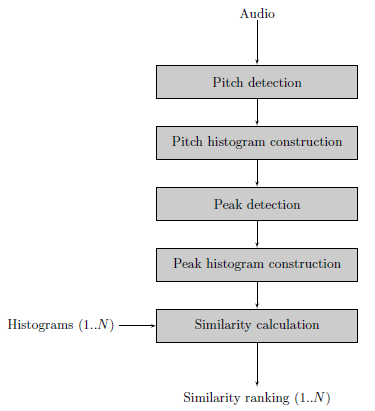
Search Using Audio Files
When audio files are fed to the algorithm additional steps need to be taken.
First of all pitch detection is executed on the audio file. Currently two pitch extractors are implemented in pure Java, it is also possible to use an external pitch extractor such as aubio
Using pitch annotations a Pitch Histogram is created.
Peak detection on the Pitch Histogram results in a number of peaks, these should represent the distinct pitch classes used in the musical piece.
With the pitch classes a clean peak histogram is created during the Peak Histogram construction phase.
Finally the Peak histogram is matched with other histograms.
The last two steps are the same for audio files or scala files.
Using real audio files can cause dirty histograms. Determining how many distinct pitch classes are used is no trivial task, even for an expert (human) listener. Tarsos should provide a semi-automatic way of peak extraction: a best guess by an algorithm that can easily be corrected by a user. For the moment Tarsos does not allow manual intervention.
Tarsos
To use tarsos you need a recent java runtime (1.6) and the following command line arguments:
This post is about the tools I use to keep the source code of Tarsos reasonably clean, consistent and readable. Static code analysis can be of great help if you want to maintain strict coding standards and follow language idioms. Some of the patterns they can detect for you:
Dead code - unused variables, parameters, methods
Suboptimal code - wasteful resource usage
Overcomplicated expressions - unnecessary if statements, for loops that could be while loops
Duplicate code - copied/pasted code is a code smell.
Formatting inconsistencies, e.g. variable modifier order
And even more subtle, but equally important:
Resource management: is a resource handled (closed) correctly on all possible code paths?
Abstraction level: is it needed to expose the concrete type of an object or could an (abstract) supertype or even an interface be used instead?
…
In a previous life I used .NET and the static code analysis tools FxCop & StyleCop. FxCop operates on bytecode (or intermediate language in .NET parlance) level, StyleCop analyses the source code itself. Tarsos uses JAVA so I looked for JAVA alternatives and found a few.
PMD & Checkstyle both operate on source code level.
FindBugs operates on bytecode level.
On freesoftwaremagazine.com there is an article series on JAVA static code analysis software. It covers PMD and FixBugs and integration in Eclipse. It does not cover Checkstyle. Checkstyle is essentialy the same as PMD but it is better integrated in eclipse: it checks code on save and uses the standard ‘Problems’ interface, PMD does not.
Continuous testing is also a really nice thing to have: detecting unexpected behavior while refactoring/programming can prevent unnecessary bug hunts. A video about immediate feedback using continuous testing makes this clear.
Another tip is a more philosophical one: making your code and code revisions publicly available makes you think twice before implementing (and subsequently publishing) a quick and dirty hack. Tarsos is available on github.
I just finished creating a first release of Tarsos. The release contains several demo applications, some more usefull than other. Tarsos is a work in progress: not all functionality is exposed with the CLI (Command Line Interface) demo applications. The demos should however give a taste of the possibilities. All demo applications follow this pattern:
The problem: There is a group of people that want access to Hackerspace Ghent but there is only one remote to open the gate.
The solution: Build a system that reacts to a phone call by opening the gate if the number of the caller is whitelisted.
What you need:
A BeagleBoard or some BeagleBoard alternative with a Linux distribution running on it. Any server running a unix like operating system should be usable.
A Huaweii e220 or an alternative GSM that supports (a subset of) AT commands and has a USB port.
A team of hackers that know how to solder something togeher. E.g. The hardware guys of hackerspace Ghent.
A “python script”:[gatekeeper.py] that reacts to calls.
The Hack: First of all try to get caller id working by following the Caller ID with Linux and Huawei e220 tutorial. If this works you can listen to the serial communication using pySerial and react to a call. The following python code shows the wait for call method:
```ruby\
def wait_for_call(self):\
self.data_channel.open()\
call_id_pattern = re.compile(‘.CLIP.”\+([0-9]+)”,.*’)\
while True:\
bytes = self.data_channel.inWaiting()\
buffer = self.data_channel.readline(bytes)\
call_id_match = call_id_pattern.match(buffer)\
if call_id_match:\
number = call_id_match.group(1)\
self.handle_call(number)\
```
The handle_call method … handles the call.
The second thing that is needed is a way to send a signal from the beagle board to the remote. Sending a signal from the beagle board using Linux is really simple. The following bash commands initialize, activate and deactivate a pin.
Today I created a spectrogram application using Tarsos. The application listens to an audio input, computes an FFT and at the same time calculates pitch. The expected pitch is overlaid on the spectrogram. All this happens real-time and is implemented using JAVA.
 In de eerste fase van het onderzoek ligt de focus van het onderzoek op één van de meer tastbare parameters: toonhoogte. In etnische muziek is het gebruik van toonhoogte vaak radicaal anders dan westerse muziek die meestal gebaseerd is op de onderverdeling van een octaaf in twaalf gelijke delen. Om toonladders uit\
muziek te extraheren en weer te geven werd het software platform Tarsos ontwikkeld. Met Tarsos is het mogelijk om automatische toonladderanlyse uit te voeren op een grote dataset of om manueel een gedetailleerde analyse te verkrijgen van enkele muziekstukken. De cultuuronafhankelijke analysemethode waarvan Tarsos gebruik maakt kan even goed toegepast worden op Indonesische, Westerse of Afrikaanse muziek.
Onze bedoeling is om Tarsos te gebruiken om evoluties in toonladdergebruik te ontdekken in de enorme dataset van het Koninklijk Museum voor Midden-Afrika. Is toonladderdiversiteit in Afrika aan het wegkwijnen onder invloed van Westerse muziek? Zijn er specifieke kenmerken te vinden over eventueel 'uitgestorven' muziekculturen? Dit zijn vragen die kaderen in het overkoepelende onderzoeksproject van Olmo Cornelis en waar we met behulp van Tarsos een antwoord op proberen te vinden.
Later krijgen de twee overige muzikale parameters, tempo en timbre, een gelijkaardige behandeling. In de laatste fase van dit toch wel ambitieuze onderzoekproject wordt de relatie tussen de parameters onderzocht.
In de eerste fase van het onderzoek ligt de focus van het onderzoek op één van de meer tastbare parameters: toonhoogte. In etnische muziek is het gebruik van toonhoogte vaak radicaal anders dan westerse muziek die meestal gebaseerd is op de onderverdeling van een octaaf in twaalf gelijke delen. Om toonladders uit\
muziek te extraheren en weer te geven werd het software platform Tarsos ontwikkeld. Met Tarsos is het mogelijk om automatische toonladderanlyse uit te voeren op een grote dataset of om manueel een gedetailleerde analyse te verkrijgen van enkele muziekstukken. De cultuuronafhankelijke analysemethode waarvan Tarsos gebruik maakt kan even goed toegepast worden op Indonesische, Westerse of Afrikaanse muziek.
Onze bedoeling is om Tarsos te gebruiken om evoluties in toonladdergebruik te ontdekken in de enorme dataset van het Koninklijk Museum voor Midden-Afrika. Is toonladderdiversiteit in Afrika aan het wegkwijnen onder invloed van Westerse muziek? Zijn er specifieke kenmerken te vinden over eventueel 'uitgestorven' muziekculturen? Dit zijn vragen die kaderen in het overkoepelende onderzoeksproject van Olmo Cornelis en waar we met behulp van Tarsos een antwoord op proberen te vinden.
Later krijgen de twee overige muzikale parameters, tempo en timbre, een gelijkaardige behandeling. In de laatste fase van dit toch wel ambitieuze onderzoekproject wordt de relatie tussen de parameters onderzocht.


 \
This blog post comments on using the Marvell OpenRD SoC(System on a Chip) as a low power multipurpose home server.
\
This blog post comments on using the Marvell OpenRD SoC(System on a Chip) as a low power multipurpose home server.