Drag and drop works for scala tone scale files and different kinds of audio files. Audiofiles are transcoded automagically using an embedded ffmpeg binary which is platform dependend. It works on linux and windows, on other platforms only WAV files are supported.
Some of the current features:
Scala file extraction from audio
Real time pitch tracking
Real time pitch class histogram visualization
Alignment of pitch intervals with histogram using mouse dragging
\
This blog post comments on using the Marvell OpenRD SoC(System on a Chip) as a low power multipurpose home server.
The Hardware
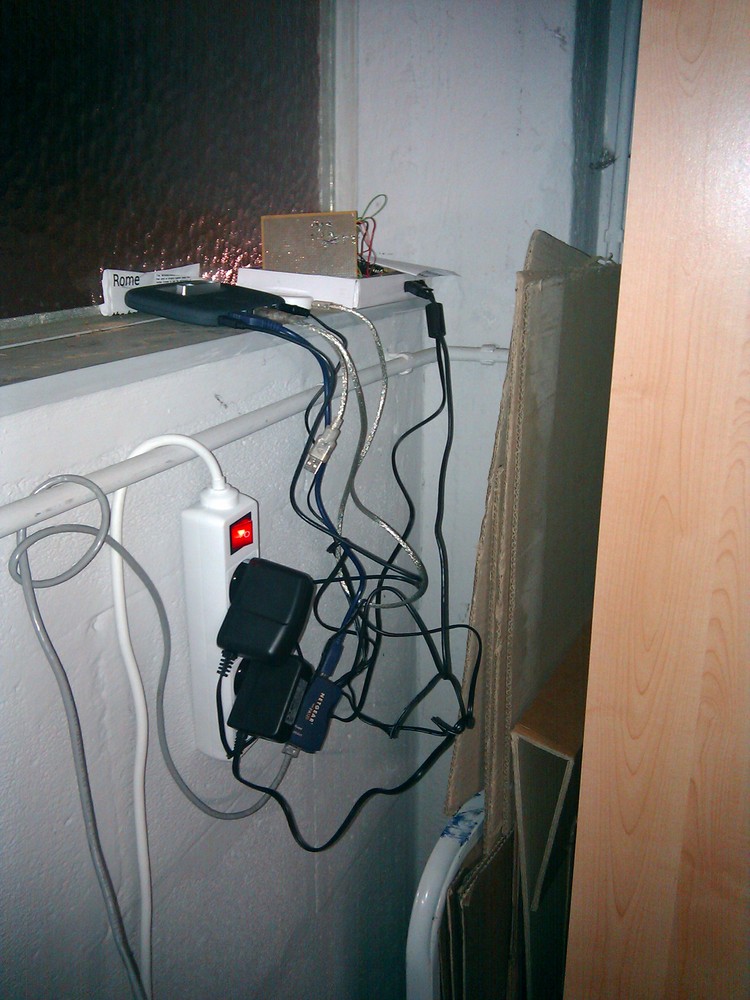
The specifications of the OpenRD SoC are very similar to the better known SheevaPlug devices, so it has 512MB DDR2 RAM, an 1.2GHz ARM processor and 512MB internal flash. To be more precise the OpenRD SoC is essentially a SheevaPlug in a different form factor. The main advantage of this form factor is the number of available connections: 7xUSB, SATA, eSATA, 2xGb Ethernet, VGA, Audio, … which make the device a lot more extendable and practical as a mulitpurpose home server.
The Software
Thanks to the work of Dr. Martin Michlmayr there is a Debian port for the Kirkwood platform readily available. He even wrote a tutorial on how to install Debian on a SheevaPlug. Installing Debian on an OpenRD is exactly the same except for one important detail: the arcNumber variable.
Once Debian is installed you can apt-get or aptitude almost all the software you are used to: webserver, samba, ruby, …
Tarsos can be used to render MIDI files to audio (WAV) files using arbitrary tone scales. This functionallity can be used to (automatically) verify tone scale extraction from audio files. Since I could not find a dataset with audio and corresponding tone scales creating one using MIDI seemed a good idea.
MIDI files can be found in spades, tone scales on the other hand are harder to find. Luckily there is one massive source, the Scala Tone Scale Archive: A large collection of over 3700 tone scales.
Using Scala tone scale files and a midi files a Tone Scale - Audio dataset can be generated. The quality of the audio depends on the (software) synthesizer and the SoundFont used. Tarsos currently uses the Gervill synthesizer. Gervill is a pure Java software synthesizer with support for 24bit SoundFonts and the MIDI tuning standard.\
How To Render MIDI Using Arbitrary Tone Scales with Tarsos
A recent version of the JRE (Java Runtime Environment) needs to be installed on your system if you want to use Tarsos. Tarsos itself can be downloaded in the form of the “Tarsos JAR Package”:[tarsos.jar].
Currently Tarsos has a Command Line Interface. An example with the files you can find attached:
The result of this command should yield an audio file that sounds like “the cello suites of bach in a nonsensical tone scale with steps of 120 cents”:[bach_BWV_1007_120.mp3]. Executing tone scale extraction on the generated audo yields the expected result. In the pich class histogram every 120 cents a peak can be found.
To summarize: by rendering audio with MIDI and Scala tone scale files a dataset with tone scale - audio information can be generated and tone scale extraction algorithms can be tested on the fly.
This method also has some limitations. Because audio is rendered there is no (background) noise, no fluctuations in pitch and timbre,… all of which are present in recorded audio. So testing testing tone scale extraction algorithms on recorded audio remains advised.
Tarsos is now capable of reproducing speech using MIDI. The idea to convert speech into MIDI comes from the blog of Corban Brook where the following video can be found, actually a work by Peter Ablinger:
Another example of music inspired by speech is this interview with Louis Van Gaal:
Tarsos sends out midi data based on an FFT analysis of the signal. It maps the spectrogram to MIDI Messages and uses the power spectrum to calculate the velocity of each note on message.
The implementation can run in real-time but the output has some delay: the FFT calculation, constructing MIDI messages, calculating velocity, synthesizing sound, … is not instantaneous.
To use this capability Tarsos supports the following syntax. If a MIDI file is given the MIDI messages are written to the file. If an audio file is given Tarsos uses the audio as input. If the --pitch switch is used only the F0 is considered to construct MIDI messages instead of a complete FFT.
Tarsos can be used to search for music that uses a certain tone scale or tone interval(s). Tone scales can be defined by a Scala tone scale file or an exemplifying audio file. This text explains how you can use Tarsos for this task.
Search Using Scala Tone Scale Files
Scala files are text files with information about a tone scale. It is used to share and exchange tone scales. The file format originates from the Scala program :
Scala is a powerful software tool for experimentation with musical tunings, such as just intonation scales, equal and historical temperaments, microtonal and macrotonal scales, and non-Western scales. It supports scale creation, editing, comparison, analysis, …
Tarsos also understands Scala files. It is able to create a pitch class histogram using a gaussian mixture model. A technique described in A. C. Gedik, B.Bozkurt, 2010, “Pitch Frequency Histogram Based Music Information Retrieval for Turkish Music “, Signal Processing, vol.10, pp.1049-1063. (doi:10.106/j.sigpro.2009.06.017).
An example should make things clear. Lets search for an interval of 300 cents or exactly three semitones. A scala file with this interval is easy to define:
```ruby\
! example.scl\
! An example of a tone interval of 300 cents\
Tone interval of 300 cents\
2\
!\
900\
1200.0\
```
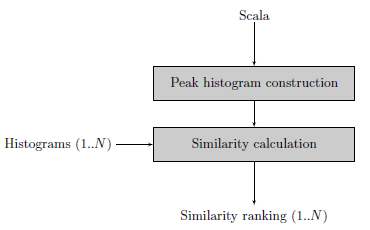
The next step is to create a histogram with an interval of 300 cents. In the block diagram this step is called “Peak histogram creation”. The Similarity calculation step expects a list of histograms to compare with the newly defined histogram. Feeding the similarity calculation with the western12ET tone scale and a pentatonic Indonesian Slendro tone scale shows that a 300 cents interval is used in the western tone scale but is not available in the Slendro tone scale.
This example only uses scala files, creating histograms is actually not needed: calculating intervals can be done using the scala file itself. This changes when audio files are compared with each other or with scala files.
Search Using Audio Files
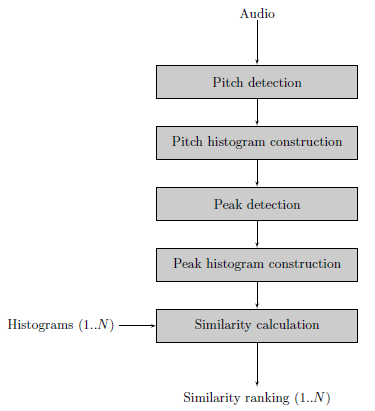
When audio files are fed to the algorithm additional steps need to be taken.
First of all pitch detection is executed on the audio file. Currently two pitch extractors are implemented in pure Java, it is also possible to use an external pitch extractor such as aubio
Using pitch annotations a Pitch Histogram is created.
Peak detection on the Pitch Histogram results in a number of peaks, these should represent the distinct pitch classes used in the musical piece.
With the pitch classes a clean peak histogram is created during the Peak Histogram construction phase.
Finally the Peak histogram is matched with other histograms.
The last two steps are the same for audio files or scala files.
Using real audio files can cause dirty histograms. Determining how many distinct pitch classes are used is no trivial task, even for an expert (human) listener. Tarsos should provide a semi-automatic way of peak extraction: a best guess by an algorithm that can easily be corrected by a user. For the moment Tarsos does not allow manual intervention.
Tarsos
To use tarsos you need a recent java runtime (1.6) and the following command line arguments:
This post is about the tools I use to keep the source code of Tarsos reasonably clean, consistent and readable. Static code analysis can be of great help if you want to maintain strict coding standards and follow language idioms. Some of the patterns they can detect for you:
Dead code - unused variables, parameters, methods
Suboptimal code - wasteful resource usage
Overcomplicated expressions - unnecessary if statements, for loops that could be while loops
Duplicate code - copied/pasted code is a code smell.
Formatting inconsistencies, e.g. variable modifier order
And even more subtle, but equally important:
Resource management: is a resource handled (closed) correctly on all possible code paths?
Abstraction level: is it needed to expose the concrete type of an object or could an (abstract) supertype or even an interface be used instead?
…
In a previous life I used .NET and the static code analysis tools FxCop & StyleCop. FxCop operates on bytecode (or intermediate language in .NET parlance) level, StyleCop analyses the source code itself. Tarsos uses JAVA so I looked for JAVA alternatives and found a few.
PMD & Checkstyle both operate on source code level.
FindBugs operates on bytecode level.
On freesoftwaremagazine.com there is an article series on JAVA static code analysis software. It covers PMD and FixBugs and integration in Eclipse. It does not cover Checkstyle. Checkstyle is essentialy the same as PMD but it is better integrated in eclipse: it checks code on save and uses the standard ‘Problems’ interface, PMD does not.
Continuous testing is also a really nice thing to have: detecting unexpected behavior while refactoring/programming can prevent unnecessary bug hunts. A video about immediate feedback using continuous testing makes this clear.
Another tip is a more philosophical one: making your code and code revisions publicly available makes you think twice before implementing (and subsequently publishing) a quick and dirty hack. Tarsos is available on github.
I just finished creating a first release of Tarsos. The release contains several demo applications, some more usefull than other. Tarsos is a work in progress: not all functionality is exposed with the CLI (Command Line Interface) demo applications. The demos should however give a taste of the possibilities. All demo applications follow this pattern:
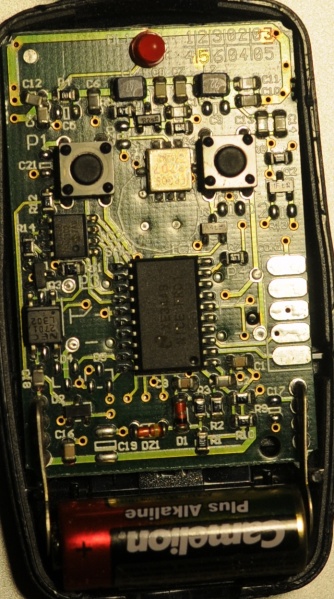
The problem: There is a group of people that want access to Hackerspace Ghent but there is only one remote to open the gate.
The solution: Build a system that reacts to a phone call by opening the gate if the number of the caller is whitelisted.
What you need:
A BeagleBoard or some BeagleBoard alternative with a Linux distribution running on it. Any server running a unix like operating system should be usable.
A Huaweii e220 or an alternative GSM that supports (a subset of) AT commands and has a USB port.
A team of hackers that know how to solder something togeher. E.g. The hardware guys of hackerspace Ghent.
A “python script”:[gatekeeper.py] that reacts to calls.
The Hack: First of all try to get caller id working by following the Caller ID with Linux and Huawei e220 tutorial. If this works you can listen to the serial communication using pySerial and react to a call. The following python code shows the wait for call method:
```ruby\
def wait_for_call(self):\
self.data_channel.open()\
call_id_pattern = re.compile(‘.CLIP.”\+([0-9]+)”,.*’)\
while True:\
bytes = self.data_channel.inWaiting()\
buffer = self.data_channel.readline(bytes)\
call_id_match = call_id_pattern.match(buffer)\
if call_id_match:\
number = call_id_match.group(1)\
self.handle_call(number)\
```
The handle_call method … handles the call.
The second thing that is needed is a way to send a signal from the beagle board to the remote. Sending a signal from the beagle board using Linux is really simple. The following bash commands initialize, activate and deactivate a pin.
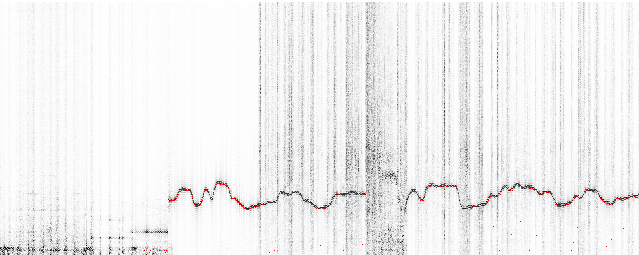
Today I created a spectrogram application using Tarsos. The application listens to an audio input, computes an FFT and at the same time calculates pitch. The expected pitch is overlaid on the spectrogram. All this happens real-time and is implemented using JAVA.
This is the scenario: you have a Huawei e220, a linux computer and you want to react to a call from a set of predefined numbers. E.g. ordering a pizza when you receive a call from a certain number.
The Huawei e220 supports a subset of the AT commands, which subset is an enterprise secret of te Huawei company. So there is no documentation available for the device I bought, thanks Huawei. Anyhow when you attach the e220 to a Linux machine you should get two serial ports:
```ruby\
/dev/ttyUSB0\
/dev/ttyUSB1\
```
To connect to the devices you can use a serial client. GNU Screen can be used as a serial client like this: screen /dev/ttyUSB0 115200. The first device, ttyUSB0 is used to control ttyUSB1, so to enable caller ID on te Huawei e220 you need to send this message to ttyUSB0:
```ruby\
AT+CLIP=1\
```
To check for calls you should listen to ttyUSB1. A serial session for ttyUSB1 looks like:
The RING and CLIP messages are the most interesting. The RING signifies an incoming call, the CLIP is the caller ID. The BOOT and RSSI are some kind of ping messages. The following Python script demonstrates a complete session that enables caller ID, waits for a phone call and prints the number of the caller.
```python\
#!/usr/bin/env python\
import serial, re
ser = serial.Serial(\
port=’/dev/ttyUSB1’,\
baudrate=9600,\
parity=serial.PARITY_NONE,\
stopbits=serial.STOPBITS_ONE,\
bytesize=serial.EIGHTBITS\
)
ser.open()
pattern = re.compile(‘.CLIP.”\+([0-9]+)”,.*’)
while 1:\
buffer = ser.read(ser.inWaiting()).strip()\
buffer = buffer.replace(“\n”,””)\
match = pattern.match(buffer)\
if match:\
number = match.group(1)\
print number\
```
To make Tarsos more portable I wrote a pitch tracker in pure JAVA using the YIN algorithm based on the implementation in C of aubio. The implementation also uses some code written by Karl Helgasson and Teun de Lange of the Jazzperiments project.
It can be used to perform real time pitch detection or to analyse files. To use it as a real time pitch detector just start the “JAR-file”:[pitch_detector_yin.jar] by double clicking. To analyse a file execute one of the following. The first results in a list of annotations (text), the second shows the annotations graphically.
The JAVA software program we are developing is called Tarsos and can now be found on GitHub. GitHub is a web-based hosting service for projects that use the Git version control system.
Currently Tarsos is a collection of Java classes to create, compare and process pitch-frequency data using histograms. In it’s current state it is not usable for end-users.
The dataset we use is the sound archive of the department of Ethnomusicology of the Royal Museum for Central Africa at Tervuren, Belgium. The archive was digitized during the DEKKMMA (Digitization of the Ethnomusicological Sound Archive of the Royal Museum for Central Africa - it works better in Dutch) project. More information about the dataset can be foun on the website of the DEKKMMA project:
The archive is a collection of sound recordings of traditional music from Central Africa, with a particular focus on Congo and Rwanda. The sound archive contains about 3,000 hours of music recordings, the oldest of which date from 1910: Edison cylinders recorded by Hutereau in the Uele-province in Congo.
The archive contains several sound carriers (Edison cylinders, Sonofil wire, magnetic tapes, audiocassettes, disks, CD's ...) with associated metadata (paper files) and contextual data (photographs, films, video's, books, documents of all kind).
The collection was created during and after the colonial era of the Belgian Kingdom in Central Africa. The RMCA collection forms for an important part the musical memory of Central Africa and in terms of size, documentation and musical quality, it is -- without any doubt -- the world's most important sound archive for this region.
Using the meta data we did a rough geocoding of each recording to create an “interactive map of the dataset”:[dataset_geocodes.html].
The aim of this research project is to gain novel musicological insights into a large dataset of music from Central Africa. While practising ethnomusicological research on this dataset, we to develop and publish useful software and methodologies for the (ethno)musicological research community.
From November 2009 until November 2013 this research project was organised at the School of Arts, University College Ghent, under supervision by Olmo Cornelis. Later, from November 2013 onwards, the project turned into a 2 year doctoral research project hosted at IPEM, University Ghent under the supervision of Marc Leman.
Partners
University Ghent, IPEM: The Institute for Psychoacoustics and Electronic Music is part of the Music department at the Faculty of Arts and Philosophy, at Ghent University.
Jobsopschool.be werd door 0110.be ontwikkeld in opdracht van scholengemeenschap Sperregem. Het doel van die webapplicatie is om de administratieve rompslomp bij het zoeken naar en aanwerven van kandidaten voor vervangingen in het onderwijs te vereenvoudigen. Zoek je vacatures in het basisonderwijs Neem dan zeker een kijkje op Jobopschool.be.
Recently I bought a big shiny red USB-button. It is big, red and shiny. Initially I planned to use it to deploy new versions of websites to a server but I found a much better use: ordering pizza. Graphically the use case translates to something akin to:
If you would like to enhance your life quality leveraging the power of a USB pizza-button: you can! This is what you need:
A PC running Linux. This tutorial is specifically geared towards Debian-based distos. YMMV.
A big, shiny red USB button. Just google “USB panic button” if you want one.
A location where you can order pizzas via a website. I live in Ghent, Belgium and use just-eat.be. Other websites can be supported by modifying a Ruby script.
Technically we need a driver to check when the button was pushed, a way to communicate the fact that the button was pushed and lastly we need to be able to react to the request.
The driver: on the internets I found a driver for the button. Another modification was done to make the driver process a daemon.
The communication: The original Python script executed another script on the local pc. A more flexible approach is possible using sockets. With sockets it is possible to notify any computer on a network.
```ruby\
if PanicButton().pressed():\
# create a TCP socket\
s = socket.socket(socket.AF_INET, socket.SOCK_STREAM)\
# connect to server on the port\
s.connect((SERVER, SERVER_TCP_PORT))\
# send the order (margherita at restaurant mario)\
s.send(“mario: [margherita_big]\n”)\
```
The reaction: a ruby TCP server waits for message from the driver. When it does it automates a HTTP session on a website. It executes a series of HTTP-GET’s and POST’s. It uses the mechanize library.
Some libraries are needed. For python you need the usb library, the python deamons lib needs to be installed seperatly. Setuptools are needed to install the deamons package.
Ruby needs rubygems to install the needed mechanize and daemons library. Mechanize needs the libxslt-dev package. You also need the build-essential package to build mechanize.
This blog post is about how to use the Touchatag RFID reader hardware on Ubuntu Linux without using the Touchatag web service.
An RFID reader with tags can used to fire events. With a bit of scripting the events can be handled to do practically any task.
Normally a Touchatag reader is used together with the Touchatag web service but for some RFID applications the web service is just not practical. E.g. for embedded Linux devices without an Internet connection. In this tutorial I wil document how I got the Touchatag hardware working under Ubuntu Linux.
To follow this tutorial you will need:
Touchatag hardware: the USB reader and some tags
A Ubuntu Linux computer (I tested 9.10 Karmic Koala and 8.04 )
SVN to download source code from a repository
The touchatag USB reader works at 13.56MHz (High Frequency RFID) and has a readout distance of about 4 cm (1.5 inch) when used with the touchatag RFID tags. Internally it uses an ACS ACR122U reader with a SAM card. A Linux driver is readily available so when you plug it in lsusb you should get something like this:
```ruby\
lsusb
Bus 007 Device 001: ID 1d6b:0001 Linux Foundation 1.1 root hub\
Bus 005 Device 004: ID 072e:90dd Advanced Card Systems, Ltd\
```
lsusb recognizes the device incorrectly but that’s not a problem. To read RFID-tags and respond to events additional software is needed: tagEventor is a software library that does just that. It can be downloaded using an svn command:
To compile tagEventor a couple of other software packages or header files should be available on your system. Te tagEventor software dependencies are described on the tagEventor wiki. On Ubuntu (and possibly other Debian based distro’s the installation is simple:
```ruby\
sudo aptitude install build-essential libpcsclite-dev build-essential pcscd libccid\
#if you need gnome support\
#sudo aptitude install libgtk2.0-dev\
```
Now the tricky part. Two header files of the pcsclite package need to be modified (update: this bug is fixed see here). tagEventor builds and can be installed:
```ruby\
cd tageventor\
make\
…\
tagEventor BUILT (./bin/Release/tagEventor)
sudo ./install.sh\
…\
```
When tagEventor is correctly installed the only thing left is … to build your application. When an event is fired tagEventor executes the /etc/tageventor/generic script with three parameters (see below). Using some kind of IPC (Inter Process Communication) an application can react to events. A simple and flexible way to propagate events (inter-processes, over a network, platform and programming language independent) uses sockets. The code below is the /etc/tageventor/generic script (make sure it is executable), it communicates with the server: the second script. To run the server execute ruby /name/of/server.rb
```ruby\
#!/usr/bin/ruby
$1 = SAM (unique ID of the SAM chip in the smart card reader if exists, “NoSAM” otherwise
$2 = UID (unique ID of the tag, as later we may use wildcard naming)
$3 = Event Type (IN for new tag placed on reader, OUT for tag removed from reader)
The tagEventor software is made by the Autelic Association a Non-Profit association dedicated to making technology easier to use for all. I would like to thank Andrew Mackenzie, the founder and president of the association for creating the software and the support.
Ik heb in opdracht van scholengroep Sperregem een website gemaakt die het vinden van kandidaten voor korte vervangingen vlotter doet verlopen. Mensen met interesse voor vacatures in het onderwijs in West-Vlaanderen kunnen zich er op inschrijven.
De website heeft enkele voordelen voor verschillende scholen in de scholengroep:
Het zoeken van kandidaten is erg eenvoudig: na het invoeren van een vacature komt er een lijst met kandidaten met een geschikt profiel die tijdens de vacature beschikbaar zijn.
Er kunnen e-mail of SMS-berichten verstuurd worden om kandidaten op de hoogte te brengen van een vacature.
Profielen van kandidaten zijn altijd up-to-date: de kandidaten zijn er zelf verantwoordelijk voor en kandidaten lange tijd niets van zich laten horen worden automatisch op non-actief gezet.
De historiek van kandidaten wordt automatisch bijgehouden en kan opgezocht worden.
Ook voor de aspirant onderwijzers is de website handig:
De vacatures zijn publiek zichtbaar, kandidaten kunnen dus actief solliciteren.
Ze kunnen zelf hun profiel beheren en bijvoorbeeld een vernieuwde versie van hun C.V. uploaden.
Voor elke kandidaat is een gepersonaliseerde lijst met vacatures beschikbaar (ook via RSS), afgestemd op hun profiel.
Daarnaast is het ook voor de personeelsdienst een handige tool: die kan nu een beter overzicht bewaren over de vacatures en de invulling ervan in de verschillende scholen.
Vandaag is de vernieuwde vooruitwebsite gelanceerd:
We bieden je nog meer video’s, foto’s, audiotracks en tekstmateriaal en hebben ook jouw persoonlijke voordelen uitgebreid. Wanneer je lid wordt van www.vooruit.be, kan je nog steeds je kalender aanvullen, vrienden maken en reacties posten, maar daarnaast krijg je ook aanbevelingen op maat, kan je voorstellingen tippen en kan je berichten sturen naar vrienden *.
Waarschijnlijk heb je het al gemerkt: deze site gaat nu heel wat sneller. Dit is te danken aan een verhuis. 0110.be wordt nu gehost op een VPS (Virtual Private Server).
De virtuele server heeft Ubuntu 8.04 LTS Server als besturingssysteem en draait op een Xen hypervisor. De fysieke server zelf bevat een achttal Intel® Xeon® E5440 @ 2.83GHz CPU’s.
De server staat in Amsterdam en is rechtstreeks verbonden met het grootste internetknooppunt ter wereld: AMS-IX.
Uit de lijst van postcodes van alle Belgische steden heb ik een SQL-bestand samengesteld. De gegevens bevatten de postcode zelf, de naam van de stad, de naam van de stad in hoofdletters en een veld “structure” waaruit de gemeente-deelgemeente relatie gehaald kan worden als er op gesorteerd wordt. Dit zijn bijvoorbeeld de deelgemeentes van Chimay.
\
\
Het sorteren kan in PostgreSQL met deze SQL instructie: order by translate(structure, ' ', 'z'). Het SQL-script zelf is een lijst van INSERT INTO SQL-Statements.
insert into cities(zipcode,name,up,structure)  VALUES ('1790','Affligem','AFFLIGEM','1790   AFFLIGEM');
insert into cities(zipcode,name,up,structure)  VALUES ('9051','Afsnee','AFSNEE','9051        Afsnee');
insert into cities(zipcode,name,up,structure)  VALUES ('5544','Agimont','AGIMONT','5544        Agimont');
...
Dit is het “SQL-bestand met een lijst van alle Belgische postcodes en steden”:[steden.sql.txt]. Hopelijk is hier iemand ooit iets mee.
While working at the Vooruit Arts Centre I got the assignment to create a tool to query an Oracle database with ticketing data. There were a few requirements for the Query Tool, in the current version all of these are met:
First of all it had to be easy to execute complex queries, no knowledge of SQL (Structured Query Language) should be required for the end user.
The results of the queries should be exportable to an easy to analyse format. * Editing queries or adding new ones should be doable, by someone knowledgeable with SQL.
The Query Tool should be easy to configure and database independent.
Should work on Windows, Mac OS X and Linux.
By publishing the Query Tool on my website I hope that the fruits of my labour can be enjoyed by a wider audience. To see it in action you can “give it a spin”:[QueryTool.jar]. A recent version, version 6, of the JRE (Java Runtime Environment) is needed.
How Do I Use The Query Tool?
The program supports two ways to query a database:
A number of predefined queries can be selected and executed. Depending on the selected query, zero or more parameters are required. E.g. the screen shot below depicts a query with one parameter: a product category. When the query is executed all the products in the selected category are fetched.
The tab “SQL” can be used to execute arbitrary SQL-instructions.
The two buttons below are self explanatory. When the button “CVS Export” is hit a CVS file is created in a configured directory.
Depending on the complexity of a query it can take a long time before results are returned. Because the application is multithreaded the user interface remains responsive and the query can be stopped at any time.
The contents of the tab “log” gives you an idea what the application does. When something goes awry while executing a query a message appears in this tab.
The tab “Config” can be used to set configuration parameters. The tab “Help” contains… helpful information.
The list of predefined queries is constructed by iterating over SQL-files in a configured directory. Adding additional queries to the program is easy, just add an extra SQL-file to the directory. An SQL-file should have the following format, otherwise it is ignored:
TITEL
----
DESCRIPTION
----
SQL-INSTRUCTION with zero or more !{PARAMETERS}!
In the screen shot above this query is visible:
Select products in category
----
Select all the products in a category.
----
SELECT * FROM
products WHERE categoryid = !{category}!
To make the queries dynamic the Query Tool supports different kinds of parameters. A parameter has this form: !{type name}!, the name is optional. If there is a name specified it is used as a label in the interface, otherwise type is used. There are three types of parameters:
Parameters that define a type. For each type a corresponding user interface is rendered. E.g. for the type string a text field is rendered. The supported types are:\
#* !{string}!\
#* !{boolean}!\
#* !{double}!\
#* !{date}!\
#* !{integer}!
Parameters for raw SQL. A textfield is rendered, the contents is directly injected in the SQL-query. It has this format: !{sql}!
Parameters for lists. In the example above a list parameter is used. These lists are fetched from the database. E.g. a list of categories. The SQL-instruction and name of the list parameters can be configured.
If you want to use your own database you need to configure the database connection string. The program uses JDBC to connect to the database. It uses metadata provided by the JDBC layer. If your database has a JDBC driver with support for metadata the Query Tool will work correctly. The JDBC driver must be included in the classpath.
For demoing purposes the executable contains a lightweight hsql database. The data in the database is a modified version of the Microsoft Northwind database. The “northwind hsql database”:[northwind.hsql.zip] is created with this “SQL-script”:[northwind.script.txt].
Downloads
“Java Source code en documentation”:[QueryTool.source.zip]: contains an eclipse project.
“Executable”:[QueryTool.jar]: Contains only the executable.
Na het bekijken van het onderstaande filmpje van een zwerm spreeuwen vroeg ik mij af of die bewegingen zich aan een bepaald algoritme houden en of ik een programma kon schrijven die dit gedrag simuleerde. Na wat onderzoek bleek dat zowat alle dieren die zich in kudde voortbewegen dit doen volgens gelijkaardige, relatief eenvoudige processen.
Er zijn drie basisregels waaraan onder andere scholen vissen, zwermen vogels en kuddes gnoes zich houden:
Voorkom botsingen met de dichtste buren door de andere kant op te gaan.
Beweeg ongeveer in de zelfde richting en even snel als het gemiddelde van de buren.
Beweeg naar het midden van de groep.
De paper Flocks, Herds, and Schools:\
A Distributed Behavioral Model - 1987 van Craig W. Reynolds was de eerste die deze regels formeel omschreef. Aan de hand van die documentatie en een praktische omschrijving kon ik aan een implementatie beginnen. De “boids implementatie in Python (src)”:[boids.zip] gebruikt pygame om een groep creaturen voor te stellen met een gekleurd vierkantje. De creaturen bewegen zich volgens de drie bovenstaande regels. Daarnaast proberen ze om binnen het zichtbare kader te blijven en begeven ze zich naar het midden van het kader. Om de boel wat interactiever te maken wordt de muisaanwijzer gezien als een gevaarlijk roofdier die niets liever lust dan vierkantjes. De vierkantjes proberen de roof-muis dus te ontlopen. De zesde en laatste regel legt een maximum snelheid op, zodat de bewegingen realistisch blijven.
De huidige implementatie is O (n²), terwijl het O (nk) zou moeten zijn, met k de grootte van de burenlijst. Een vloeiende simulatie van een zwerm van duizenden is dus momenteel niet mogelijk. De berekeningen voor een extra dimensie zijn erg eenvoudig te implementeren, helaas is de visualisatie van de resultaten dat niet. Ik heb geprobeerd om met de OpenGL bindingen voor Python te werken maar veel resultaat heeft dat niet opgeleverd. Dit is de “3D-versie”:[3D.zip], maar dan met een 2D visualsatie.
Ik heb er voor het gemak ook een “uitvoerbaar bestand voor Windows”:[boids_binary.zip] van gemaakt.
Ik heb een B-Tree en een Red-Black tree geschreven in Ruby. Om die datastructuren te testen heb ik een programma geschreven dat alle woorden uit een grote tekst inleest in een b-tree met het woord als sleutel en de frequentie als waarde en daarna een red black tree gebruikt als priority queue met als sleutel de frequentie en als waarde het woord. Op die manier kunnen de meest voorkomende woorden bepaald worden. De broncode is “hier neer te laden”:[trees.zip].
Het programma is een ideale test voor Ruby VM’s: het is redelijk intensief en gevarieerd. IronRuby, JRuby, Ruby 1.8 en Ruby 1.9 werden getest op een Intel Core 2 Duo E6660 en dit zijn de resultaten:
De verschillen zijn dus erg groot. Zowel in geheugengebruik als in duur. Ruby 1.8 is blijkbaar erg traag maar gebruikt relatief weinig geheugen. JRuby is in deze test drie keer sneller maar gebruikt meer geheugen. Ook IronRuby is sneller dan de standaard Ruby VM maar gebruikt net niet het dubbele aan geheugen. Hierbij moet wel verteld worden dat IronRuby een alfa build is, de resultaten kunnen dus nog veel veranderen.
Ruby 1.9 werd later getest op Mac OS X, met dezelfde pc. De nieuwe Ruby lijkt toch enkele beloften in te lossen. Ter vergelijking werd de voor Mac OS X geoptimaliseerde Ruby 1.8 VM die standaard met het besturingssysteem meegeleverd wordt ook nog getest.
I have modified a bash-script to backup PostgreSQL databases, this is the original script. The “modified version”:[database_backup_script.txt] can be used to backup databases on a remote or local database server. Also this script does not need a trust relationship but uses a login and password. To get started you need to:
Modify the directory and database variables to suit your needs.
Add an entry to crontab to perform the backups nightly or whenever you wish.
Have fun.
The script empties ~/.pgpass\ and\ writes\ login\ info\ for\ the\ system\ databases.\ Then\ it\ logs\ in\ and\ fetches\ an\ up-to-date\ list\ of\ databases.\ For\ every\ database\ an\ entry\ is\ made\ in~/.pgpass and every database is backed up. The results are logged to $logfile.
Gisteren werd de laatste hand gelegd aan de thesis over collaborative filtering (CF) waar Greet Dolvelde en ikzelf een jaar mee bezig zijn geweest. Als je hier meer over wilt weten dan kan je het werk “Collaborative Filtering: Onderzoek & implementatie [pdf]”:[collaborative_filtering_onderzoek_en_implementatie.pdf] downloaden. De intiemste details van verschillende CF-benaderingen worden er in geuren en kleuren uit de doeken gedaan. Uit de poster zou moeten duidelijk zijn waarover de thesis eigenlijk gaat:
Maandag heb ik een examen over A.I. Dat gaat onder ander over genetische algoritmen. Om dat principe in werking te zien heb ik een eenvoudig programmatje geschreven in Python: er zitten enkele beestjes (vierkantjes) in een omgeving. Als de beestjes opvallen, witte beestjes zie je goed zitten op een zwarte achtergrond, worden ze verslonden. De beestjes die minder opvallen overleven, muteren of planten zich voort. Overlevenden gaan een generatie langer mee. Bij het muteren verandert de huidskleur willekeurig. Bij voortplanten wordt er een kind gemaakt die het gemiddelde van de huidskleuren van zijn ouders als kleur heeft. Als het meerendeel van de beestjes uiteindelijk een goeie schutkleur aangenomen hebben kan de achtergrond veranderd worden en begint alles van voor af aan.
Dit is de “broncode van het programma”:[generations.py], het werkt enkel met grijswaarden. Er is ook “een uitvoerbaar bestand voor Windows”:[generations.exe]. De .exe is gemaakt met PyInstaller. De achtergrondkleur kan veranderd worden door er op te klikken. Dit is “broncode van de versie met kleur”:[generations-kleur.py].
Om Python wat te leren kennen heb ik een “Text To Speech Recognition” programma geschreven. Het roept SAPI 5.1 aan om een tekst voor te laten lezen door Microsoft Sam. Het voorgelezen stuk tekst wordt daarna meteen via microfoon opgenomen en Sam probeert het zelf, via Speech Recognition, te verstaan. Het resultaat van de speech recognition wordt dan gelezen door Sam enzovoort… Dit is een voorbeeld van Sam in dialoog met zichzelf:
I am sitting in a room different from the one you are in now. I am recording the sound of my speaking voice and I am going to play it back into the room again.
I’m sitting in a room different from the one U.N. NA I’m recording the sound of my speak English and I’m going to play it back into the room against
I’m sitting in a room different from the one you could in a LAN recording the sound of my speak English and I’m going to clamp back into the room against
I’m sitting in a room different from the one you put in a LAN recording the sound and I speak English and I’m going to clamp back into the room against
I’m sitting in a room different from the one you put in a LAN recording the sound and I speak a Mac into ghent
I’m sitting in a room different from the one you put in a LAN recording the sound and I speak a match into ghent
Ik heb voor het vak Studium Generale een paper geschreven. De paper moet een kritische verwerking zijn van vijf bijgewoonde lezingen. Dit jaar was het thema
Het studium generale van de Hogeschool Gent zal zich dit academiejaar\
buigen over de paradoxale werking van geheugen en vergeten voor de huidige\
wereld. Ook blijkt het massale opslaan en toegankelijk maken van het collectieve\
geheugen slechts voor een minderheid kritische meerwaarde te bezitten; het\
toenemen van historisch besef en kritische inventarisatie gaat niet hand in hand\
met de toename aan inzicht.
In deze paper wordt de aandacht gevestigd op één aspect van de brede waaier aan\
mogelijke onderwerpen: De invloed van retorische technieken en de filosofie van\
het dramatisme op de vorming van het collectieve geheugen. Aan dat centrale\
thema worden de verschillende lezingen verbonden. De paper is te downloaden als pdf en ook de latex bron bestanden zijn beschikbaar:
“Studium Generale: Het vergeten van het geheugen - PDF”:[studium.pdf]
“Studium Generale: Het vergeten van het geheugen - TEX”:[studium.zip]


 \
This blog post comments on using the Marvell OpenRD SoC(System on a Chip) as a low power multipurpose home server.
\
This blog post comments on using the Marvell OpenRD SoC(System on a Chip) as a low power multipurpose home server.


 This is the scenario: you have a Huawei e220, a linux computer and you want to react to a call from a set of predefined numbers. E.g.